Leaderboard


Popular Content
Showing content with the highest reputation on 01/11/2022 in all areas
-
Information in this post no longer relevant with v1.1r1, information remains for clarity. There is a minor issue with the altimeter information in the initial release of the 650, that is being corrected for the next version. It's also separate from the altimeter temperature effects, and doesn't change anything in the first post on this thread. Let me explain the issue first: In real life, traditional ATC "primary" radar has no way to see how high an aircraft is, so a system called "secondary surveillance radar" or SSR sends a radar pulse to interrogate the aircraft transponder. The transponder provides a Mode A code such as "4651" and a Mode C response encoding the aircraft altitude. Modern SSR does loads more with Mode S but let's stick to the basics. Real Mode C altitude responses are fixed to 29.92inHg for the encoder pressure setting - it's basically always reporting a flight level, even at very low altitudes. To present that correctly, the controller radar display reads the 29.92 altitude, and converts it into whatever the sector pressure is. So if a controller tells you "Palm Springs Altimeter 3014", their radar display is converting the 29.92 into the correct altitude for 30.14. Now, in online flying this doesn't work. I could be flying on my own fixed weather, another pilot could be flying real world weather, and yet another on another sim with a slightly different weather source. To make this work, rather than sending the altitude relative to 29.92, the “xPilot” VATSim client sends the actual altitude displayed on your altimeter. If it's right for the pilot, it's right for the network. (I'm not talking about the altitude to draw the 3D aircraft model here, that's something else, I'm talking about what shows on the controller's display). The advanced systems in the 650 operate entirely separately from X-Plane. On the initial release version, the X-Plane stock cockpit altimeter is not synchronised with the Challenger 650 cockpit, so when, for example, the Vatsim client asks for the cockpit altitude to show the controller it's linked to the X-Plane cockpit values and not the Challenger 650. This will be addressed in a future release, but for the time being the keyboard binding "Baro pressure selection 2992" can at least set X-Plane to the standard pressure setting. It won't fix the issues in every case, but is a workaround until the product is updated. Sorry for the inconvenience to online pilots - the Challenger 650 is pushing the boundaries of what X-Plane can do, so it's only natural these previously unknown issues are exposed as more and more people enjoy the Challenger 650.4 points
-
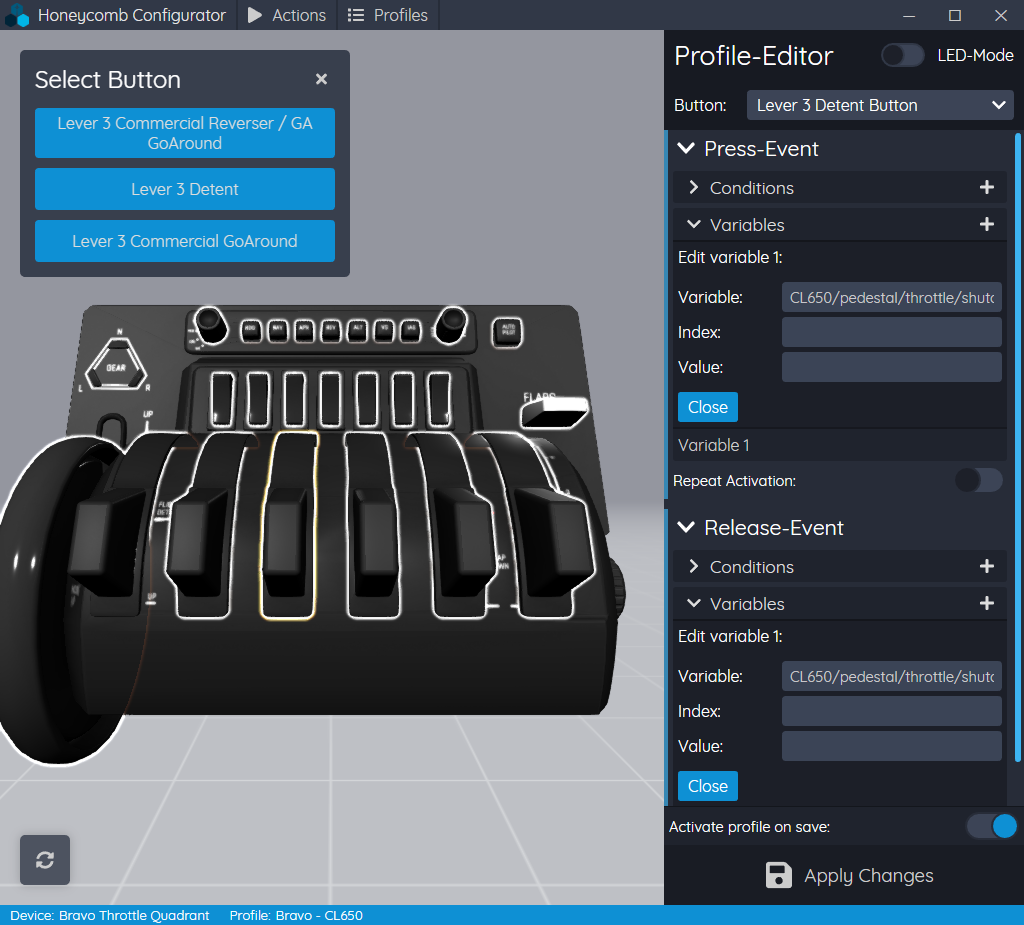
At the request of users in the discord, here are my bindings for the throttles and reversers on the Bravo. Use the Commercial handles and map the following in the Honeycomb Configurator: Lever 3 Commercial Reverser/GA GoAround -Press-Event -Variable 1: sim/engines/thrust_reverse_toggle_1 -Release-Event -Variable 1: sim/engines/thrust_reverse_toggle_1 Lever 3 Detent: -Press-Event -Variable 1: CL650/pedestal/throttle/shutoff_L_down -Release-Event -Variable1: CL650/pedestal/throttle/shutoff_L_up Lever 4 Commercial Reverser/GA GoAround -Press-Event -Variable 1: sim/engines/thrust_reverse_toggle_2 -Release-Event -Variable 1: sim/engines/thrust_reverse_toggle_2 Lever 4 Detent: -Press-Event -Variable 1: CL650/pedestal/throttle/shutoff_R_down -Release-Event -Variable 1: CL650/pedestal/throttle/shutoff_R_up Remember to activate the profile in the Honeycomb software before you load up, and use the plugin menu to load the profile once you're in the sim. I haven't checked the indicator lights yet to see if they work with defaults or not, and the autopilot seems to mostly work with the default bindings, but once I get a more complete profile I can post it here for other users.

 3 points
 -
https://www.smartcockpit.com/plane/BOMBARDIER/CHALLENGER 605.html A source for some stuff Best Steff3 points
-
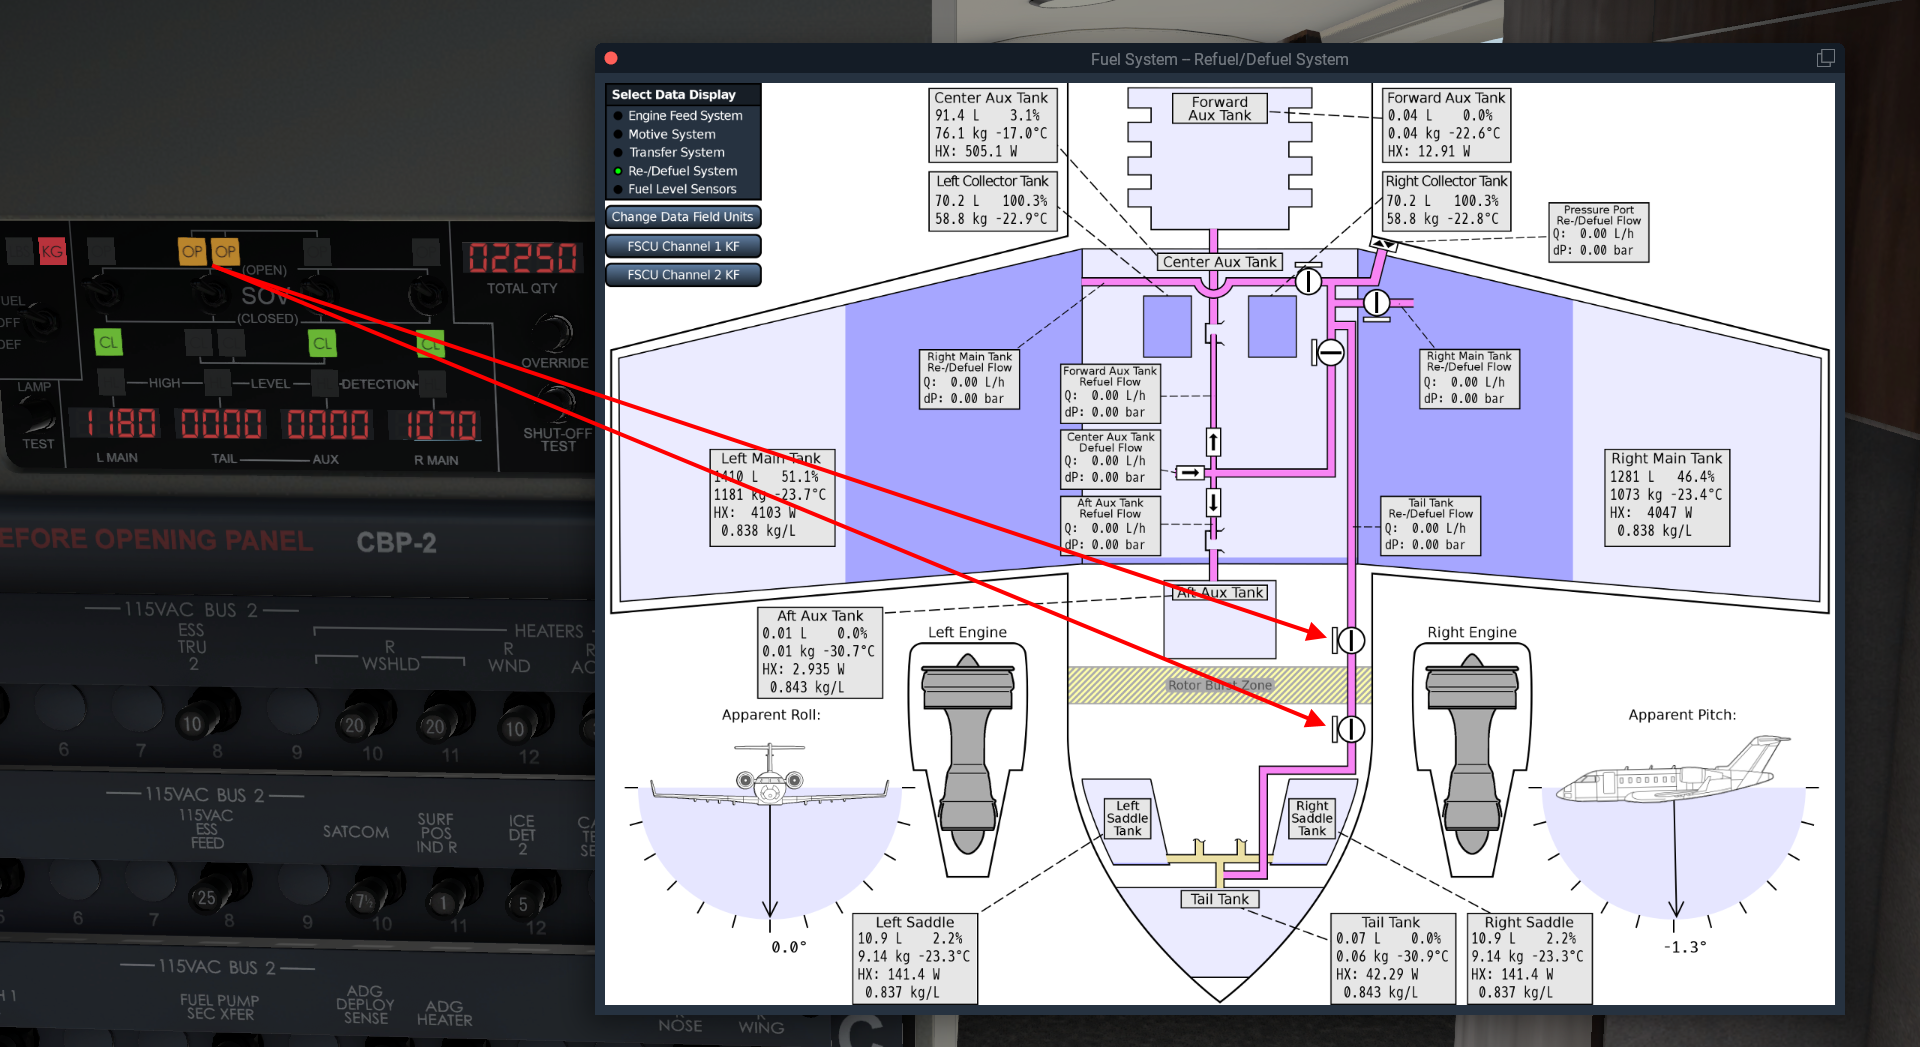
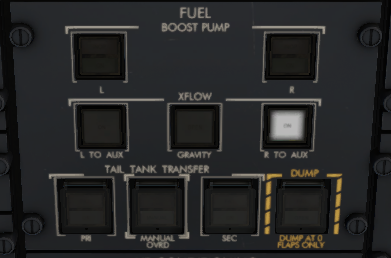
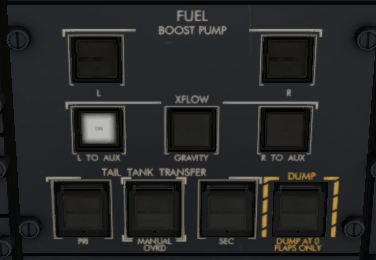
Reference material - https://www.smartcockpit.com/docs/CL605-FUEL_SYSTEM.pdf Page: 16 Fuel tanks are expected to be within 400 lbs / 181 kgs of each other on taxi / takeoff / landing OR 800 lbs / 362 kgs during flight, to avoid Fuel Imbalance EICAS message. First, orient yourself on the overhead panel, we'll be working in the 2nd row (or middle row) of the FUEL panel area. (Fuel.PNG) All three of these buttons should be extinguished under normal operations. Gravity XFLOW Press to begin the process, there's a 1 second delay after pushing the button for it to illuminate OPEN. This will allow fuel to flow freely between both main (wing-based) tanks. There is no EICAS notification that this is open/occurring. (gravity.png) To observe what's happening in the sim. You can go to the Challenger 650 menu -> Study -> Engines -> Fuel System... You'll notice that whatever Main Tank (either Left or Right) has more fuel that this will continue to consume, whereas the side with less fuel will not. Thus balancing the tanks. L (R) to AUX XFLOW Press the appropriate button to begin the process, there's a 1 second delay after pushing the button for it to illuminate ON. This will remove fuel from whatever side is select and transfer it to the auxiliary tank. Determine which tank has more weight in fuel Left side? Choose L to AUX (L to AUX.png) Right side? Choose R to AUX (R to AUX.png) There is a lock out mechanism that does not allow you to press the opposite button when one is already selected. Pressing L to AUX, for example, then pressing R to AUX, will no longer illuminate the L to AUX button. Pressing the R to AUX button again will resume the L to AUX transfer and the button will illuminate ON again. Once you're done balancing the tank, make sure to deselect the previously selected L (R) to AUX button. The aircraft will now suspend fuel consumption from the two main tanks and pull from the AUX tank until depleted. *Edit* Thanks! @airforce2 As long as a main tank is below 93% full, the aux tank feeds the main tank to maintain the level at 93%. Once a main drops to 93%, the main quantity will remain constant and the aux level will drop. It will appear that the engines are burning from the aux tank, but in reality the engines are burning from the mains and that fuel is being simultaneously replaced in the main tank from the aux tank ejector xfer pumps. To observe what's happening in the sim. You can go to the Challenger 650 menu -> Study -> Engines -> Fuel System... Note: The plane will display an EICAS warning message: FUEL XFLOW SOV OPEN if either button is ON for more than 50 seconds and the tanks are balanced within 100 lbs.

 2 points
 -
Version 1.0.1
335 downloads
TropicAir livery for the Challenger 650 by HotStart.2 points -
Documents attached updated 20th December 2022. Latest versions are always available in ...\Aircraft\X-Aviation\CL650\Documentation directory. IMPORTANT: you must be signed in to download the PDFs below. Not a user yet? Head over to Sign Up. 1128340285_CL650FMSPrimer.pdf CL650 Operations Reference.pdf 1323904309_CL650ExpandedNormalProcedures.pdf CL650 Checklists.pdf CL650 Checklists - Printable.pdf CL650 Flexible Take-Off.pdf CL650 Shared Cockpit Quick Start Guide.pdf2 points
-
For some odd reason they got deleted by youtube...and I don´t have them anymore . I plan on redoing them with XP12 when that one comes out - there have been a lot of changes to our model since back then and also the new simulator platform warrants a better looking video, so might as well redo them then! Cheers, Jan2 points
-
I can see the same effect on my system. Will try and track down the issue further.2 points
-
Hi , for the time being, I’ve found the MMEL….all the other manuals are quite hard to find ( for free..) Cl600_EASA-MMEL_Rev01 2.pdf2 points
-
I've run a bunch of A B testing on Gizmo retail vs Gizmo dev branch and it looks like a bunch of this is on me. I'm seeing some pretty abysmal perf numbers out of retail. The good news is I'm seeing some significantly better numbers out of the dev branch... Will push harder to get you all something soon. Turns out Gizmo is NOT the issue. See last post in this thread.2 points
-
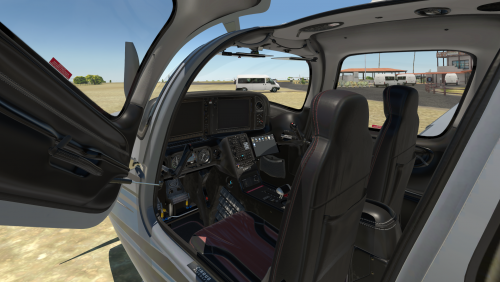
Great work on this plane - I am loving it. As a primary VR flyer, I wanted to give my feedback on my experience so far (I know there have been other threads, but they are closed before others can give feedback - understandably to keep them under control). I think the VR experience for a day-one release is fantastic. No issues with flying the plane. My only feedback would be: 1. The ability to communicate with the fuel truck, ramp worker, and use the cell phone inside VR (make the menus similar to the study menus that are usable in VR). This would only apply once inside the cockpit. 2. Several 3-way test rocker switches do not centre in VR. I *think* this might be an X-Plane VR controller limitation and not an issue with the plane. 3. Limit the knob rotation sensitivity (although this is something a user can easily accomplish to their own liking in VR config) In terms of movement inside the aircraft - for me it's not as huge a deal. Yes, VR hotspots would be appreciated (maybe even just one near the door so that it can be closed without having to leave VR). Again, just some items to add somewhere on a future to-do list. Nothing mission critical or immersion-breaking. This plane handles great in VR (the HUD is fantastic!) and I am having lots of fun. Thanks again for all of your hard work.1 point
-
Note: this is already integrated directly on Simbrief (see above) so the link below now only exists as a backup. LINK HERE Note: aircraft name is clipped to 12 characters for custom airframes, sadly (limit does not apply to default profiles). Fixed by SimBrief Based on the already-accurate default CL60, with the following adjustments: equipment codes and extra flight plan remarks kindly provided by Graeme_77 here: OEW/BOW updated to match the Hot Start airframe without passengers (12,315 -> 12,556kg, includes two pilots) passenger weights updated to somewhat more closely match the randomized weights as simulated, going with 74+15kg so you can still carry 5 passengers+luggage and full fuel at MTOW if you are flying Kim Dotcom around (supposedly ~141kg or thereabouts), sorry, you will have to make adjustments, or just count him as two passengers see below for more information: Don't forget to add extra crew (anything above the two included in OEW) as passengers when planning your flight! Cheers, Tim
 1 point
 -
Version 1.10
10,841 downloads
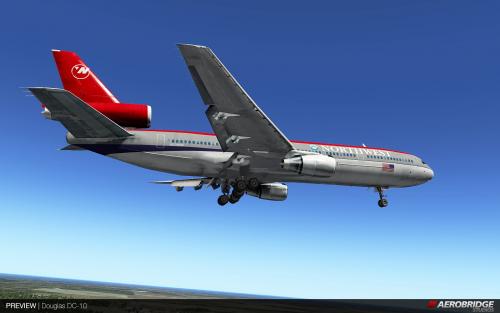
The DC-10 is uploaded here upon popular request, and that the dropbox link is suspended for having too many downloads. Aerobridge Studios- Douglas DC-10 Developed and designed by : Peter Tram, Pierre Lavaux, Jeffrey Chen Manual : Peter Tram Version 1.1 The McDonnell Douglas DC-10 is a three-engine wide-body jet airliner manufactured by McDonnell Douglas. The DC-10 has range for medium- to long-haul flights, capable of carrying a maximum of 380 passengers. Its most distinguishing feature is the two turbofan engines mounted on underwing pylons and a third engine at the base of the vertical stabilizer. The model was a successor to McDonnell Douglas's DC-8 for long-range operations, and competed in the same markets as the Lockheed L-1011 TriStar, which has a similar layout. From Wikipedia Features: - Custom 3D Modelling based on the default KC-10 - Customised soundset - Refined flight modelling - Refined animations - Real-world airport lighting shades - Basic Custom Panel Support: Please contact us by emailing to aerobridge1nfo@gmail.com or by questioning us here on X-Pilot LICENSE AGREEMENT: Aerobridge Studios reserves all rights. Educational use, business use or commercial use, without a proper license is prohibited. Please contact us for license arrangements.Copying content for personal or other use not covered by the license is prohibited.1 point -
The Challenger can be hard work on the approach and landing, but when it all comes together it's very rewarding. All the beta testers had difficulty learning how to land, it's all part of the fun. On approach be aware that unlike aircraft like the 737, the pitch response to power is reversed, that means a power increase will see the aircraft pitch down for a moment. This can lead to an oscillation developing, so be sure to fly the pitch attitude accurately. If you find you're wobbling up and down, aim to make smooth power changes, and remember the HUD flight path vector is useful tool, but can get you into trouble too. A useful check is 0.6 on the AoA index on approach. If it's higher than that, you're too slow. Remember Vref +5, and check your weights on the approach ref page. For the landing flare, lift the nose to to arrest the rate of descent, starting at just below 40 ft. Make a smooth power reduction and fly the aircraft onto the runway. The pitch attitude in the flare is around 3 degrees, but look at the end of the runway, not the HUD! You'll have plenty of time for butter later, so for now put the aircraft down positively in the touchdown zone. If you go butter hunting, you'll only find little bounces - ask me how I know! Once you've landed, extend the flight spoilers (the ground spoilers are automatic, but the flight spoilers need to be raised by pulling the lever), use the reversers and you're down. And stay away from that HLIS button, it'll trick you into making your landings worse!1 point
-

Version 1.0.0
295 downloads
This is Donghai Jet livery for the Challenger 650 by HotStart. The aircraft, B-3077, is in real life a Bombardier Challenger 605 (Bombardier CL-605-2B16). If you like my work, please donate and help keeping my workshop going: paypal.me/xpfwshare. Thank you, and happy flying!1 point -
Edit: SimBrief now has added MACH 0.74 and MACH 0.72 cruise profiles to their CL60 profile, so the discussion below is mostly irrelevant now. I've requested that SimBrief add an LRC cruise schedule to their CL60 profile if possible, to make it easier to plan range-topping missions such as London to New York westbound: https://forum.navigraph.com/t/cl60-cruise-schedules/7076 In the meantime, the most economical profile available is MACH 0.77. For those who have access to the actual fuel tables for the CL60, is there a way the LRC cruise could be expressed as a fuel factor relative to MACH 0.77 cruise, let's say over a ~3,500-3,600nm air distance? SimBrief's fuel factor will also apply to climb and descent, but over longer ranges this matters somewhat less. I guess, for planning purposes, we would have: a fuel factor that applies to a specific air distance we would scale said fuel factor based on actual air distance (either linearly or using another recommended method) Regards, Tim1 point
-

Version 1.0.0
38 downloads
Created for the Torquesim SR20 Entegra by request from @Boris on our Discord. The Outback livery was previously only available for the SR22 versions but with some cleaning up I decided to make it available with this interior. You can download the livery which already includes the interior or the interior (objects.zip) all by itself to install in whatever Entegra SR20 livery you choose. Livery- Drop the unzipped livery into the SR20 liveries folder. Enjoy. Interior (objects.zip) - Drop the interior textures into whatever livery you wish. They should go in that livery's objects folder.1 point -
Resolved, fix will be in next update.1 point
-
As discussed on Discord, this is due to OMAR not having any instrument procedures and therefore being excluded from the FMS's database. A fix for this will be in a forthcoming update.1 point
-
I was able to modify the object file and create a VR config file which includes some teleport spots as well as the ability to properly control the yoke. I have not touched anything else as I think they will come with an update at some point and are not required as a needed item at the moment (ex. 3 way switches.). Just skip those items in the checklist and you'll be fine. Also, if you want to control any interior cabin lighting, you will have to do it outside of VR until they make some changes to allow for manipulation with the VR controllers.1 point
-

Version 1.0.0
204 downloads
I thought I'd take the time and share something I've quickly whipped together for the brand new CL650 by Hotstart. The livery is a randition of the RACQ Life Flight CL650 that operates from Brisbane, Australia. Life Flight currently operates 4x CL604's in their fleet which operate from YBBN, YBTL and WSSS. I'll update as much as I can but I thought I'd give it a whirl before someone with far more talent brings out something! Enjoy!1 point -
Thank you for adding this.1 point
-
Thanks Ed, will check it out shortly and see what's happening there.1 point
-
In Challenger_manuals a user upload complete manuals for 605 (quite similar to 650)1 point
-
Ok. In that case I was prob just to quick when I just wanted to test if it works. Guess the antenna had not picked up the satellite yet. I am on my wa to Insbruck right now. Following the checklist/gave the antenna time and everything works fine :-)1 point
-
It's being investigated with the help of the project consultant pilots. If the FMS should show VFR only airports, then I'm sure a solution will be possible. The concern is having a total worldwide set of every little airfield could be less useful, as real aircraft databases are often a smaller subset of the full thing to minimise "clutter".1 point
-
The clickspots for the Duct Test switch are the labels around the switch. Click the label (Loop A, Loop B, etc) you want to rotate the switch to and hold, you might have to zoom your view in and pop out the EICAS. Mouse scroll wheel is not supported because its a momentary switch. You have to click the desired position and hold.1 point
-
Yes, if you do not fly in Career Mode you will use the default XP11 weight and balance system.1 point
-
Many thanks for this info. Have nice flights. Frank1 point
-
Ah fuel pressure is required. Now I remember Toto mentioning that. Thank you Graeme!1 point
-
Also, SimBrief has now added MACH 0.74 and 0.72 cruise profiles. Yay!1 point
-
It would be very low priority right now as it's a whole custom navdata system, and there have been no other requests. I think it's about €30/year for the Nav Data alone. I subscribe monthly for Nav Data and worldwide charts, which also work on the 650 MFD.1 point
-
At the moment this method of working is not supported - the Challenger 650 FMS has a complete navdata processor to avoid having to deal with limitations of the X-Plane navigation API, but the FAA CIFP data is not supported.1 point
-
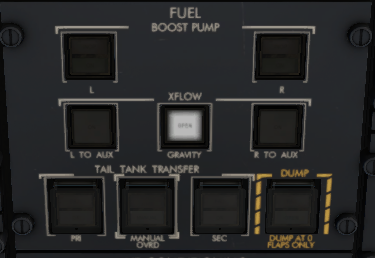
This is expected behaviour. The other shut off valves require fuel pressure to open them, with no fuel pressure they will remain in the closed position. The tail tanks are servo controlled, so will open with no fuel pressure. They will also time-out after 30 seconds and close if fuelling has not commenced, at which point a reset of tail and aux SOVs is required. Try opening the refuel truck 2D panel, then pressing Start. You can also read all about the refuel system on the Study, Engines, Fuel System screen, and select Refuel system at the top left.
 1 point
 -
That's very close to what I've been doing, what our SMEs recommended and avoids FCP inputs when hand flying - that's the reason why that procedure is described in the Takeoff section.1 point
-
1 ACTION at the top right means that you need to do it. 2 ACTION means the FO will do it, and CONFIRM means you have to check it.
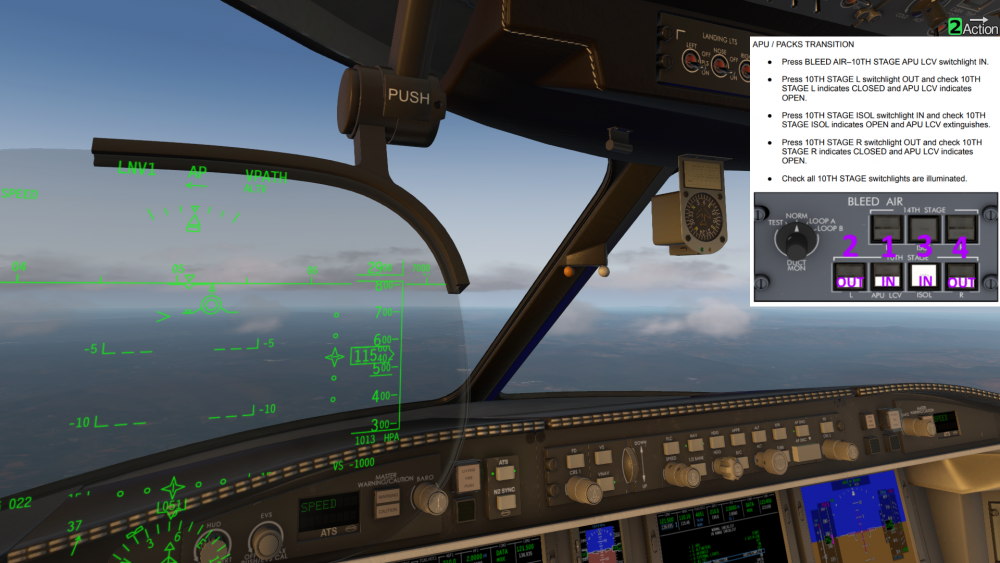 1 point
 -
Agreed. A full manual that provides more insight to the location of buttons, sequence of checklist items, photographs, and a guide to various systems like the fueling system, etc. this provided documentation assumes the users are familiar with CL60 aircraft !1 point
-
Several years ago, I attended a 3-week initial maintenance training class on the Challenger 604 at FlightSafety. The animated systems graphics in the add-on considerably exceed the official training materials in both quality and detail!1 point
-
It's work again, Thank you for your help1 point
-
Let's not be dramatic.1 point
-
Just a note to my fellow VR users - I'm nearly finished creating a vr config file that makes VR even better. Also fixes the 3 position switches and makes then snap back to center again. PM me if you would like it when finished and I will send a link...1 point
-
I also would like to see a manual. I also would like to a cockpit guide for all the switches and buttons. When you use the checklist you have to know where everything is. jeffg1 point
-
I have a small thing to add... The switches of the refueling panel are so black, I cant see which position they are... Only when i look from near 90 deg from the side.1 point
-
Just to explain the issue clearly. In real life altimeters suffer from "errors". When it says 10000ft it doesn't mean you're 10000ft above the sea, it means in the conditions the altimeter was calibrated for, if the subscale (baro) was set perfectly, you'd be at 10000ft. On a cold day you could be at 9000 "real" ft, on a warm day 11000 "real" ft. But the altimeter would still show 10000ft. Now all real aircraft fly in the same real sky, so on a given day, one aircraft indicating 10000ft and another aircraft indicating 11000ft will pass each other safely. Even if their altimeters say 11000ft and 12000ft respectively. The Challenger 650 simulation includes these altimeter effects. Unfortunately when reading the information from X-Plane, online network clients read the "real" altitude (to draw the aircraft) and importantly (and unfortunately) show that to the controllers. This does not happen in real life, as controllers and transponders have no secret data from the world. This means online controllers will see an incorrect Flight Level reading when the Challenger 650 is doing an accurate simulation of real altimetry. To prevent any issues, the Challenger 650 simulation includes an option to disable accurate altimetry for flying on line. If you disconnect from the network, the Challenger will resume simulating altimetry effects, and as a result may climb or descend. It's the hope that in the future online networks will read two separate values, one "real" altitude to draw the various aircraft in the 3D world, and one "sensed" altitude, to downlink to controllers for the Transponder / SSR altitude. More information on altimeter errors https://skybrary.aero/articles/altimeter-temperature-error-correction
 1 point
 -
Has anyone with a WMR headset (like the reverb G2) figured out a way to get a VR session working properly? If I start x-plane directly to VR from within steam-vr, x-plane crashes when I start a flight with the challenger. I am starting using a non persistent flight to skip the FBO. (I reported this bug and sent the log file here in the forum.) If I start x-plane and the Challenger flight in 2D and then activate the VR hardware when I am in the cockpit, x-plane is extremely stuttery. This is not a Challenger problem. It's an x-plane problem I always have. Any information as to your workflow to get it working ok would be much appreciated. I have been mucking around for 3 hours now...1 point
-
The passenger load you specify in the FBO is used to drive the passenger weight calculation. The weight is randomised, accounting for factors like seasons and even geographic regions. I will try and get the max and min weights possible and add them here if I can. Two pilots are accounted for in the operational empty weight. If you want to change the payload, you can freely do this in the X-Plane weight and balance menu. So you can match simbrief exactly if you prefer. On the FMS it calculates the performance based on the weight you enter. You can enter ZFW directly if that's easier than use pax/cargo fields for your particular operation. Some operators will add 500kg to the loadsheet or caluculated weight when doing takeoff calcs to make sure you've got some margin. At the moment a loadsheet is not provided - I agree that would be a very useful and authentic thing, and the developers already have my feedback on that. Business jet operations are not like airline operations with fixed seating ( "No, Miss VIP, you must sit on the Lav seat due CG limitations!" ), so some kind of range of CG needs to be calculated and displayed rather than a single point. Hope that makes sense?1 point
-
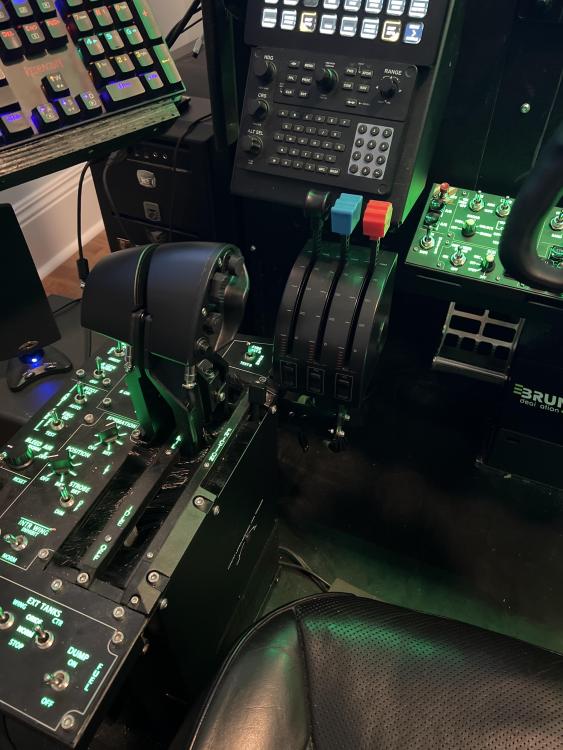
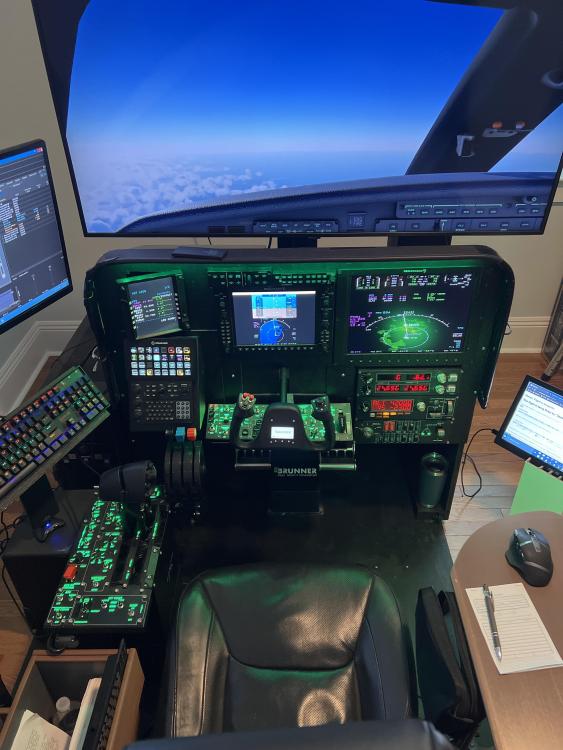
WOW! Just purchased the CL650 and she is a thing of beauty. It will take some time to get up to speed with all the systems but that's ok as it will be worth it. Type rating in a bird like this is a process. POINT of SUBJECT: I have the following Hardware - RSG G1000XFD, G100015MFD, GMA350, GFC700, GCU47X and GTN750, WinWing F/A18A HOTAS Throttle Quadrant/Startup, Combat and Takeoff panels, Stream Deck XL as well as Brunner MKII Yoke and Peddles and a few Saitek items My goal is map/bind as many functions as possible to all. I'm putting this out there hoping others with similar hardware may wish to share/collaborate. I also have a Discord for Brunner Hardware but you will need to PM me for this info. I'm thinking online Google sheets might be the way to go. Any suggestions please post. Thanks

 1 point
 -
Is it possible in the future to get a few improvements for us VR users such as the ability to teleport around the cabin (therefore being able to also close the doors) and maybe a way via the menus to interact with the refueler and cell phone for instance? Currently there's no way to do any of that in VR. I'm not fussed if the FBO doesn't work, but these are a bit important to be left out. The fire test switches also cannot be centered in VR to turn them off.1 point
-
Change between hPa and inHg altimeter scales by using the DCP menu to navigate to config, then pressure. Lots of PFD and MFD options are available in these menus.
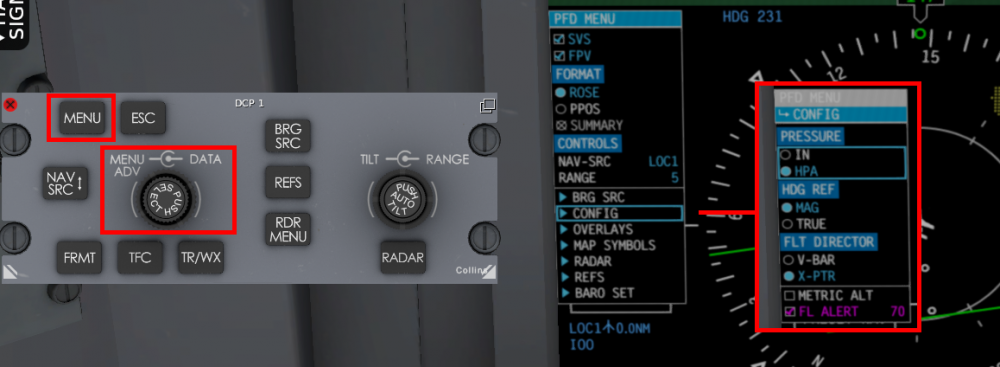 1 point
 -
Version 1.0.0
191 downloads
This is an interior texture pack for the TorqueSim/RealSimGear Take Command! SR22 Series. This interior texture pack can be installed into any livery of your choice, just add the files included in the download (ex. SR22_INT_1.png) inside the livery of your choice's "objects" folder. Then that livery will have the customized interior! Livery painters: feel free to bundle these inside a livery you publish! This paint-kit/texture pack is licensed under CC BY-NC-SA 4.0. To view a copy of this license, visit https://creativecommons.org/licenses/by-nc-sa/4.0 You are free to: Share — copy and redistribute the material in any medium or format Adapt — remix, transform, and build upon the material Under the following terms: Attribution — You must give appropriate credit, provide a link to the license, and indicate if changes were made. You may do so in any reasonable manner, but not in any way that suggests the licensor endorses you or your use. NonCommercial — You may not use the material for commercial purposes. ShareAlike — If you remix, transform, or build upon the material, you must distribute your contributions under the same license as the original. No additional restrictions — You may not apply legal terms or technological measures that legally restrict others from doing anything the license permits.1 point