Leaderboard


Popular Content
Showing content with the highest reputation on 01/09/2022 in Posts
-
Folks, I've identified what the issue is with xPilot (I don't have IVAO or the LiveTraffic plugin). xPilot is setting the weight-on-wheels dataref for all aircraft contacts to permanently '1', causing the CL650's TCAS computer to exclude them from display or computing TAs or RAs against them. I've submitted a bug report to the xPilot project, so fingers crossed, this will be fixed soon on their end. It's likely possible LiveTraffic and IVAO have the same bug.9 points
-
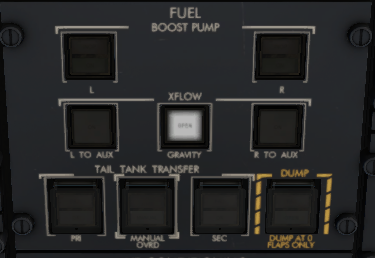
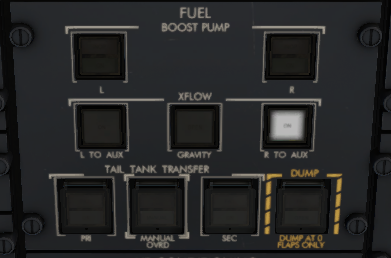
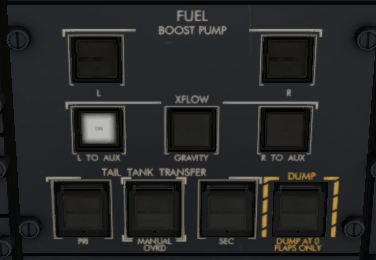
Reference material - https://www.smartcockpit.com/docs/CL605-FUEL_SYSTEM.pdf Page: 16 Fuel tanks are expected to be within 400 lbs / 181 kgs of each other on taxi / takeoff / landing OR 800 lbs / 362 kgs during flight, to avoid Fuel Imbalance EICAS message. First, orient yourself on the overhead panel, we'll be working in the 2nd row (or middle row) of the FUEL panel area. (Fuel.PNG) All three of these buttons should be extinguished under normal operations. Gravity XFLOW Press to begin the process, there's a 1 second delay after pushing the button for it to illuminate OPEN. This will allow fuel to flow freely between both main (wing-based) tanks. There is no EICAS notification that this is open/occurring. (gravity.png) To observe what's happening in the sim. You can go to the Challenger 650 menu -> Study -> Engines -> Fuel System... You'll notice that whatever Main Tank (either Left or Right) has more fuel that this will continue to consume, whereas the side with less fuel will not. Thus balancing the tanks. L (R) to AUX XFLOW Press the appropriate button to begin the process, there's a 1 second delay after pushing the button for it to illuminate ON. This will remove fuel from whatever side is select and transfer it to the auxiliary tank. Determine which tank has more weight in fuel Left side? Choose L to AUX (L to AUX.png) Right side? Choose R to AUX (R to AUX.png) There is a lock out mechanism that does not allow you to press the opposite button when one is already selected. Pressing L to AUX, for example, then pressing R to AUX, will no longer illuminate the L to AUX button. Pressing the R to AUX button again will resume the L to AUX transfer and the button will illuminate ON again. Once you're done balancing the tank, make sure to deselect the previously selected L (R) to AUX button. The aircraft will now suspend fuel consumption from the two main tanks and pull from the AUX tank until depleted. *Edit* Thanks! @airforce2 As long as a main tank is below 93% full, the aux tank feeds the main tank to maintain the level at 93%. Once a main drops to 93%, the main quantity will remain constant and the aux level will drop. It will appear that the engines are burning from the aux tank, but in reality the engines are burning from the mains and that fuel is being simultaneously replaced in the main tank from the aux tank ejector xfer pumps. To observe what's happening in the sim. You can go to the Challenger 650 menu -> Study -> Engines -> Fuel System... Note: The plane will display an EICAS warning message: FUEL XFLOW SOV OPEN if either button is ON for more than 50 seconds and the tanks are balanced within 100 lbs.

 6 points
 -
Note: this is already integrated directly on Simbrief (see above) so the link below now only exists as a backup. LINK HERE Note: aircraft name is clipped to 12 characters for custom airframes, sadly (limit does not apply to default profiles). Fixed by SimBrief Based on the already-accurate default CL60, with the following adjustments: equipment codes and extra flight plan remarks kindly provided by Graeme_77 here: OEW/BOW updated to match the Hot Start airframe without passengers (12,315 -> 12,556kg, includes two pilots) passenger weights updated to somewhat more closely match the randomized weights as simulated, going with 74+15kg so you can still carry 5 passengers+luggage and full fuel at MTOW if you are flying Kim Dotcom around (supposedly ~141kg or thereabouts), sorry, you will have to make adjustments, or just count him as two passengers see below for more information: Don't forget to add extra crew (anything above the two included in OEW) as passengers when planning your flight! Cheers, Tim
 5 points
 -
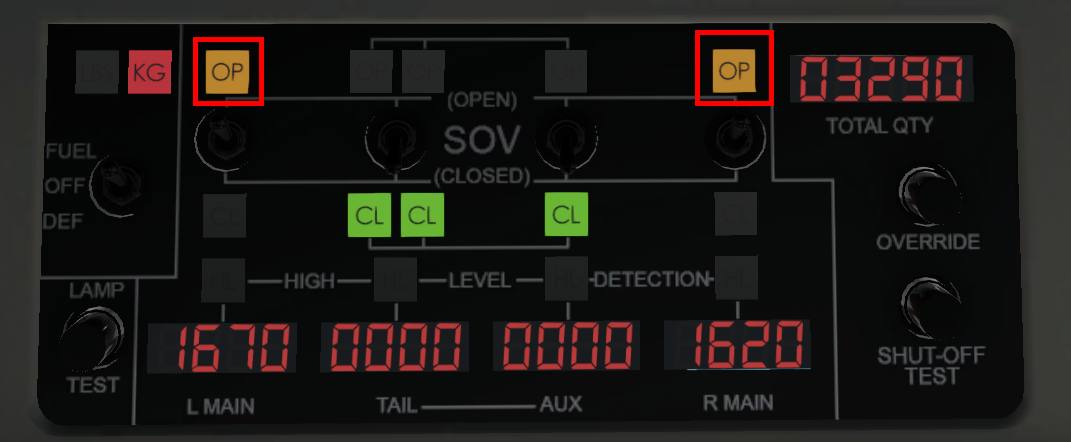
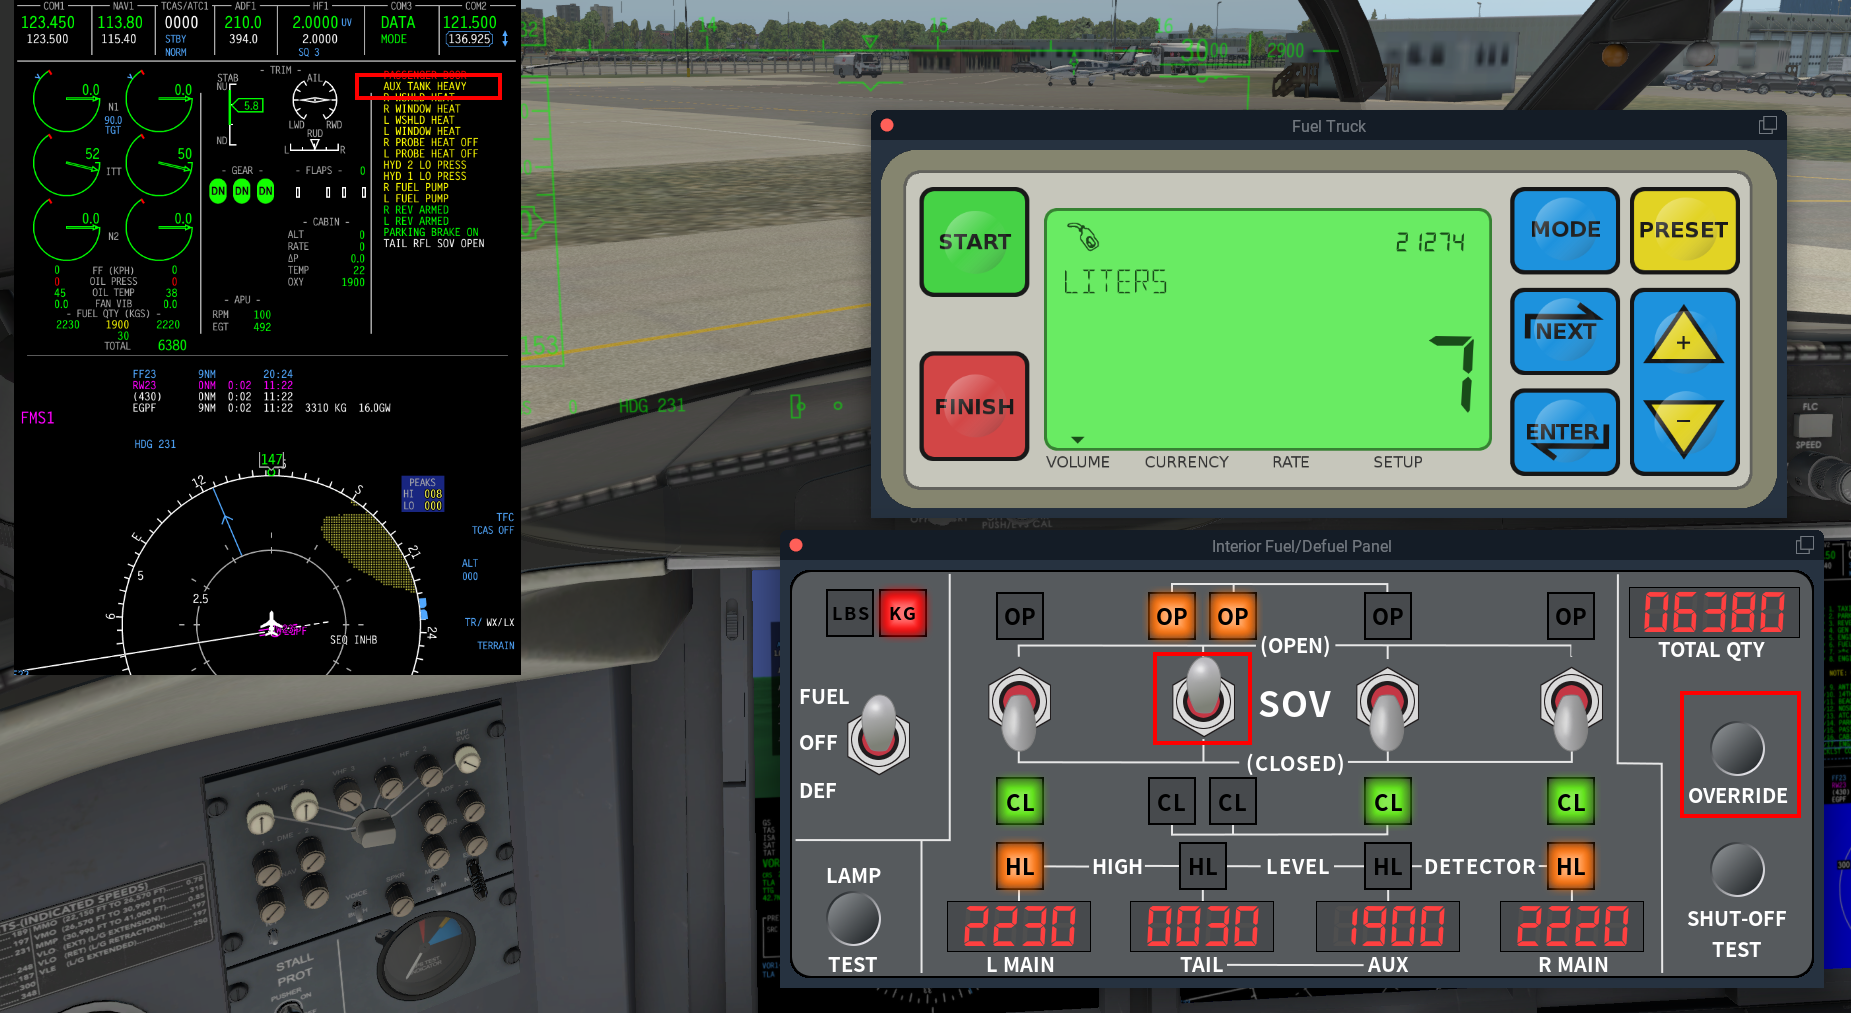
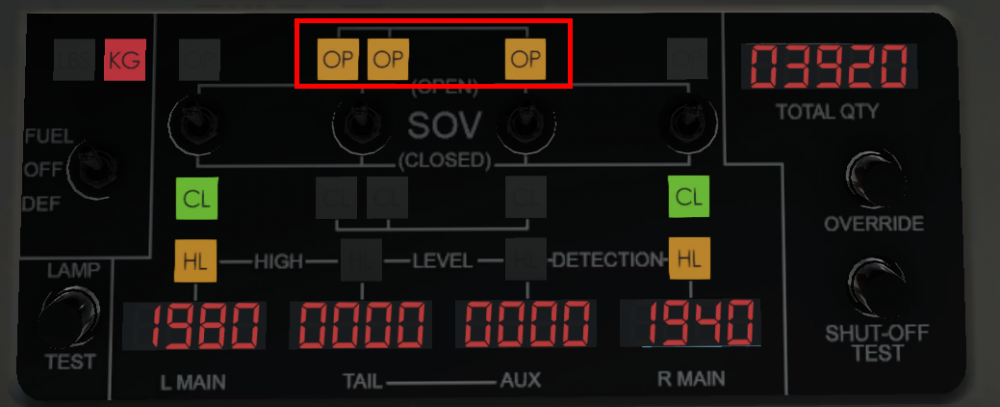
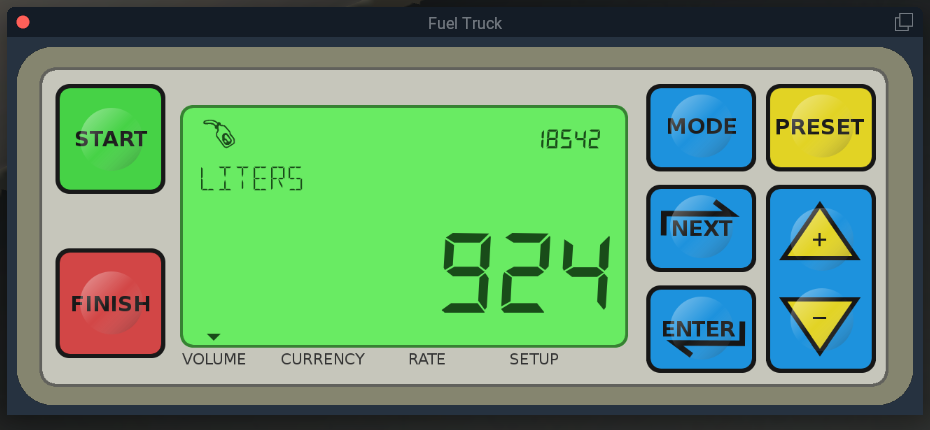
A few pilots are having issues with AUX TANK HEAVY messages. This is totally understandable as (A) we didn't tell you how to work the refuelling system and (B) Good grief - never let a pilot near a refuelling truck! The docs will be reviewed to see if something better can be written, in the mean time... Refuelling - Easy Method Tell the fueller how much fuel you want. He's going to say "I'll start up the pumps". Wait for him to go downstairs, then only switch the L WING and R WING shut off valve (SOV) on. Check the OP lights (OPen) indicate. The fuel values are pressure operated, no refuel pump pressure, no valves open. The open setting on the switch can also "time out" and the valves won't open even when pressure is applied, so watch the panel until the valves indicate open. The wing tanks will fill, the HL (high level = full) lights will indicate and the fueller will tell you he's done. If you don't have enough fuel, tell him to keep pumping, and this time open the TAIL and AUX valves together (always together - note the white line on the panel between TAIL---AUX indicating they work together. Again, watch the panel until the valves indicate OP. If you don't have all the open lights on, the fuel balance between aux and tail will be incorrect. When the fueller finishes this time and you have enough fuel, close the SOVs and switch the fuel switch off. You cannot defuel in the simulation, it's virtually impossible in the real world outside of maintenance operations. If you want to help the fueller out, you can work the pump yourself using the menu Challenger 650 \ Ground Services \ Refuel \ Refuel Truck. It's fairly simple, like a fancy gas pump! The pump symbol at the top left of the display indicates the pump is running. Start and Finish are the only buttons you need for basic operation. But I've still got AUX TANK HEAVY when refuelling on the ground! Did you land or start refuelling with a significant amount of fuel in the aux tank? You may need to balance the aux and tail fuel when refuelling to keep the aircraft in trim. To do this, ask the fueler to start the pump, on the refuelling panel switch only the TAIL SOV to open and then press and hold the override button. With this button you have great power, but also great responsibility - be very careful! Refuel with the override button pressed until the AUX TANK HEAVY message disappears, then resume normal fuelling if required.

 5 points
 -
The CG value in the FMS Takeoff perf page is for pilot information only. It does not need to be completed, and has no effect on the performance of the aircraft. The developers are investigating options to display load and balance information in a manner that best simulates the corporate pilot experience as it differs substantially from scheduled air transport.5 points
-
Documents attached updated 20th December 2022. Latest versions are always available in ...\Aircraft\X-Aviation\CL650\Documentation directory. IMPORTANT: you must be signed in to download the PDFs below. Not a user yet? Head over to Sign Up. 1128340285_CL650FMSPrimer.pdf CL650 Operations Reference.pdf 1323904309_CL650ExpandedNormalProcedures.pdf CL650 Checklists.pdf CL650 Checklists - Printable.pdf CL650 Flexible Take-Off.pdf CL650 Shared Cockpit Quick Start Guide.pdf4 points
-
No problem! Don't be like me though ;-)4 points
-
I've run a bunch of A B testing on Gizmo retail vs Gizmo dev branch and it looks like a bunch of this is on me. I'm seeing some pretty abysmal perf numbers out of retail. The good news is I'm seeing some significantly better numbers out of the dev branch... Will push harder to get you all something soon. Turns out Gizmo is not the problem. See last post below.3 points
-
I've run a bunch of A B testing on Gizmo retail vs Gizmo dev branch and it looks like a bunch of this is on me. I'm seeing some pretty abysmal perf numbers out of retail. The good news is I'm seeing some significantly better numbers out of the dev branch... Will push harder to get you all something soon. Turns out Gizmo is NOT the issue. See last post in this thread.3 points
-
12556 kg in X-Plane includes the pilots. Operational Empty Weight or Basic Operational Weight. 12315 kg in the SimBrief profile does not include crew weight. Basic Empty Weight. Pax weights - 58kg - 81kg, with 6kg standard deviation, depending on geographic location Seasonal variation +/- 4 kgs Baggage - 15kg with 4kg deviation. Non-persistent mode gives you the aircraft with just two pilots. It is intended to bring a Study menu visualisation of the passenger distribution and other parameters to the aircraft in a future enhancement.3 points
-
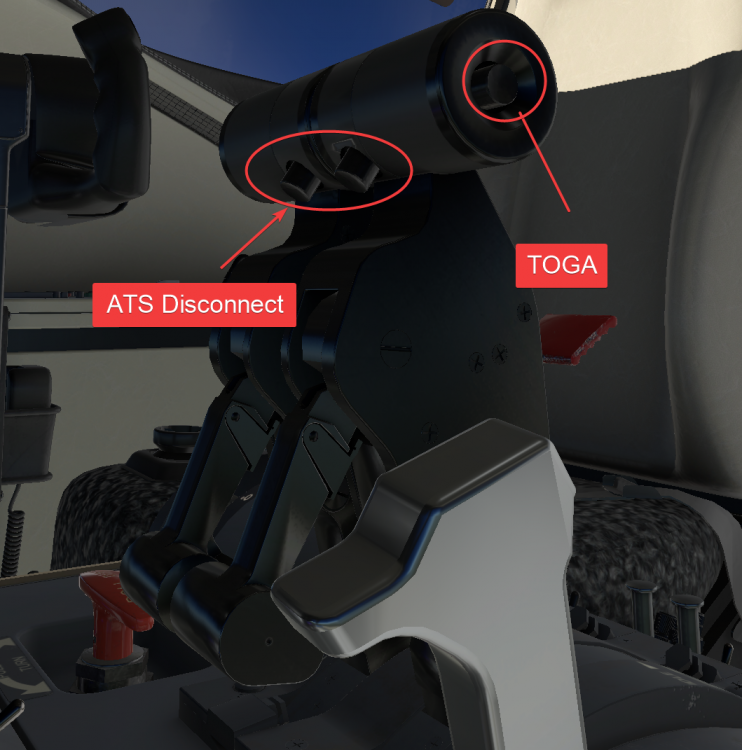
Conceptually the ATS is quite different from a 737 type of autothrottle. Let me try and explain it simply: The ATS will only work if there is a valid thrust rating. Click the PERF button on the CDU, and make sure it shows <ACT> next to a rating. You can use the TOGA buttons at any point, even on stand with the engines shut down, to arm the flight directors and ARM the autothrust system. It will then show "N1 TO" on the ATS matrix display. If the flight directors are already showing, you must turn them off and then press TOGA to arm the ATS. For takeoff, just push the power levers forward or press the "ATS" button on the FCP. This will then engage the ATS to give you takeoff thrust. If at any point you have FAIL on the matrix display, you must use the ATS Disconnect, (look for at_disc in the bindings) to clear the matrix display before reengaging the ATS. Hope that makes enough sense to get you going.3 points
-
1) ATS Disengage - Advance thrust levers 2) Retract flight spoiler if in use 3) Pitch up smoothly at no less than vRef speed 4) Fly V2 + 10 minimum and retract flaps to 20 5) Fly MAP or as instructed by ATC3 points
-
The Challenger can be hard work on the approach and landing, but when it all comes together it's very rewarding. All the beta testers had difficulty learning how to land, it's all part of the fun. On approach be aware that unlike aircraft like the 737, the pitch response to power is reversed, that means a power increase will see the aircraft pitch down for a moment. This can lead to an oscillation developing, so be sure to fly the pitch attitude accurately. If you find you're wobbling up and down, aim to make smooth power changes, and remember the HUD flight path vector is useful tool, but can get you into trouble too. A useful check is 0.6 on the AoA index on approach. If it's higher than that, you're too slow. Remember Vref +5, and check your weights on the approach ref page. For the landing flare, lift the nose to to arrest the rate of descent, starting at just below 40 ft. Make a smooth power reduction and fly the aircraft onto the runway. The pitch attitude in the flare is around 3 degrees, but look at the end of the runway, not the HUD! You'll have plenty of time for butter later, so for now put the aircraft down positively in the touchdown zone. If you go butter hunting, you'll only find little bounces - ask me how I know! Once you've landed, extend the flight spoilers (the ground spoilers are automatic, but the flight spoilers need to be raised by pulling the lever), use the reversers and you're down. And stay away from that HLIS button, it'll trick you into making your landings worse!2 points
-
To set the park brake you need to have hydraulic pressure (Pump 3A on). Then hold the toe brakes, and set the parking brake while holding the toe brakes. If you simply apply the park brake, there will be no braking effect, and Jenny won't be happy you messed up her ramp when the chocks are removed.2 points
-
I have a small thing to add... The switches of the refueling panel are so black, I cant see which position they are... Only when i look from near 90 deg from the side.2 points
-
I have tried using the plugin menu and it works for removing/adding chocks (and I forgo using the hand signals for starting engines). However, when you select the phone or fuel via the plugin menu, it brings up an empty window with no options. I know the development team is aware (they have been very upfront about the VR capabilities) and I have established a workflow that seems be adequate for using the plane in VR. I typically do everything in 2D (start in the FBO, walk to the plane, do most of the checklists). I only go into VR once the passengers are inside and the door is closed. Also, when I am flying, I don't use the sat phone to call the FBO (it doesn't work in VR) and I wait until I am on the ground and through checklists to call the FBO to pick up passengers (otherwise they will still be on the plane next time you fly if you leave from the same place). This workflow seems to be good for me, and I know that over time they might look at adding the ability to access windows (fuel, cell phone, etc) inside VR. The hotpots tool is a good one. Especially for creating one near the door and maybe another near the lights/PA controller in the galley. It seems a good number of us fly in VR and it's always nice to see developers out there give it some attention. With the lower(ing) cost of VR hardware and capabilities of systems increasing, I would guess that more and more people will pick it up.2 points
-
Hi there, Is anyone has it? Could be nice to read Thanks Regards2 points
-
Sure thing. Please see attached for the FMS file. Here's the full route: KAVL/35 DCT VIEWS DCT COLZI DCT FAK237020 DCT FAK DCT BUKYY DCT JAYBO DCT SIE DCT KACY/31 I see in the fms file that this VORradialdistance format is present as well. If you start a new flight in simbrief and enter KAVL to KACY, that is the first route that it will recommend you. KAVLKACY01.fms2 points
-
If you can't guarantee all essential functionality in the distributed package, you should issue a warning like "access to navcen.uscg.gov is mandatory, otherwise the GPS on this aircraft won't work" on the store page, or offer a refund for those who can't use the aircraft properlly due to this issue. The situation is, 1. customers would expect a product with full advertised functionality because they are not warned about some of them will not work if access to unspecified, unrelated domain were blocked and of the X-Aviation no-refund policy, and 2. customers could not legally acquire the said almanac files in this case either. I hope there will be an offline solution for this, like simulating GPS position without the said, close-to-reality almanac. It is OK to have a less accurate model here as the more accurate one is not achievable.2 points
-
To add, if you want to use CRJ procedures, the checklist system is totally customisable, it's an XML file in the aircraft directory and is self explanatory. It was designed to allow users to create their own SOPs and procedures.2 points
-
I’ve got the Bravo and I found it worked better to use an axis specifically for reverse, then you have all the control you’d want. I have my axes L to R as: Speedbrake Reverse Eng 1 Eng 2 <not used> Flaps2 points
-
The passenger load you specify in the FBO is used to drive the passenger weight calculation. The weight is randomised, accounting for factors like seasons and even geographic regions. I will try and get the max and min weights possible and add them here if I can. Two pilots are accounted for in the operational empty weight. If you want to change the payload, you can freely do this in the X-Plane weight and balance menu. So you can match simbrief exactly if you prefer. On the FMS it calculates the performance based on the weight you enter. You can enter ZFW directly if that's easier than use pax/cargo fields for your particular operation. Some operators will add 500kg to the loadsheet or caluculated weight when doing takeoff calcs to make sure you've got some margin. At the moment a loadsheet is not provided - I agree that would be a very useful and authentic thing, and the developers already have my feedback on that. Business jet operations are not like airline operations with fixed seating ( "No, Miss VIP, you must sit on the Lav seat due CG limitations!" ), so some kind of range of CG needs to be calculated and displayed rather than a single point. Hope that makes sense?2 points
-
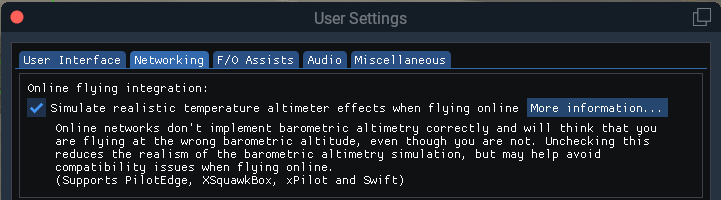
I don't have the aircraft but the behavior seems correct -- you probably understood it backwards. When the checkbox is ticked, altitude will not change (because advanced barometric altimetry is always on); when it's unticked (your case: advanced barometric altimetry enabled when offline only), when you lose connection it switches from the online/simplified simulation to the realistic one, hence the altitude change… Some observations for developers: - assuming it isn't already, online networks would probably appreciate if the realistic mode were disabled by default (fewer support headaches) - maybe the realistic system could be on a delay to account for the occasional lost connection, or maybe even remain on the simplified system if the connection is lsot in the air - maybe the transition from the simplified to the advanced simulation could eventually be more gradual to avoid an 800ft-like jump while airborne?2 points
-
Sorry to hear that @chroode. Welcome to X-Pilot!2 points
-
Hey Kari, To get winds into the CDU, go to Index (IDX), Route Menu, LSK 6 R Then FPLN Wind Update LSK L4 This will bring a mostly empty page, this is fine, anod nothing to worry about, click "SEND" LSK 5 R and the winds will start to be requested and downloaded. This may take a while depending on how many waypoints you've got, and how good your VHF Datalink signal is, when it's done, you'll just need to "Exec" the new wind data.
 2 points
 -
That's what just brought me here from the X-Plane Forums. Suspended for accidentally posting a link to the new HotStart Challenger 650. How was I supposed to know? I just started using X-plane a few months ago. Glad to be here.2 points
-
Yes they are, and we should have put them in the Operations Reference doc. Sorry about that. PBN/A1L1B1C1D1O1S2T1 M-SBDE1E2E3FGHIJ1J4J5J7M3RWXYZ/LB1V1D12 points
-
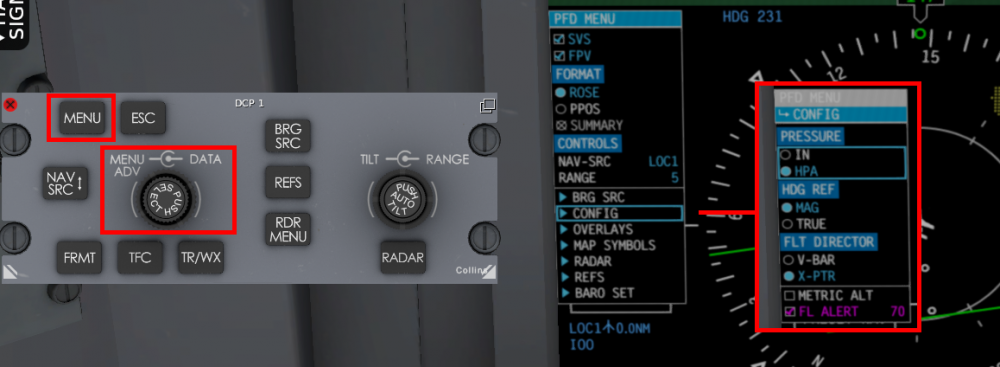
Change between hPa and inHg altimeter scales by using the DCP menu to navigate to config, then pressure. Lots of PFD and MFD options are available in these menus.
 2 points
 -
The Challenger has very good takeoff performance, so everything happens quickly. For the first few flights a heavier weight can help keep things in check. One of the key differences between A320/737 aircraft and the Challenger is there is no speed reference system on the Challenger. Instead the flight directors will give a fixed pitch target when pressing the TOGA buttons. Following the guidance from our subject matter experts, and adapting it for use in the simulation, we've got two easy ways to manage the initial climb, which can be remember as Pitch/Sync and FLC. Try both and see what works for you. Pitch / Sync: Takeoff and follow the initial flight director pitch target. Accelerate in the initial climb maintaining that pitch, retract the flaps at VFTO+5 then at a safe altitude hold the “Sync” button and lower the nose to about 10 degrees to start accelerating. If using autothrust it can be set to maintain a suitable speed, but your primary control is pitch, which can be adjusted easily by holding sync and flying the aircraft to the new pitch attitude. FLC: Takeoff and aim for the initial pitch target before selecting FLC mode to capture a speed of roughly V2 +20. At most weights this will result in a very steep climbout. At a safe altitude, increase the speed to lower the nose then retract the flaps at VFTO+5 A hybrid approach may be useful - remember unlike an airliner the Challenger has seats facing sideways - so while a space rocket climb profile can be fun, it’s unlikely to get repeat business for your VIP transport business.1 point
-
The custom atmosphere simulation means the aircraft will fly at the indicated altitude for the conditions, which is quite different from the perfectly correct altitude that most simulations use. This may cause confusion for online controllers as your aircraft will appear to be off altitude. Please familiarise yourself with the atmosphere simulation fully before flying online.
 1 point
 -
Hey guys, At random times everything seems to go a bit crazy and I go from 40 fps down to 20 and everything slows down. It seems to be completely random, I cant find a common situation between all the times it has happened. I know some others were having similar issues. Interested to see if anyone can help! Update: Its something to do with Gizmo and I believe X-aviation, seems to be some sort of issue there where Gizmo is using more than the actual Challenger
 1 point
 -
I'm guessing they want people to pay big bucks for those who use the manuals for training or official flight use? I find it hard to think that someone who is completely unfamiliar with the airframe to know it in and out from just the provided manuals. Hotstart has made a wonderfully complex aircraft here. If any aircraft for X-Plane has ever deserved a full on manual, it's this one.1 point
-
Press on fms the MFD DATA button.1 point
-
Hi , for the time being, I’ve found the MMEL….all the other manuals are quite hard to find ( for free..) Cl600_EASA-MMEL_Rev01 2.pdf1 point
-
Same issue here. 2022-01-09 09:51:01 CL650[chart_prov_common.c:191]: Error downloading chart index https://aeronav.faa.gov/d-tpp/1802/xml_data/d-TPP_Metafile.xml: SSL peer certificate or SSH remote key was not OK1 point
-
Yes absolutely. Smart Cockpit has been a great resource for users leading up to launch.1 point
-
Well done, Jan! Much appreciated.1 point
-
Great feedback for me as potential VR only customer of the CL650 as I am considering getting it but am/was worried about VR compatibility - thank you very much all! Helps in making a buy decision Manip sensitivity: so everything manip sensitvity related is okay for me as that can be tuned in a vrconfig file very easily myself. No deal breaker Hotspots: for those that already have this bird - use this easy to use plugin to create your own hotspots. It is really easy and well made! Will create and save a vrconfig for you. VR Tools Plugin Ability to communicate with services: that would be nice to hear getting picked up by Hotstart at some point. You can still go via the challenger plugin menu can`t you?1 point
-
There is a lot more going on in this add on than any other plane you have, also Reflections have always being known to be an issue which is why few use them.1 point
-
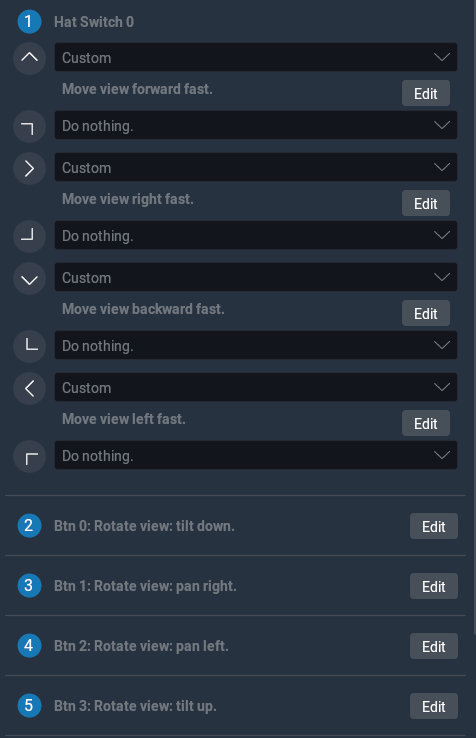
Ah yes, thanks! That helps. Those commands aren't compatible with the analog axes themselves (the custom curves aren't respected), but I was at least able to assign the move/rotate view commands to the d-pad and X,Y,A,B buttons, respectively.
 1 point
 -
This is a definite trait of the aircraft. Maybe reduce your curves slightly.1 point
-
I will look into it. Nice thing that we can customize the XML checklist. It will require new custom voice recordings correct ?1 point
-
I hope that the GNSS problem can be resolved as soon as possible, I really like this aircraft1 point
-
If you bind CL650/checklist/prev_checklist you can go back in the checklists and find Quick Turn Checklist. It doesn't have custom audio implemented yet, that's a known issue.1 point
-
A true one percenter: plane broken? Throw it out and buy a new one!1 point
-
For anyone else victim to the games that Russia is apparently playing with DNS infrastructure on a national level, you can try adding an override for navcen.uscg.gov into your hosts file (/etc/hosts on Linux, C:\WINDOWS\System32\drivers\etc\hosts on Windows): 206.65.196.29 navcen.uscg.gov (At least in this country, it would seem that the host itself is not being blocked, just the DNS entry is being filtered.)1 point
-
Hi Chroode, Here's the buttons
 1 point
 -
I disabled the simulated walking around and wasd keys. I'm able to move around the A/C as I'd like with my regular keys. Hope this helps.
 1 point
 -
To add a little bit of detail, the N1 TO value is not displayed above a certain altitude, I think 15000, but could be wrong. You can set TGT above that. As the APU can also not be started until below 15000ft, I tend to do the thrust setting within the "In Range Checklist", where the APU is started and N1 target set.1 point
-
Stunning. Except for full-motion (which I have always thought was over-rated in terms of cost/benefit to training) this may be as good as, or in some ways better than, the full-motion CL650 sims I use every year. I WANT IT NOW! It happens that I start annual 650 recurrent three days after this beauty is released. It will be interesting to compare.1 point