
Leaderboard


Popular Content
Showing content with the highest reputation on 01/08/2022 in Posts
-
Documents attached updated 20th December 2022. Latest versions are always available in ...\Aircraft\X-Aviation\CL650\Documentation directory. IMPORTANT: you must be signed in to download the PDFs below. Not a user yet? Head over to Sign Up. 1128340285_CL650FMSPrimer.pdf CL650 Operations Reference.pdf 1323904309_CL650ExpandedNormalProcedures.pdf CL650 Checklists.pdf CL650 Checklists - Printable.pdf CL650 Flexible Take-Off.pdf CL650 Shared Cockpit Quick Start Guide.pdf10 points
-
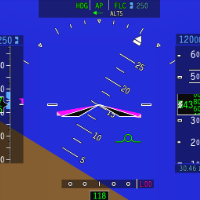
The Challenger has very good takeoff performance, so everything happens quickly. For the first few flights a heavier weight can help keep things in check. One of the key differences between A320/737 aircraft and the Challenger is there is no speed reference system on the Challenger. Instead the flight directors will give a fixed pitch target when pressing the TOGA buttons. Following the guidance from our subject matter experts, and adapting it for use in the simulation, we've got two easy ways to manage the initial climb, which can be remember as Pitch/Sync and FLC. Try both and see what works for you. Pitch / Sync: Takeoff and follow the initial flight director pitch target. Accelerate in the initial climb maintaining that pitch, retract the flaps at VFTO+5 then at a safe altitude hold the “Sync” button and lower the nose to about 10 degrees to start accelerating. If using autothrust it can be set to maintain a suitable speed, but your primary control is pitch, which can be adjusted easily by holding sync and flying the aircraft to the new pitch attitude. FLC: Takeoff and aim for the initial pitch target before selecting FLC mode to capture a speed of roughly V2 +20. At most weights this will result in a very steep climbout. At a safe altitude, increase the speed to lower the nose then retract the flaps at VFTO+5 A hybrid approach may be useful - remember unlike an airliner the Challenger has seats facing sideways - so while a space rocket climb profile can be fun, it’s unlikely to get repeat business for your VIP transport business.9 points
-
The Challenger can be hard work on the approach and landing, but when it all comes together it's very rewarding. All the beta testers had difficulty learning how to land, it's all part of the fun. On approach be aware that unlike aircraft like the 737, the pitch response to power is reversed, that means a power increase will see the aircraft pitch down for a moment. This can lead to an oscillation developing, so be sure to fly the pitch attitude accurately. If you find you're wobbling up and down, aim to make smooth power changes, and remember the HUD flight path vector is useful tool, but can get you into trouble too. A useful check is 0.6 on the AoA index on approach. If it's higher than that, you're too slow. Remember Vref +5, and check your weights on the approach ref page. For the landing flare, lift the nose to to arrest the rate of descent, starting at just below 40 ft. Make a smooth power reduction and fly the aircraft onto the runway. The pitch attitude in the flare is around 3 degrees, but look at the end of the runway, not the HUD! You'll have plenty of time for butter later, so for now put the aircraft down positively in the touchdown zone. If you go butter hunting, you'll only find little bounces - ask me how I know! Once you've landed, extend the flight spoilers (the ground spoilers are automatic, but the flight spoilers need to be raised by pulling the lever), use the reversers and you're down. And stay away from that HLIS button, it'll trick you into making your landings worse!8 points
-
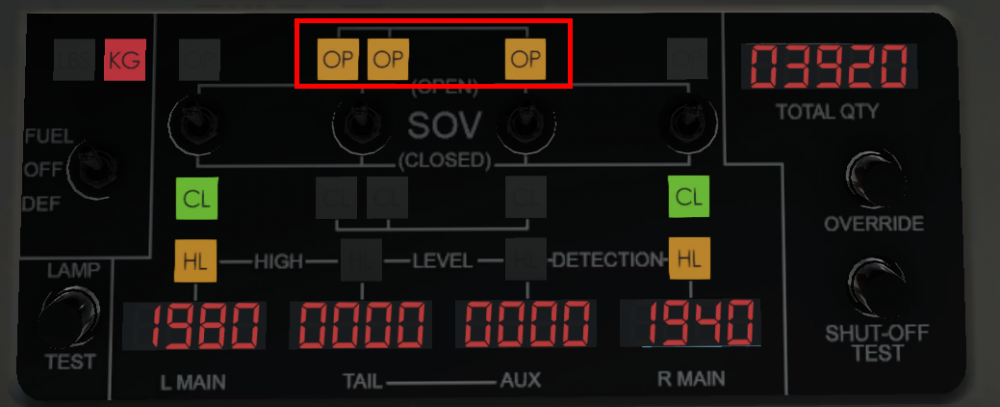
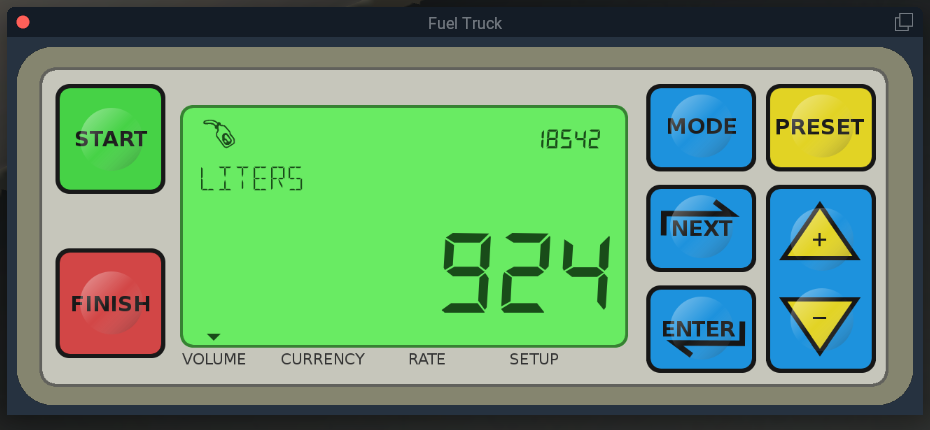
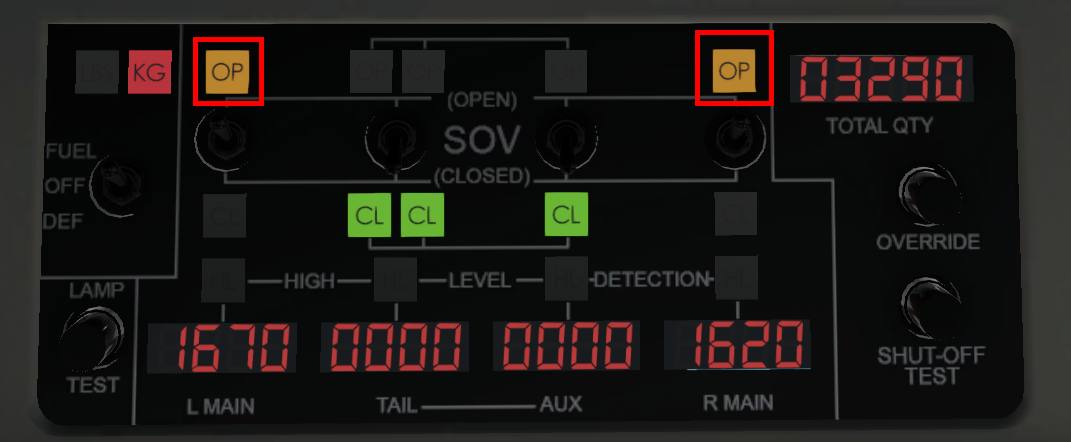
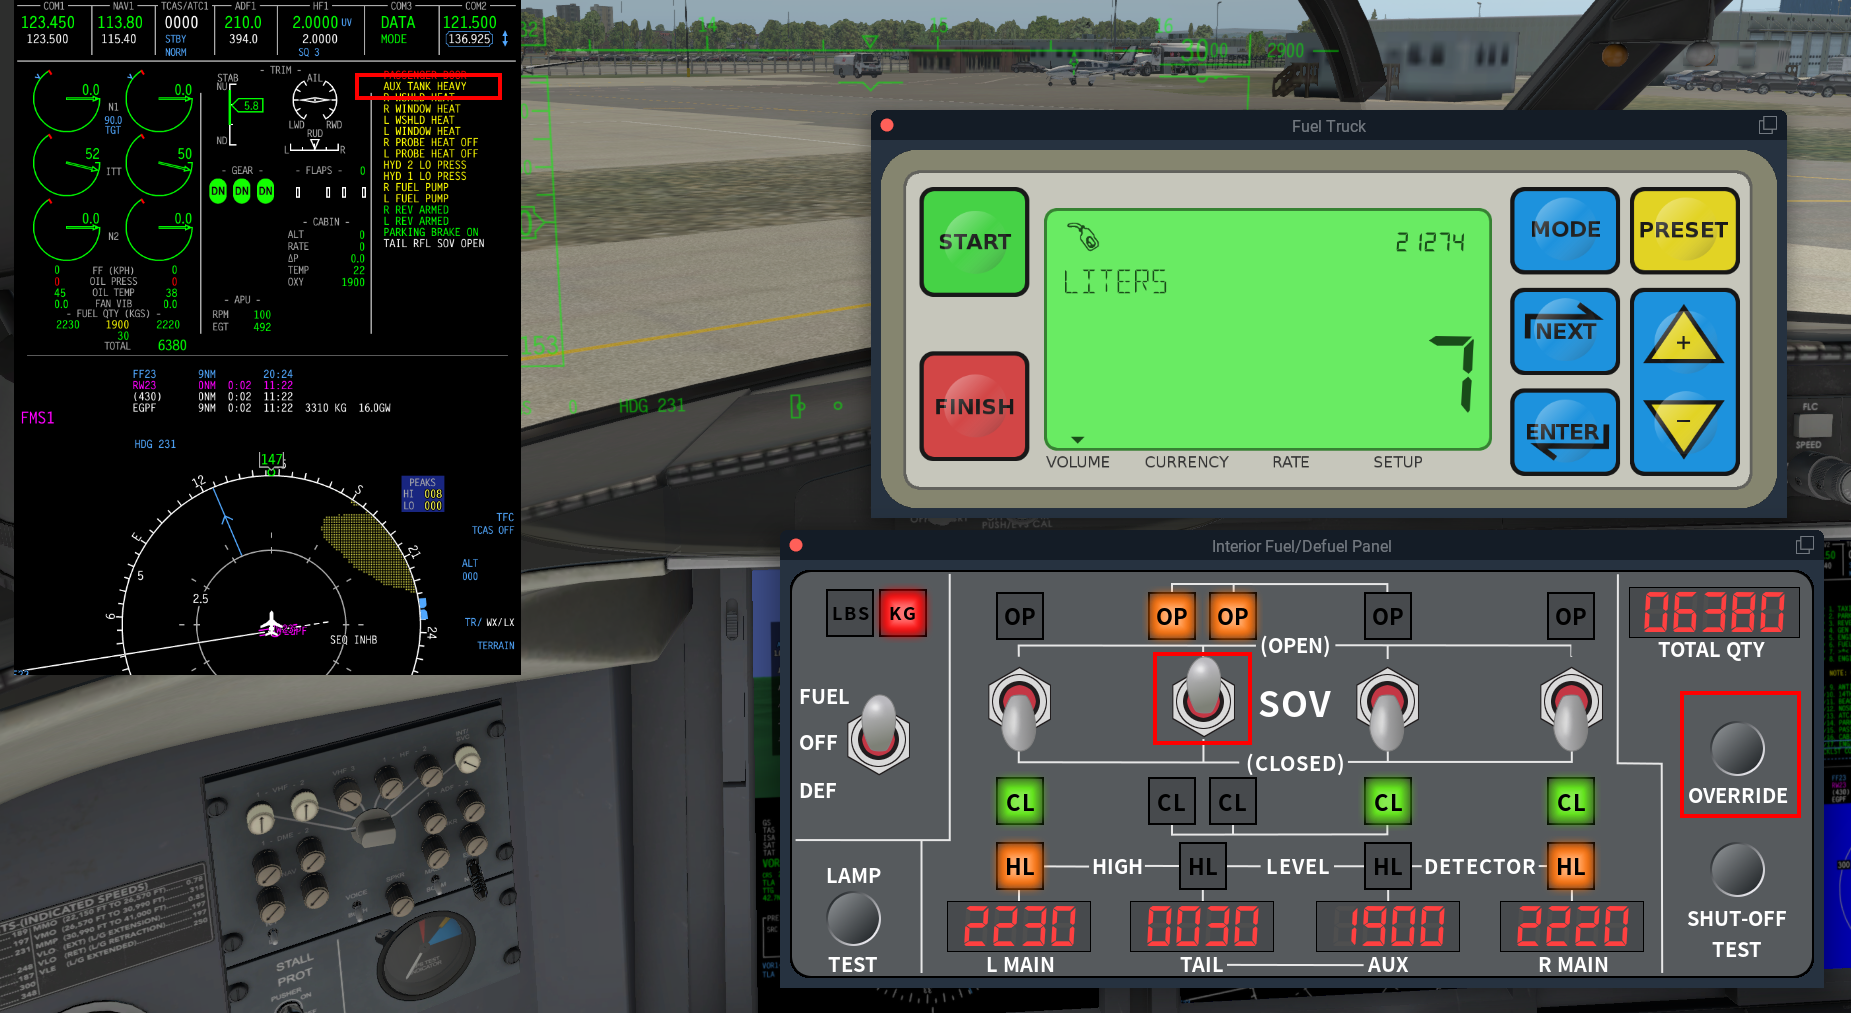
A few pilots are having issues with AUX TANK HEAVY messages. This is totally understandable as (A) we didn't tell you how to work the refuelling system and (B) Good grief - never let a pilot near a refuelling truck! The docs will be reviewed to see if something better can be written, in the mean time... Refuelling - Easy Method Tell the fueller how much fuel you want. He's going to say "I'll start up the pumps". Wait for him to go downstairs, then only switch the L WING and R WING shut off valve (SOV) on. Check the OP lights (OPen) indicate. The fuel values are pressure operated, no refuel pump pressure, no valves open. The open setting on the switch can also "time out" and the valves won't open even when pressure is applied, so watch the panel until the valves indicate open. The wing tanks will fill, the HL (high level = full) lights will indicate and the fueller will tell you he's done. If you don't have enough fuel, tell him to keep pumping, and this time open the TAIL and AUX valves together (always together - note the white line on the panel between TAIL---AUX indicating they work together. Again, watch the panel until the valves indicate OP. If you don't have all the open lights on, the fuel balance between aux and tail will be incorrect. When the fueller finishes this time and you have enough fuel, close the SOVs and switch the fuel switch off. You cannot defuel in the simulation, it's virtually impossible in the real world outside of maintenance operations. If you want to help the fueller out, you can work the pump yourself using the menu Challenger 650 \ Ground Services \ Refuel \ Refuel Truck. It's fairly simple, like a fancy gas pump! The pump symbol at the top left of the display indicates the pump is running. Start and Finish are the only buttons you need for basic operation. But I've still got AUX TANK HEAVY when refuelling on the ground! Did you land or start refuelling with a significant amount of fuel in the aux tank? You may need to balance the aux and tail fuel when refuelling to keep the aircraft in trim. To do this, ask the fueler to start the pump, on the refuelling panel switch only the TAIL SOV to open and then press and hold the override button. With this button you have great power, but also great responsibility - be very careful! Refuel with the override button pressed until the AUX TANK HEAVY message disappears, then resume normal fuelling if required.

 6 points
 -
An Expanded Procedures is provided to help you accomplish every action in the Challenger. These Expanded Procedures follow the checklist structure exactly, but have additional guidance on how to accomplish each action. Follow the first few items on the procedure to get the avionics powered up. Once all the avionics are on the checklist is available on the MFD, and from this point the virtual First Officer will be able to read the checklist to you so you don’t loose your place. The Expanded Procedure guidance is also available as a popup hint for each item. You can easily ask the First Officer to start the checklist with any key or button bound to the command CL650 \ Checklist \ Confirm checklist item. Don’t worry about learning every item in the checklist the first time through. Have fun, pick a new system to focus on each time, and soon it will all become natural. When you've got it, disable the hint images and you're on your own!4 points
-
Yes they are, and we should have put them in the Operations Reference doc. Sorry about that. PBN/A1L1B1C1D1O1S2T1 M-SBDE1E2E3FGHIJ1J4J5J7M3RWXYZ/LB1V1D13 points
-
Great work on this plane - I am loving it. As a primary VR flyer, I wanted to give my feedback on my experience so far (I know there have been other threads, but they are closed before others can give feedback - understandably to keep them under control). I think the VR experience for a day-one release is fantastic. No issues with flying the plane. My only feedback would be: 1. The ability to communicate with the fuel truck, ramp worker, and use the cell phone inside VR (make the menus similar to the study menus that are usable in VR). This would only apply once inside the cockpit. 2. Several 3-way test rocker switches do not centre in VR. I *think* this might be an X-Plane VR controller limitation and not an issue with the plane. 3. Limit the knob rotation sensitivity (although this is something a user can easily accomplish to their own liking in VR config) In terms of movement inside the aircraft - for me it's not as huge a deal. Yes, VR hotspots would be appreciated (maybe even just one near the door so that it can be closed without having to leave VR). Again, just some items to add somewhere on a future to-do list. Nothing mission critical or immersion-breaking. This plane handles great in VR (the HUD is fantastic!) and I am having lots of fun. Thanks again for all of your hard work.2 points
-
To set the park brake you need to have hydraulic pressure (Pump 3A on). Then hold the toe brakes, and set the parking brake while holding the toe brakes. If you simply apply the park brake, there will be no braking effect, and Jenny won't be happy you messed up her ramp when the chocks are removed.2 points
-
Hey, If you're getting "Check APT OAT" somepoint towards the end of your flight, then that's prompting you to enter the airport OAT for temperature compensation, should you wish to use it. On the CDU, it's on the Index Page 2, on the LSK 5 R "Temp Comp". When you go into this, you can just turn it off, so it stops nagging you for that flight by clicking "Temp Comp On/Off" under LSK 4 R, or you can enter the airport OAT under LSK 2 R to get temperature compensated altitudes. Edit: Link to Totoritko talking about temperature compensation during one of the release streams (timestamped to 58 mins 34 seconds)2 points
-
I have a really big issue with my NWS. After I remove the chocks, and before I even give thrust to move forward at all, the nose wheel turns 90 to the right. At this point in time I had the NOSE STEER armed per the checklist. I turned the NOSE STEER off and taxied by only using differential brakes, this was mildly inconvenient. I thought the issue would go away when I reloaded the game and plane. Do my disbelief, the issue still persisted. I then completed a flight, thinking that the issue would somehow resolve itself in flight, it did not. I landed the plane with NOSE STEER ARMED, as prescribed in the checklist, and about 2000 ft after landing roll the nose gear flung 90 degrees to the right and left me in the grass scratching my head. I proceeded to look from an external view of this issue and the gear is clipping through itself basically being stuck to the right. Sorry for the long explanation of my problem, I hope there is a fix to this or I'm just simply missing a step somewhere!2 points
-
Can get pretty bad for me - https://streamable.com/zqew7o I really hope AMD get to fixing this... I have sent them a support request. I am on the latest AMD drivers, on the RX 580.2 points
-
Hopefully this will help next time2 points
-
A paint kit will be made available, yes. I don't have a timing for that, but I'd suggest you're looking at days, not weeks.2 points
-
The avionics will look at the X-Plane Date, when checking nav data validity. If you regularly load X-Plane to a date or month that's different to the nav data you have, then look for this option in the Challenger 650 menu, User Settings, Miscellaneous. This will force the avionics to compare nav data with the real date, not the X-Plane date.
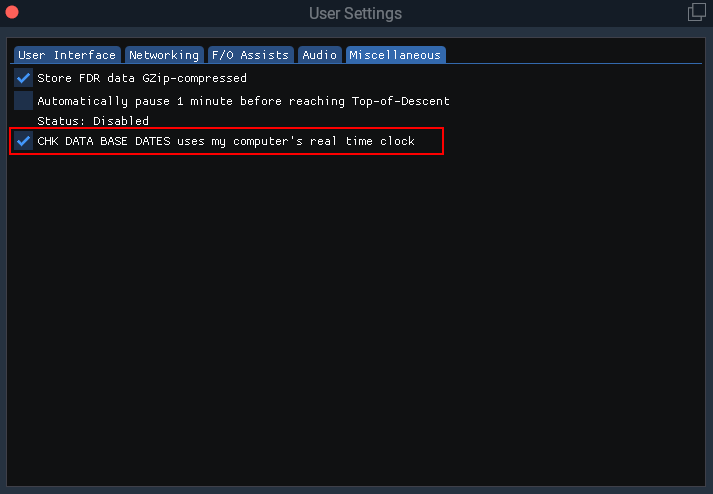 2 points
 -
To avoid this: Do not use groundspeed acceleration Do not drag the airplane around using the map after the avionics is powered on To reset alignment on the IRSes, we need to use a debug menu. Select Challenger 650 > Study > INS > Realign IRUs Immediately and confirm:
 1 point
 -
If you are seeing this message, the most likely reason is you attempted a flight plan fetch from simbrief, but didn't enter a valid simbrief ID in User Settings. To correct this, log onto Simbrief and grab the number from this data field: Enter that number into X-Plane under Challenger 650 > User Settings > Networking > Simbrief Pilot ID. This should take care of the issue.1 point
-
Some internal and external elements flicker on AMD Cards when running Vulkan, dropping back to OpenGL is not really a solution because AMD does not bother to optimise for OpenGL anymore, so performance suffers massively While I know this is technically AMD's problem, it feels like I've basically thrown $115 into the bin, is there maybe anyway I could get a refund or could you fix this issue like FJS did for their Q4XP in update 1.13 Thanks.1 point
-
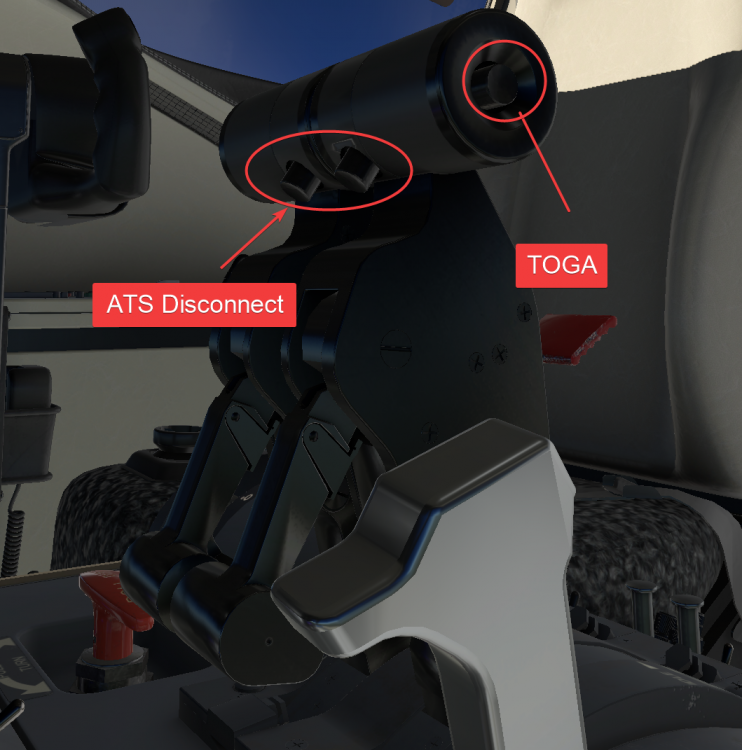
Ok, why do i get a flashing ATS Fail? As soon as i power the aircraft it start flashing FAIL and it wont stop. Been watching youtube for 4 hours now and not even once that thing flash Fail, it just a black panel until he clicks TOGA and it shows N1 TO, but not for me.1 point
-
I'm getting an FPS drop/stutter every time I switch views, cockpit to 'circle' view, and vice-versa.1 point
-
Hey guys, At random times everything seems to go a bit crazy and I go from 40 fps down to 20 and everything slows down. It seems to be completely random, I cant find a common situation between all the times it has happened. I know some others were having similar issues. Interested to see if anyone can help! Update: Its something to do with Gizmo and I believe X-aviation, seems to be some sort of issue there where Gizmo is using more than the actual Challenger
 1 point
 -
Yes once it has an almanac downloaded it will keep it until it can replace it.1 point
-
The system is on by default because a lot of the advanced features like SBAS / Baro VNAV approach selection only make sense with the temperature effects, and this feature set would be rendered useless with the atmosphere simulation off. There may be some changes possible to inhibit altimetry changes when in-flight to deal with the vatsim disconnect case, I'll ask the devs to look at that as a possibility such that once you're airborne, you don't get atmosphere changes.1 point
-
Yea, I get that for career. But I'm talking non-persistence. In that mode that logic goes out the window, even just disabling whatever is forcing overwriting default xplane fuel so you can select whatever you want.1 point
-
Solved on discord, the OAT needs to be entered on the TEMP COMP page on page 2 of the index1 point
-
Yes I followed that discussion on discord. It's just that there needs to be a general random failure trigger of some sort with mean time, which I was trying to accomplish this way; I think something like PMDG or FSLABS did (1 random failure every ~10h, if you wish so) would be a popular feature here, it greatly increases immersion if you have a reason to do checklists and watch the engines & co. during cruise. I understand the reason with training, but there is no sense in training if the situation can never occur outside of the training (well, unless you are a real 650 pilot). But I did not want to engage into that discussion here, so thank you for your feedback.1 point
-
You can set the descent angle in degrees. It's on VNAV Setup under the PERF index. For climb it's normal to climb in FLC mode and 250 kts. Check the operations reference included in the documentation for other climb information.
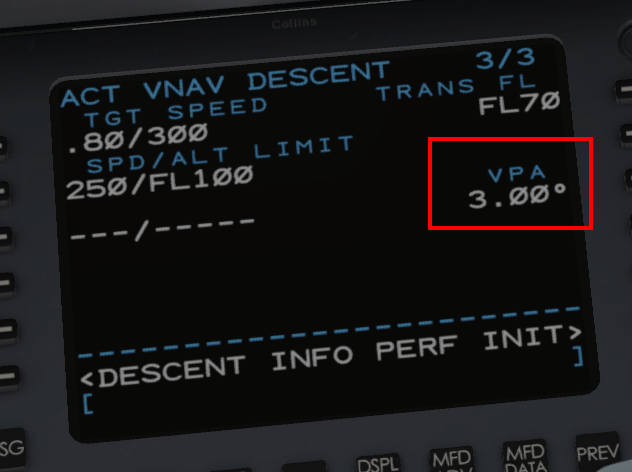 1 point
 -
Press the ATS button on dash @chroode1 point
-
I agree with that, the throttle handlind in VR deserves a bit more love As @JC_YYZ mentioned with point 3 - most rotation knobs are for me waaay to sensitive, especially dialing things on PFD/MFD (settings) is currently somewhat painfull. In addition, it seems there is currently no way to get the interactive checklist in VR? Or am I somewhat blind? Also currently only the "Ergonomic Yoke" mode seems to be included, not the realistic one which would improve the overall experience imo. Also the Chart zooming does not seems to work in VR currently if I got it right. Interstellar job guys, congrats, wow!1 point
-
Hi Chroode, Here's the buttons
 1 point
 -
To add to this one other major thing I ran into was that there's no combined throttle manipulator and they'd immediately snap back to idle upon releasing them. Also there were a couple three way switches that did work, just mostly the testing related ones that did not.1 point
-
All known issues. Thanks for pointing them out though.1 point
-
Sorry to hear that @chroode. Welcome to X-Pilot!1 point
-
Hey Kari, If you open up one of the CDUs, then click on the "DSPL MENU" softkeys above the letter and number softkeys, then in the bottom right "SIDE L/R" select which MFD you want to manipulate, then on the bottom left "WINDOW OFF/ON/VNAV" you can toggle through these.
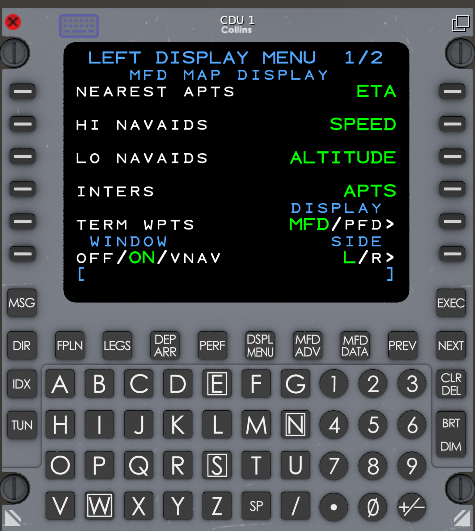 1 point
 -
Hey, When you say "tried activating it for the TO roll", what did you do? (Advance the throttles forward, pushed a button, etc) As for being unable to use vnav speeds (I believe it's worded something like "Resume xxx kts speed", make sure you've got VNAV mode selected. In Graeme's pre-release stream, he framed it in the following way that helped me understand it better. In the Challenger, VNAV is just a modifier, it's not a vertical navigation mode on it's own. You'll want to use one of the modes such as FLC, VS, PATH Activating VNAV whilst any of those are active, will then make them VNAV compliant (my wording), so they will ahdere to any constraints set. It'll also chenge their indication slightly, to show you that they are using the VNAV information E.g. FLC will turn into VFLC Path to VPath1 point
-
Don't know if this helps, but here is a pic of the gear everytime I load into it fresh and even when I park it while its straight, It locks to the left.
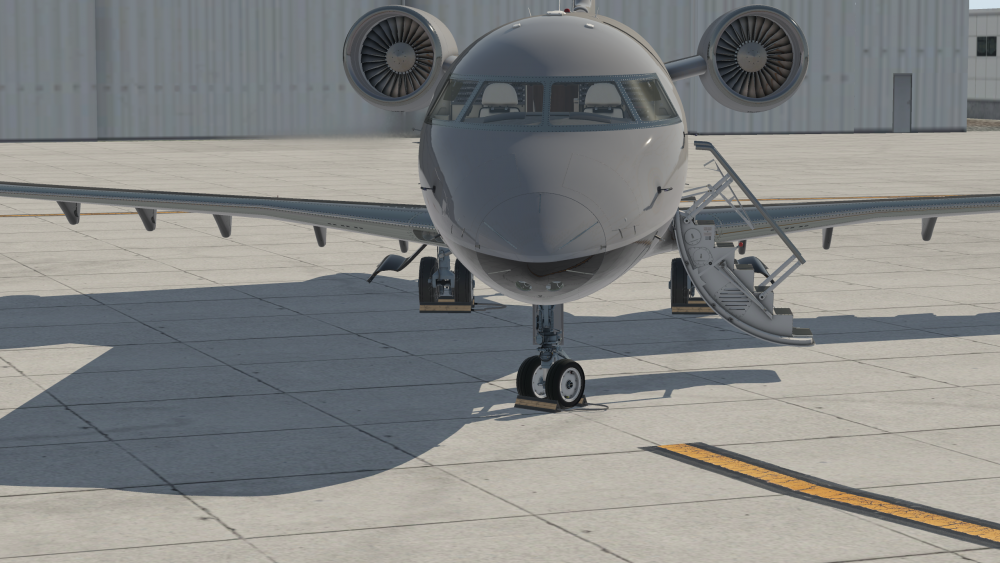 1 point
 -
No worries, I totally understand. Doing a manual install of the data has resolved the issue. And in-case anyone else stumbles across this post with the same issue, you'll be glad to hear it's a nice and easy drag and drop into X-Plane 11\Custom Data to manually update the airac.1 point
-
Not sure, but the issue is the XP data isn't updated to the latest cycle, so more of a Navigraph thing than a Challenger thing. I tend to download the navdata manually from Navigraph, maybe worth trying to see if that gets the latest version for you.1 point
-
Once you've got the engines running once, go to Airframe Manager and save a state "Engines Running". You can then reload that at any point. You can also load it without selecting "Restore Position and Trajectory" and you can start that Engines Running state anywhere. It's a slightly DIY approach to an ready to go state, but as so much of the avionics are set to your personal preference it's probably better to have a one-time setup like this than have something fixed and unchangeable for a state. Hope this helps for now. Having some ready to go states in the non-career mode is something the testing team have requested too - the hope is the developers will be able to get a feel for how people are using this feature in the first few weeks, and decide how best to proceed. A bit more info about state saving here:1 point
-
Thanks, think it's down to winds combined with the flaky vnav - using the banana and vs to get down now1 point
-
Nothing to add on the report, but when testing it there were quite a few times when, during the problem solving process, we realised we were diagnosing the issues like we would with a real aircraft. Looking at reversion options etc. It really shows the value of the coding approach taking with this aircraft.1 point
-
Excellent report, TVM. Will check and report further.1 point
-
Thanks for the report. Will check that out and make sure it's added to the fix list if we can replicate. Glad to see somebody using the hint images ;-)1 point
-
Those are not currently available to X-Plane. I’ll pass on the interest to the developers.1 point
-
The aircraft is perfectly flyable using VR. It's not made to work well inside the FBO.1 point
-
When the APU encounters a fault, you'll need to hop out of the plane and reset the APU ECU to clear the fault. Go to the tail of the aircraft near the cargo door, pop the latches and pull the little door open under the left engine nacelle: Inside you'll find a panel with 3 buttons. Push the "RESET" button, close it up and you should be good:
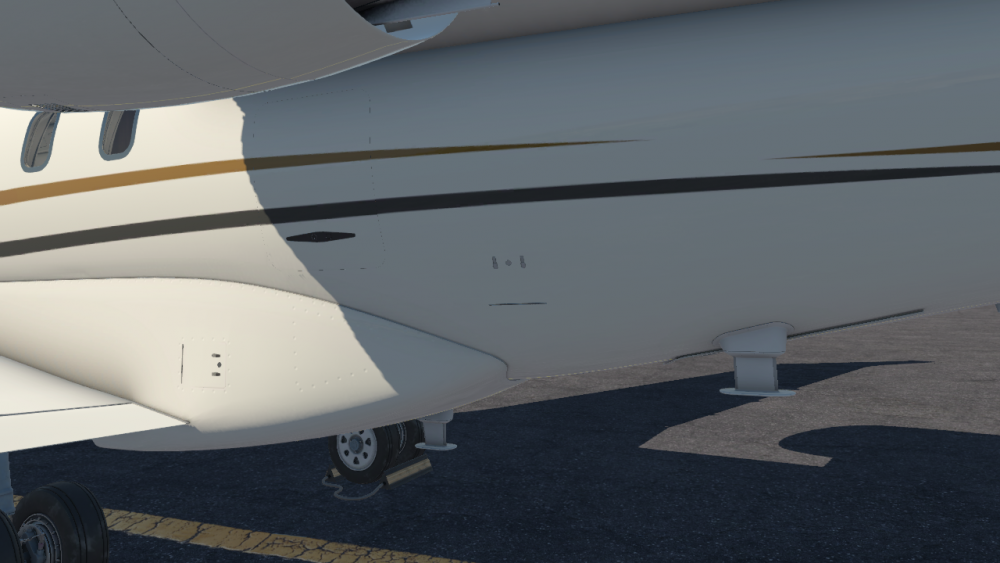
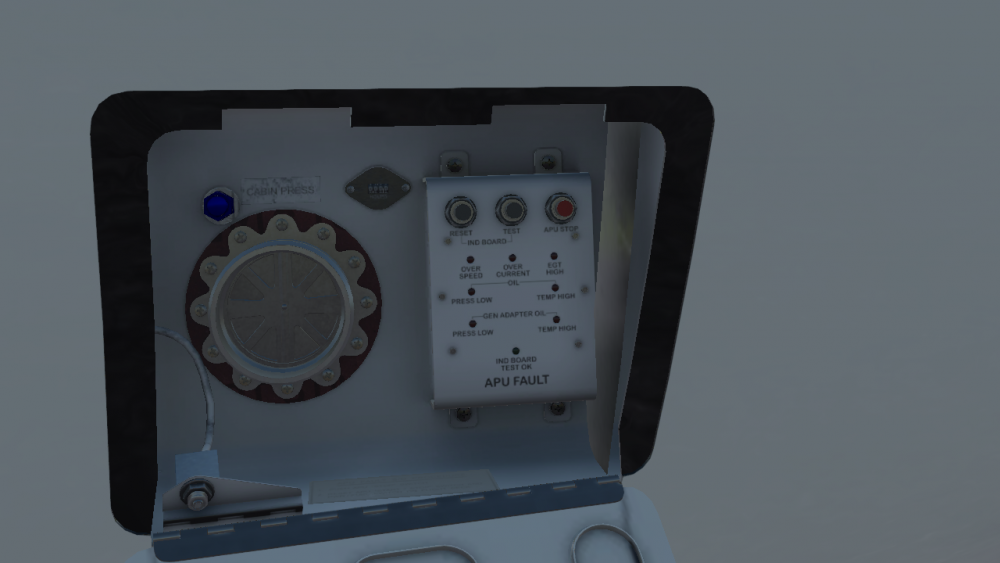 1 point
 -
Use the stock xplane autopilot commands, those will work with the CL650. The challenger keybinds do not repeat on hold. The challenger 650 keybinds are designed to work with rotary encoders and the default X-Plane commands allow for the repeat on keypress.1 point
-
Ok, I redid this checklist item and it's indeed On - or Auto, but a bit mumbled Thanks!1 point
-
Done and thanks for the quick response. I actually didn't have anything installed, so I installed the TBM and all is good now. Cheers, Len1 point
-
I'm afraid not. It has been designed as a real world, wear and tear add on. But look on the bright side. Eventually, you'll get much better at your landings.1 point
-
1 point


.jpg.1600f10bffe8ae9e33c40b8296326e0b.jpg)