Leaderboard

.thumb.jpg.ede78836fe6795baf7b91e5eb2aad35e.jpg)


Popular Content
Showing content with the highest reputation on 01/25/2022 in all areas
-
Hi all I made a vSpeed callout LUA-script for the HotStart Challenger 650 if anyone are interested. It requires HotStart Challenger 650 v1.2 or higher. Take a look here:5 points
-
Just updated to fix some issues - included a readme and updated the PDFs. Hope it helps2 points
-
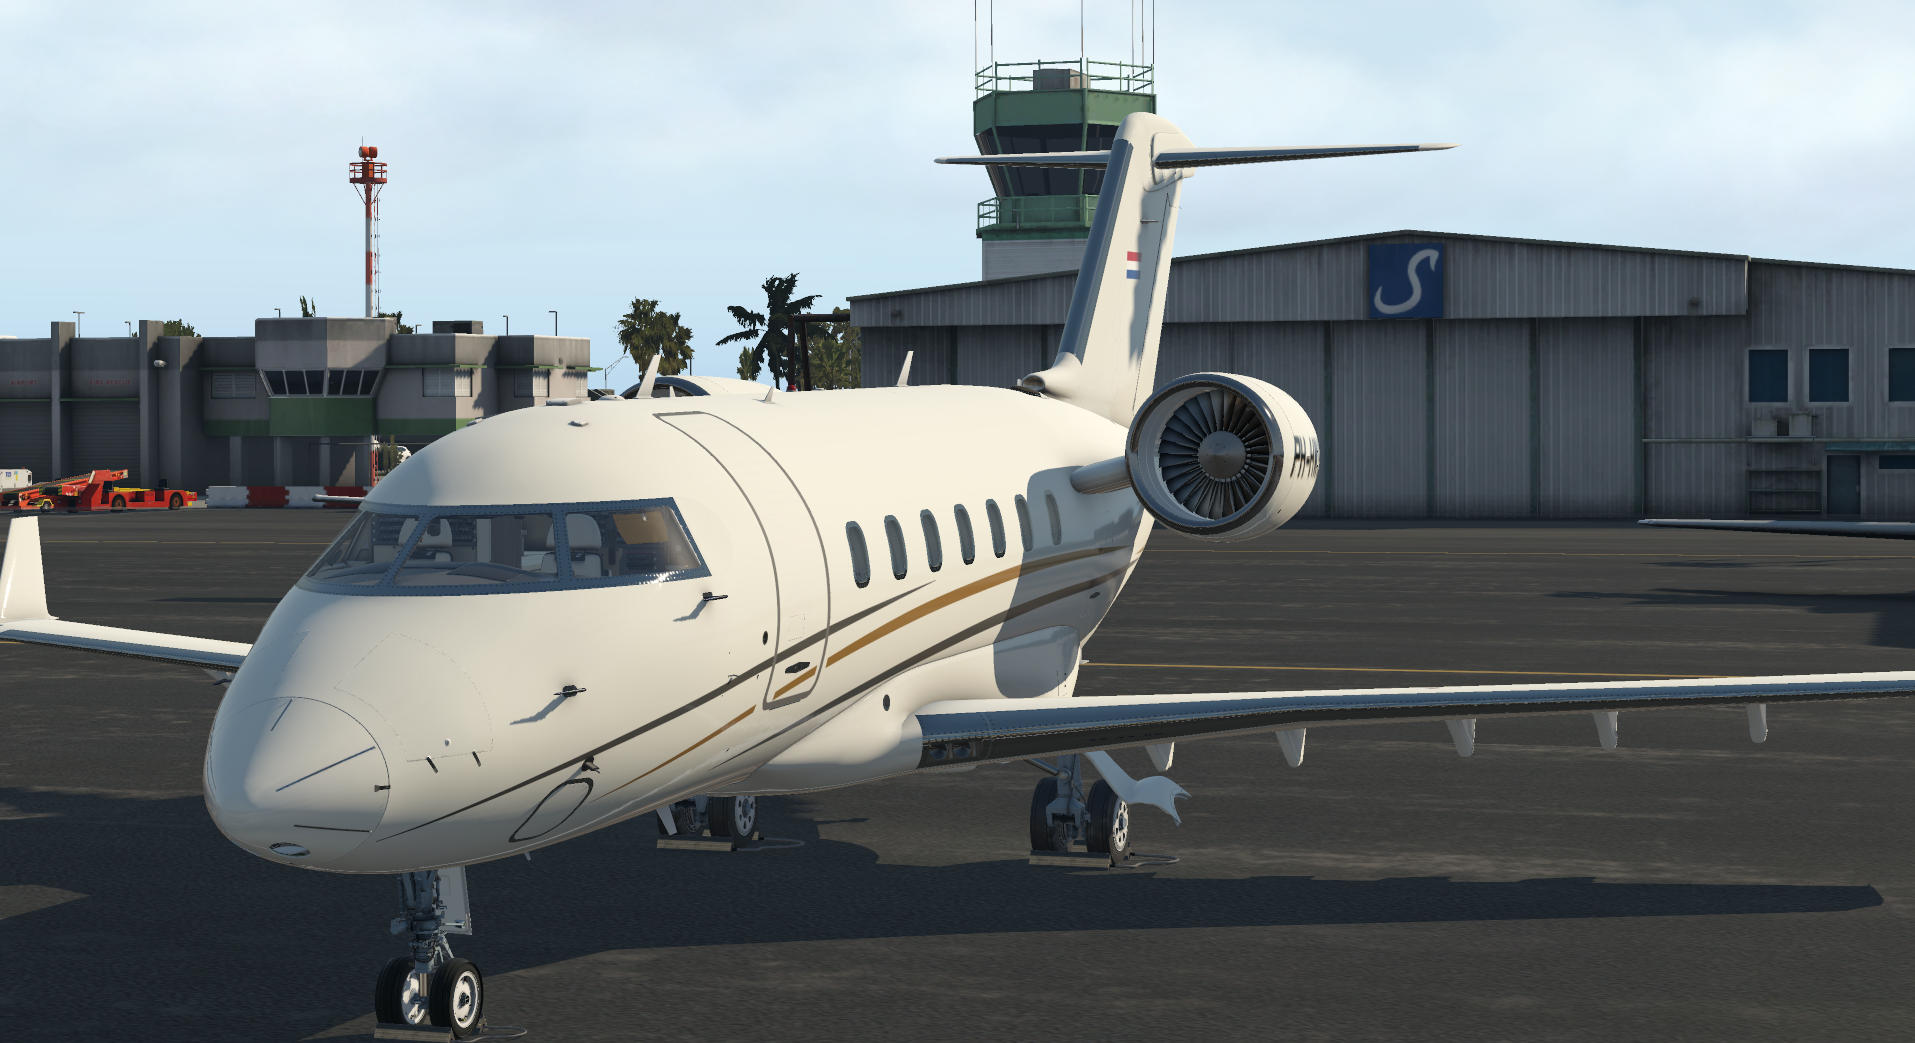
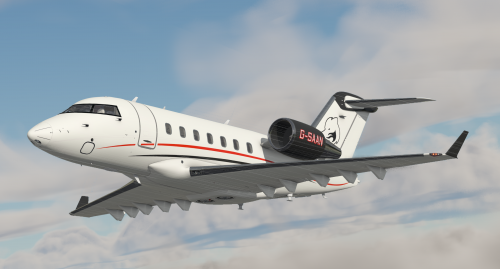
The Challenger can be hard work on the approach and landing, but when it all comes together it's very rewarding. All the beta testers had difficulty learning how to land, it's all part of the fun. On approach be aware that unlike aircraft like the 737, the pitch response to power is reversed, that means a power increase will see the aircraft pitch down for a moment. This can lead to an oscillation developing, so be sure to fly the pitch attitude accurately. If you find you're wobbling up and down, aim to make smooth power changes, and remember the HUD flight path vector is useful tool, but can get you into trouble too. A useful check is 0.6 on the AoA index on approach. If it's higher than that, you're too slow. Remember Vref +5, and check your weights on the approach ref page. For the landing flare, lift the nose to to arrest the rate of descent, starting at just below 40 ft. Make a smooth power reduction and fly the aircraft onto the runway. The pitch attitude in the flare is around 3 degrees, but look at the end of the runway, not the HUD! You'll have plenty of time for butter later, so for now put the aircraft down positively in the touchdown zone. If you go butter hunting, you'll only find little bounces - ask me how I know! Once you've landed, extend the flight spoilers (the ground spoilers are automatic, but the flight spoilers need to be raised by pulling the lever), use the reversers and you're down. And stay away from that HLIS button, it'll trick you into making your landings worse!1 point
-
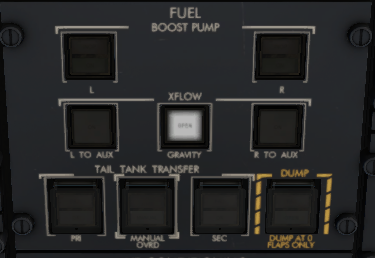
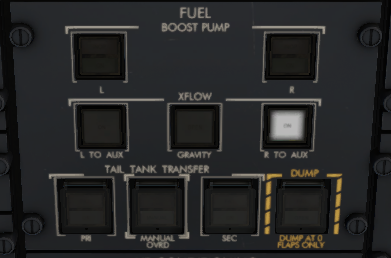
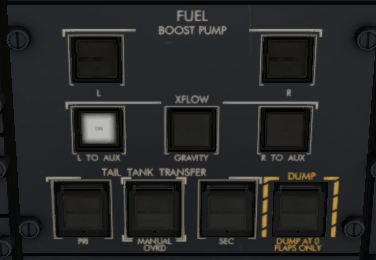
Reference material - https://www.smartcockpit.com/docs/CL605-FUEL_SYSTEM.pdf Page: 16 Fuel tanks are expected to be within 400 lbs / 181 kgs of each other on taxi / takeoff / landing OR 800 lbs / 362 kgs during flight, to avoid Fuel Imbalance EICAS message. First, orient yourself on the overhead panel, we'll be working in the 2nd row (or middle row) of the FUEL panel area. (Fuel.PNG) All three of these buttons should be extinguished under normal operations. Gravity XFLOW Press to begin the process, there's a 1 second delay after pushing the button for it to illuminate OPEN. This will allow fuel to flow freely between both main (wing-based) tanks. There is no EICAS notification that this is open/occurring. (gravity.png) To observe what's happening in the sim. You can go to the Challenger 650 menu -> Study -> Engines -> Fuel System... You'll notice that whatever Main Tank (either Left or Right) has more fuel that this will continue to consume, whereas the side with less fuel will not. Thus balancing the tanks. L (R) to AUX XFLOW Press the appropriate button to begin the process, there's a 1 second delay after pushing the button for it to illuminate ON. This will remove fuel from whatever side is select and transfer it to the auxiliary tank. Determine which tank has more weight in fuel Left side? Choose L to AUX (L to AUX.png) Right side? Choose R to AUX (R to AUX.png) There is a lock out mechanism that does not allow you to press the opposite button when one is already selected. Pressing L to AUX, for example, then pressing R to AUX, will no longer illuminate the L to AUX button. Pressing the R to AUX button again will resume the L to AUX transfer and the button will illuminate ON again. Once you're done balancing the tank, make sure to deselect the previously selected L (R) to AUX button. The aircraft will now suspend fuel consumption from the two main tanks and pull from the AUX tank until depleted. *Edit* Thanks! @airforce2 As long as a main tank is below 93% full, the aux tank feeds the main tank to maintain the level at 93%. Once a main drops to 93%, the main quantity will remain constant and the aux level will drop. It will appear that the engines are burning from the aux tank, but in reality the engines are burning from the mains and that fuel is being simultaneously replaced in the main tank from the aux tank ejector xfer pumps. To observe what's happening in the sim. You can go to the Challenger 650 menu -> Study -> Engines -> Fuel System... Note: The plane will display an EICAS warning message: FUEL XFLOW SOV OPEN if either button is ON for more than 50 seconds and the tanks are balanced within 100 lbs.

 1 point
 -
The Challenger has very good takeoff performance, so everything happens quickly. For the first few flights a heavier weight can help keep things in check. One of the key differences between A320/737 aircraft and the Challenger is there is no speed reference system on the Challenger. Instead the flight directors will give a fixed pitch target when pressing the TOGA buttons. Following the guidance from our subject matter experts, and adapting it for use in the simulation, we've got two easy ways to manage the initial climb, which can be remember as Pitch/Sync and FLC. Try both and see what works for you. Pitch / Sync: Takeoff and follow the initial flight director pitch target. Accelerate in the initial climb maintaining that pitch, retract the flaps at VFTO+5 then at a safe altitude hold the “Sync” button and lower the nose to about 10 degrees to start accelerating. If using autothrust it can be set to maintain a suitable speed, but your primary control is pitch, which can be adjusted easily by holding sync and flying the aircraft to the new pitch attitude. FLC: Takeoff and aim for the initial pitch target before selecting FLC mode to capture a speed of roughly V2 +20. At most weights this will result in a very steep climbout. At a safe altitude, increase the speed to lower the nose then retract the flaps at VFTO+5 A hybrid approach may be useful - remember unlike an airliner the Challenger has seats facing sideways - so while a space rocket climb profile can be fun, it’s unlikely to get repeat business for your VIP transport business.1 point
-
Version 1.0.0
205 downloads
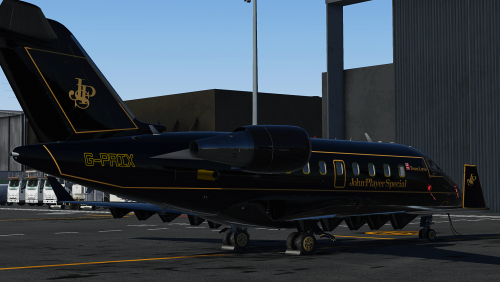
Classic Lotus livery inspired. Fictional for the challenger, but did exist. Still adding and refining.1 point -
Hello, I am having an issue getting a few commands bound to buttons on my Honeycomb Alpha and Bravo using the configurator, specifically autopilot disconnect and TOGA. Both buttons are causing the same problem: When I bind them in the configurator and load the profile, pressing the button does nothing. Using datareftools I am able to see that the command is being actuated, but the button in the cockpit doesn't depress and the relevant action does not work. Binding these commands through the X-Plane 11 settings menu works fine, but I am trying to avoid that route. These are the commands that I am using: CL650/contwheel/0/ap_disc and CL650/pedestal/throttle/toga_L I have also attempted to set the dataref for TOGA: CL650/pedestal/throttle/toga_L_value to 1, but when I load the bindings I get an error message that reads: "This profile contains "CL650/pedestal/throttle/toga_L_value" with value "1" which does not seem to be a writeable variable for this aircraft. It will be discarded." Any help would be appreciated, thanks.1 point
-
The CL650 automatically selects Experimental Flight Model - you don't need to do anything with X-Plane settings.1 point
-
Version 1.0.1
333 downloads
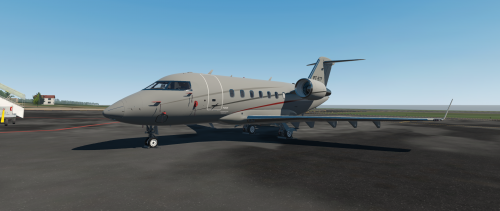
TropicAir livery for the Challenger 650 by HotStart.1 point -
For me what is still needed to fly in VR like I can the TBM is for the popup panels to work in VR just like they do in 2d. Second is for the throttles to work like the default C90B or the 737-800 do in VR.1 point
-
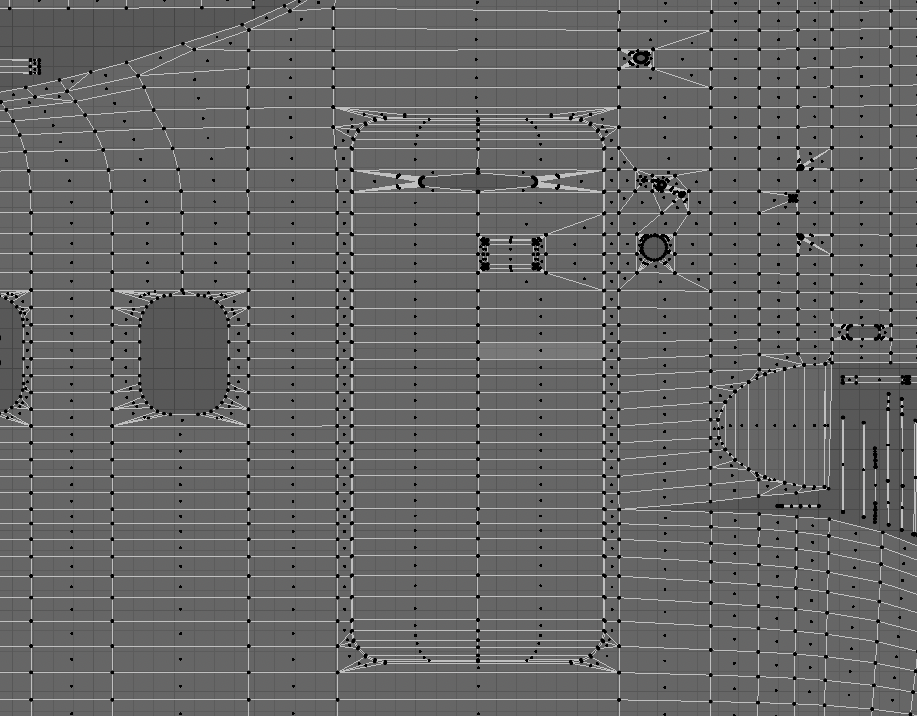
Yes, I know. But the flap was incorrect, so it had to be re-cut. However, the overall UV island for the Fuselage_Front has not moved. The cut is different, but the cut was made on a different part of the UV map. It is impossible to adjust without compromising the entire map, and that will ruin the whole paint. If you have some vector graphics overlayed on the UV map to make the paint, all you need to do is re-open the PSD (assuming you're using Photoshop) and re-align what you created. Below is a screenshot of the door UV island (upside down), and you can see the flap. The adjustment is definitely possible, and if you wish, attach a copy of the PSD and I'm happy to adjust it for you. It will take me a few seconds. I'm afraid I missed it in discord. But again, I haven't touched that UV island in months. Looking at it, sure, I can see it's upside down, I'm happy to rotate it 180 degrees. If you want me to do this for the next update, consider it done. The alternative is if you just rotate that part of the texture by 180 degrees. I'll leave that one up to you. No issue if you want me to rotate the UV island. That isn't possible (kind of). If I align it with the base mesh, then I'll have to overlay that UV island over the rear fuselage UV island, which means doubled up textures. The APU exhaust shield needs to be it's own UV island. I did make sure the texel density for the APU exhaust shield matches the fuselage, so the resolution will be consistent throughout the whole paint. Below is the UV island location for the APU shield. Hope this helps. Regardless of all this, a paintkit is coming very soon. Hopefully tonight.
 1 point
 -
Exactly, and you can see that in the FMAs! VFLC / FLC / VVS / VS. Even VALT indicates ALT with VNav so it will capture VPATH.1 point
-
Hi Cameron, I just released the new version 0.62 which includes support for macOS.1 point
-
Very nice livery! Could you make a variant without the registration in the cockpit?1 point
-
I want to thank the whole team for doing such a good job on this aircraft. You have pushed the simulation very high, the FBO is brilliant, the plane very beautiful, the systems are of a realism that I have never seen before, the excellent audio quality, the study side very well done, the humor of the door is a plus that I love... In short, I will not stop complimenting the quality of this work. I recommend it to all my subscribers and I even call it my precious Thanks again Best regards1 point
-
I agree and have already said it in another post, This is fantastic! Truly the best purchase I have made and I have tons. I am really truly impressed. I have the TBM-900 and didn't believe it could ever get better but I was proven wrong. I find myself always using the Planes bought from X-Aviation the most. The IXEG , TBM, and now this one are pretty much all I continue to fly. I am really impressed as well with the quickness of the updates coming out. Just wait till Grame comes out with all the Videos he has in store for this Plane. I'm sure there is plenty I will learn about it.1 point
-
Here's the route that I used, as requested by Pilsner: NZAA 05R PAGL3Q KARRL Y506 SILVO Y506 TPAPA TPAP1D NZWN 161 point
-
View File Hot start Challenger 650 - Lotus Livery (John Player) Classic Lotus livery inspired. Fictional for the challenger, but did exist. Still adding and refining. Submitter maxrank Submitted 01/24/2022 Category Hot Start Challenger 650 Livery For https://www.x-aviation.com/catalog/product_info.php/take-command-hot-start-challenger-650-p-2121 point
-
Good eye. Fixed.1 point
-
There is nothing behind there at this time. An equipment maintenance section will be made. Good eye. Fixed. Nothing we can do about that. That's X-Planes reflection rendering. It's the same reason we can't make the interior a high gloss finish. It'll reflect everything in the cockpit.1 point
-
The rotation of the nose gear doors was changed, but the hinges were on a different object. They were fixed at the same time as the doors, but not pushed through. (Blame that on me and working on it at 2am). At the latest, the fix will be issued with the next update. However, I'll ask Cameron about sending out an interim update. Apologies.1 point
-
Understand. Thank you very much for your cooperation. As soon as I get a new CTD, I will send you the full log. By the way, it is a superb aircraft.1 point
-
Yes indeed! Option A: VGP and chill Option B: VS and follow the chart1 point
-
Version 1.0.0
134 downloads
This livery does use parts of the default livery, specifically the 2 lines on the fuselage in order to make it easier without a paintkit Since some people have asked for me to upload it, here it is! For me it's basically as if I had my own CL650 irl, but in sim. You can use it however you want to!1 point -
View File Ambulanzjet Challenger 650 | Rega Challenger 650 from REGA - Swiss Air Ambulance STILL A WORK IN PROGRES! Submitter killerbee123 Submitted 01/22/2022 Category Hot Start Challenger 650 Livery For https://www.x-aviation.com/catalog/product_info.php/take-command-hot-start-challenger-650-p-2121 point
-
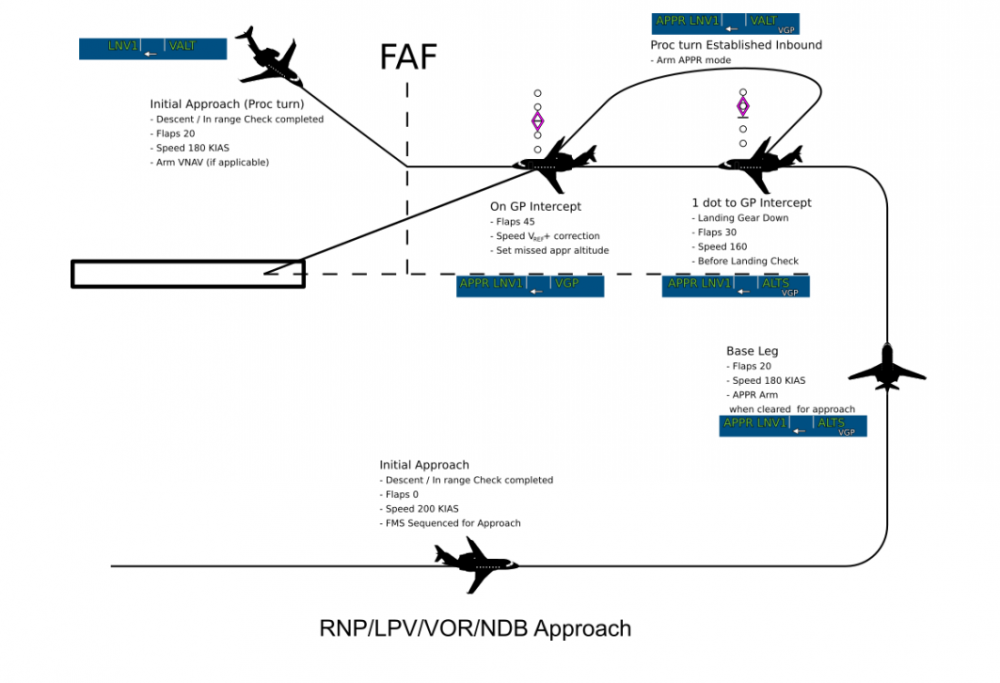
You can't follow a vertical path automatically when in VOR (green needles) mode. You have to select VS and fly the profile from the chart. The alternative is to treat it like an RNP approach: Check the database coding to make sure the track and descent angle are as per the chart. Tune the VOR, and display the VOR needle using BRG SRC on the DCP. This is to allow monitoring. Leave the navigation in FMS mode - magenta needles. Fly the approach with APPR mode, you should have APPR LNV1 and VGP / GP FMAs. This is shown in the Operations Reference pdf, included in the Documentation folder.
 1 point
 -
Thanks guys, any idea on finding out the correct T/O trim?1 point
-
As far as I know, you don't engage autopilot on the runway, it's a bad idea usually for a number of reasons - I'll attempt to explain why. What I do (and I may not have that completely right and there are variations on the theme here) is before you enter the runway set the heading bug to the runway heading (should be aligned with the runway) and arm the heading pressing HDG. Verify your speed bug is set to VREF+20 (can be different with airline procedures), alt armed to the desired initial climb set by ATC as part of your clearance, or your charts if not in controlled space. You have to follow the departure chart because it keeps you safe and out of the way of other traffic. Double check the MFD for any configuration warnings (should say TO configuration ok - if not - such as spoilers, yaw damper, etc... it will tell you what's missing) - double check your flaps. Press the TOGA button on the throttle the PFD should say "TO/TO" in green. Usually you do all that before you enter the runway so you're ready to go. In the US you confirm you have received your takeoff clearance by turning your strobes on which tells the tower (and also tells other aircraft in the vicinity) visually you are starting your takeoff roll. Then with toe brakes on you advance the throttles to 50% to verify engines stabilized so you don't have to slam on the brakes if something goes sideways, then release brakes and advance to take off max or press the ATS button that should read N1 TO. The flight crew operation manual says ATS should engage automatically at 75% or so but I've not seen that in the 650 so I just press it. Rotate at VR and once positive climb verified, retract the gear, by that time tower will give you a heading to follow after your initial turn instructions and you can engage autopilot 1,000 feet above the runway (or more) one the plane is stable in climb. Because you are in HDG mode you will follow runway heading and can quickly turn to any heading specified by ATC. Usually ATC will give you a turn instruction on take-off (left or right), and/or a specific heading to follow immediately after tower hands you over to the departure controller so LNAV is usually not the first mode you're in as you will be vectored by the departure controller until you are allowed to resume your own navigation. Thus HDG mode is what you want. For vertical you probably want VS mode too as FLC mode is typically too agressive for your passengers and you want comfortable transitions and small g forces, not fighter jet behaviors. I also found in controlled space your chart says one thing, but ATC may tell you something different so FMS legs initially aren't followed that closely. Remember that you are not alone in the sky - which is hard in x-plane I know without a traffic add-on and ATC. If you ever fly online on VATSIM or pilot's edge - you'll quickly get what works and what doesn't.1 point
-
Hi. I've been setting up the annunciator panel on my HC Bravo. Most of it is fairly straight forward, and some points are a bit finnicky. But i haven't been able to find dataref's that'll work satisfactory with the 'low fuel pressure' and 'low hyd pressure' indicators. So if possible, I kindly request if the following EICAS messages could be added to the datarefs (like =1 for active message, and =0 for inactive) in the future: - L Fuel Lo Press - R Fuel Lo Press - Hyd 1 Lo Press - Hyd 2 Lo Press - Hyd 3 Lo Press And if you'd get bored (highly likely) a ref for the engine oil pressures would be nice. The standard refs from x-plane do work and i can get a fairly close match between the EICAS amber field and the Bravo annunciator. But it would be nice to have a ref that is scaled to what we see in the EICAS.1 point
-
Having datarefs for each CAS message may be possible. I’ll enquire.1 point
-
Engine pylon is mounted a bit high on the fuselage IRL they are more in line with the cabin windows
 1 point
 -
View File Hot Start - Challenger 650 - TropicAir(PT-STP) Livery TropicAir livery for the Challenger 650 by HotStart. Submitter Victor_Tango_Mike Submitted 01/10/2022 Category Hot Start Challenger 650 Livery For https://www.x-aviation.com/catalog/product_info.php/take-command-hot-start-challenger-650-p-212?osCsid=redmukm7he79lo2ou63juv11s11 point
-
Are there any CG tables with TRIM values released yet?1 point