
Leaderboard


Popular Content
Showing content with the highest reputation on 10/06/2022 in all areas
-
The Challenger can be hard work on the approach and landing, but when it all comes together it's very rewarding. All the beta testers had difficulty learning how to land, it's all part of the fun. On approach be aware that unlike aircraft like the 737, the pitch response to power is reversed, that means a power increase will see the aircraft pitch down for a moment. This can lead to an oscillation developing, so be sure to fly the pitch attitude accurately. If you find you're wobbling up and down, aim to make smooth power changes, and remember the HUD flight path vector is useful tool, but can get you into trouble too. A useful check is 0.6 on the AoA index on approach. If it's higher than that, you're too slow. Remember Vref +5, and check your weights on the approach ref page. For the landing flare, lift the nose to to arrest the rate of descent, starting at just below 40 ft. Make a smooth power reduction and fly the aircraft onto the runway. The pitch attitude in the flare is around 3 degrees, but look at the end of the runway, not the HUD! You'll have plenty of time for butter later, so for now put the aircraft down positively in the touchdown zone. If you go butter hunting, you'll only find little bounces - ask me how I know! Once you've landed, extend the flight spoilers (the ground spoilers are automatic, but the flight spoilers need to be raised by pulling the lever), use the reversers and you're down. And stay away from that HLIS button, it'll trick you into making your landings worse!1 point
-
So, with a beta key, you will be able to join the cl650-beta-team chat room of Discord, and report the bugs here.1 point
-
I have not heard about using the WX radar, and it never occurred to me to de-pressurize the aircraft and use the cabin altitude for aircraft altitude. I'm going to keep that one in my bag of tricks to freak out the sim instructor at my next proficiency check! Thanks! Rich Boll1 point
-
There are definitely changes for V12 I have yet to address. I have already rolled into the obvious ones, like the rain effects and lighting changes, but the flight model is changed in V12 significantly as are the gyro behaviors...among other things. I'm moving through the port though...its definitely one of the bigger transitions compared to X-Plane versions past, but we're moving through it. -TK1 point
-
Thank you for another update of my favorite plane ... I am still waiting for the sound of opening the locker with the key / headphones . And I still think (and not only me) that the speed of the taxi is a bit too low PS Another nice video from real MU2. Set the movie to 17:55. For me, with this configuration of throttle and condition levers, the plane would not move at all. https://www.youtube.com/watch?v=YomFMUyPofY ;-)1 point
-
KirkR, Many thanks for your response. This is a very good creation. Support is excellent. Sharing of info on the forum is great - respectful, just nice helpful people. So glad I dusted off the credit card finally and bought it. Retired pilot so I'm really getting into this machine. All the best, Dave1 point
-
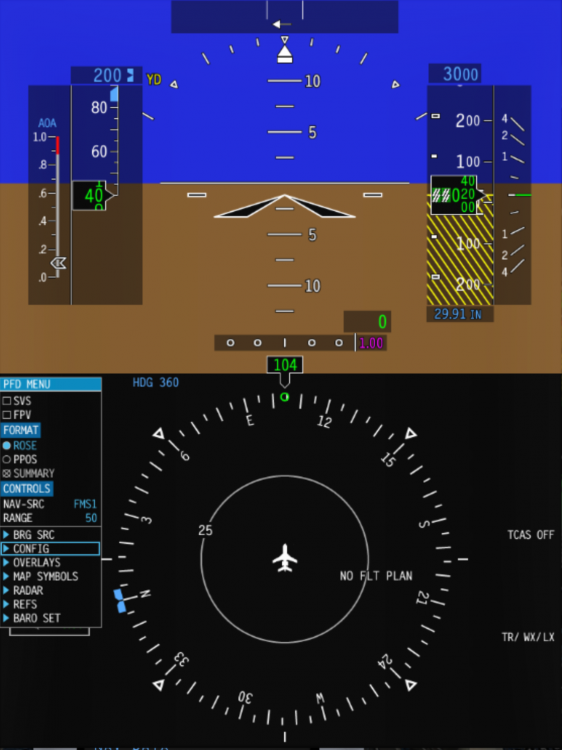
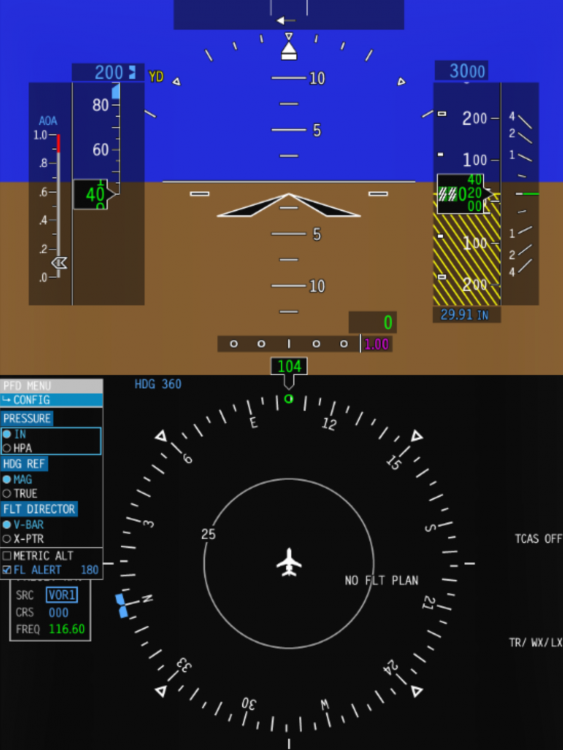
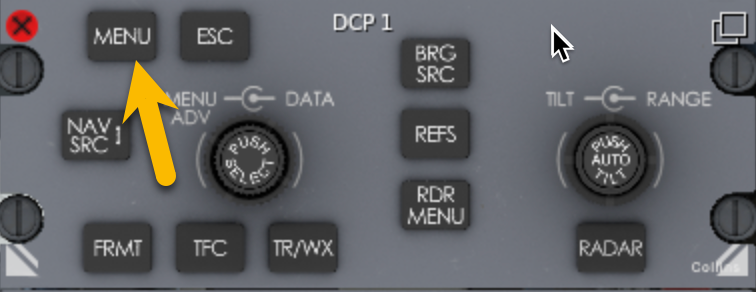
Switching the units for the altimeter is via DCP Menu (PFD) - Config. And welcome to the Challenger community. I started a few months ago, have come a long way through the help of the community. The support team are highly responsive, and there some actual Challenger pilots involved as well. Lots of good stuff in this forum, including training videos.
 1 point
 -
Forgive my ignorance but what is the "HLIS" button and where is it?1 point
-
I've found the answer after experimenting with the custom CL650 flt_spoiler_up and flt_spoiler_down keybinds. It seems that either will require multiple key press to fully extend or retract, respectively. Since I'm using a throttle hotas with a spare lever axis, the default xp "speedbrakes" axis is my preferred choice - it serves the same purpose. Issue resolved.1 point
-
If this is such a huge focus for you (you've mentioned doors multiple times now), you were never really the target customer for IXEG anyhow. Hate to say that, but it's true.1 point
-
The above reference helped me understand why I develop an imbalance on the ground. The APU's fuel source is from the right main tank, and that is indeed the one that goes lower when I am sitting in the plane continuing to learn its systems after I have started the engines. If I had to pay for the gas and maintenance then this would be self correcting!1 point
-
Thanks Bob, you're absolutely right. I've edited my original post to reflect that.1 point
-
As I understand it, the engines never suspend consumption from the mains--they feed *only* from the main tanks, never directly from the aux tanks. Though the collector tanks are physically located in the aux tank, they remain functional components of the main tank system, in that they only receive fuel from the mains. As long as a main tank is below 93% full, the aux tank feeds the main tank to maintain the level at 93%. Once a main drops to 93%, the main quantity will remain constant and the aux level will drop. It will appear that the engines are burning from the aux tank, but in reality the engines are burning from the mains and that fuel is being simultaneously replaced in the main tank from the aux tank ejector xfer pumps. Regards Bob1 point
-
There are a few ways you can do this. First, if you are going to a single altitude constraint, say an along track waypoint, destination/-30 at 10,000, then you can use the DIRECT TO button on the CDU, line select the altitude into the scratch pad, and then re-enter it for the along track waypoint. That will re-sync the VNAV and execute a vertical “direct to”. If you’re in VNAV mode, e.g., VALT or VVS, the aircraft should recapture the VNAV path and change to VPATH mode. You can do this with any altitude constraint and create a vertical “direct to”. The second method is used of you’re descending on a STAR with multiple constraints. You can use the same method above to execute a vertical direct to the next altitude constraint. However, of that constraint is an “at or above”, then you have just changed that constraint into an “at” constraint. That will affect the downstream VNAV path angle after that constraint. You will comply with the altitude constraints on the STAR, but you may fly them at a much shallower VNAV path angle. Basically, the Collins VNAV uses the default VNAV path angle (3.0 but can be changed) and the lowest “AT” constraint, or the lowest “AT or BELOW” constraint, and then checks that 3.0 degree path back up through the remaining higher altitude constraints. If that path meets all coded/pilot entered altitude constraints, then the 3.0 path is used. If not, then the VNAV path is “smooth” between the constraints where is doesn’t work until it can again project a 3.0 degree path back to the cruise altitude for TOD. On a STAR with many altitude constraints, the best way to recapture the VNAV path from above when ATC interrupts the descent is to use either VVS or VFLC and descend at a rate equal to or faster than the target vertical speed shown on the vertical speed indicator (pink target bug) or as shown on the MFD Vertical Path information display. The only catch is that if the target constraint is a window altitude constraint, one that is both “at or above” and “at or below” altitudes, you need to make sure you capture VPATH before you reach that waypoint. Otherwise, you risk not meeting the “at or below” constraint. This is my preferred real world method. Rich1 point
-
You do, but it's far from impossible to miss!1 point
-
Just to add to this I highly recommend setting a timer on your phone or something if you start a transfer to aux - multiple times I have ended up with an imbalance the other way because I forgot it was running.1 point


