Leaderboard


Popular Content
Showing content with the highest reputation on 04/23/2022 in all areas
-
I don't think I'm going to make it in April Marco.....though I am very close to wrapping things up. Targeting first half of May it looks like now. Right now there is a lot of quality control checks being done. With 3 variants it is quite a lot of flight testing. The last week has been compatiblity work with all the probable hardware configurations and setting up the preferences etc. All the lighting / night lighting is done and the only thing that remains is a punchlist of small items, a few more liveries to do and the last thing will be the sound. This certainly won't drag out, there is nothing else on my plate and this work is all day every day for me until release. -Tom3 points
-
Version 2.3.0
15,121 downloads
ATTENTION: To use this aircraft, you must own a X-Aviation product, to get Gizmo plugin. If you don't own one, please don't download this aircraft! P.180 Avanti II for X-Plane 11 - CURRENT VERSION: 2.3.0 (uploaded at: February 25th, 2020) If you want to support P.180 Avanti development, please donate here: PAYPAL v2.3.0 Main Features Compatible only with EXPERIMENTAL FLIGHT MODEL (11.40+), capable of flying up to M.67 at altitude. Terrain Radar operation via PFD/MFD buttons. Tablet for aircraft loading (engines must be off and the aircraft stationary), and access to AVITAB. Librain Support. See Change Log for more! If you don't have Gizmo already installed in your X-Plane copy, there is an version of Gizmo in the folder extra files. Put the Gizmo.plugin folder in you X-Plane 11/Resources/plugins folder. If you already have Gizmo, DO NOT SUBSTITUTE the existing one with this. MIGHT BREAK OTHER GIZMO ADDONS!!! If you find reflections too high, in the extra files folders are textures to change that. Copy the low reflections texture into the objects folder, and replace the existing one! v2.2.0.VR NOW VR COMPATIBLE with the help of SimVRLabs! OFFICIAL SUPPORT: Official Bug tracker: https://bitbucket.org/iliastselios/p180_avanti/issues?status=new&status=open Support Forums: DESCRIPTION: As you might already know this aircraft is based on X-Plane's default P.180 Avanti , originally designed for X-Plane 8, was included in X-Plane 9, and from that point has been overhauled to Avanti II version. This is aircraft is totally FREE! It is a "return" to the X-Plane community that supported us those last 4 years that we exist as a development team! This aircraft main features are: High quality visuals, cockpit all new 3D model and textures, including PBR materials. Simulated: a. startup and shutdown procedures b. engine controls and operations c. autopilot controls and operations d. partially operation of the electrical, pneumatic, hydraulic, fuel systems. Emulation of Proline 21 avionics suite. Currently there is only one layout that will allow you to operate the aircraft in all scenarios. Many improvements will come in the future. Installation in the 3D cockpit of the default X-Plane 11 FMC. Improved flight characteristics. Internal custom lighting. Of course Avanti development is not stopping here! Actually the overall development will be continuous, and the aircraft will always be in beta stage. Updates and upgrades will be available frequently! Main planned future upgrades are: Adding more functionallity to Proline 21 avionics suite, heading from an emulation to a simulation. Custom NAV maps. Custom FMC. Fully simulation of all systems. New 3D model from ground up. Improved flight model. Avanti EVO. Special thanks to: Austin Meyer for giving his permission to use parts of the Avanti on this project and X-Plane by Laminar Research that gave us this magnificent simulator! The team that originally developed Avanti for X-Plane, Robert Pearson (aerodynamics), Massimo Durando (cockpit & 3D cockpit), and Javier rollon (External Model. JRollonPlanes www.jrollon.com) for his fantastic 3D work. @Hueyman for the propeller 3D model and the prop disc images. Ben Russell of Gizmo64 for his support and that made available to us that powerful tool (aka Gizmo), and Cameron Son of X-Aviation for the support. And of course X-Plane community for the interest in that project and patient to wait to be realized!1 point -
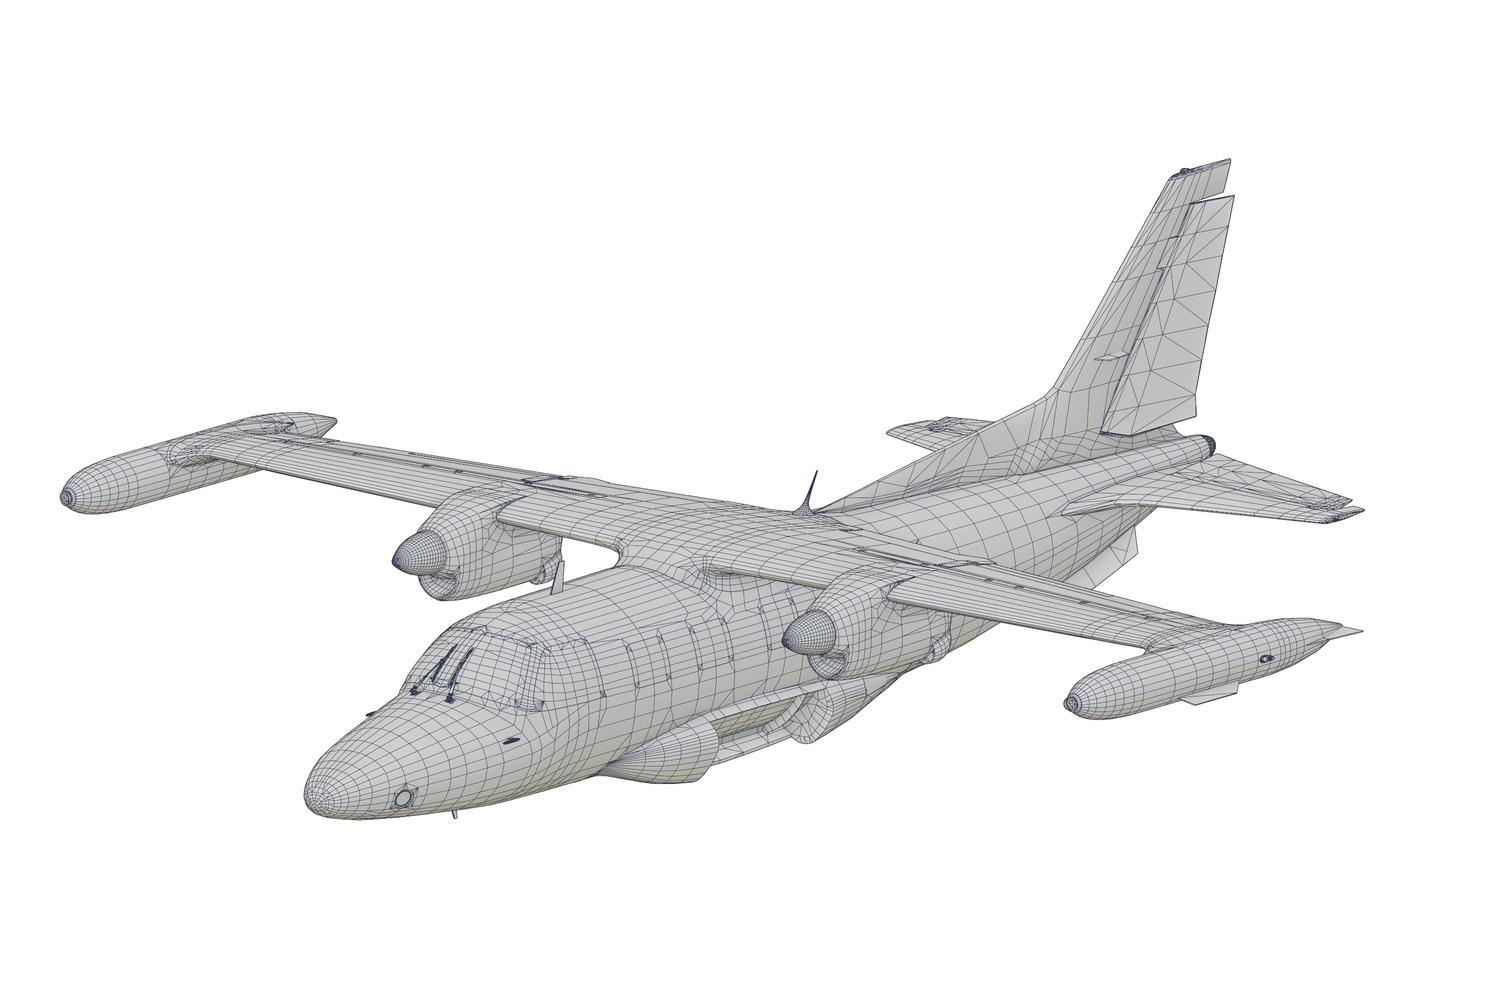
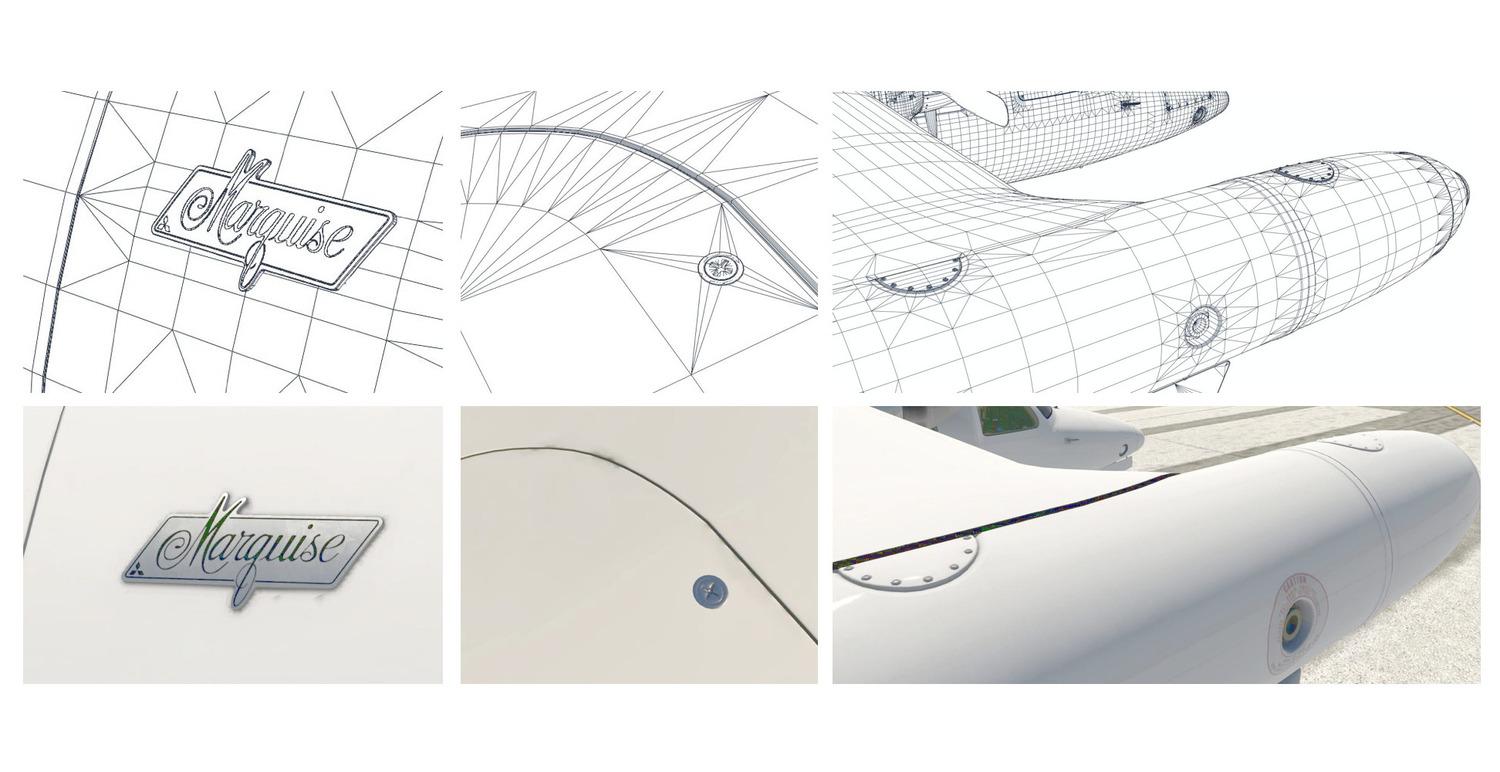
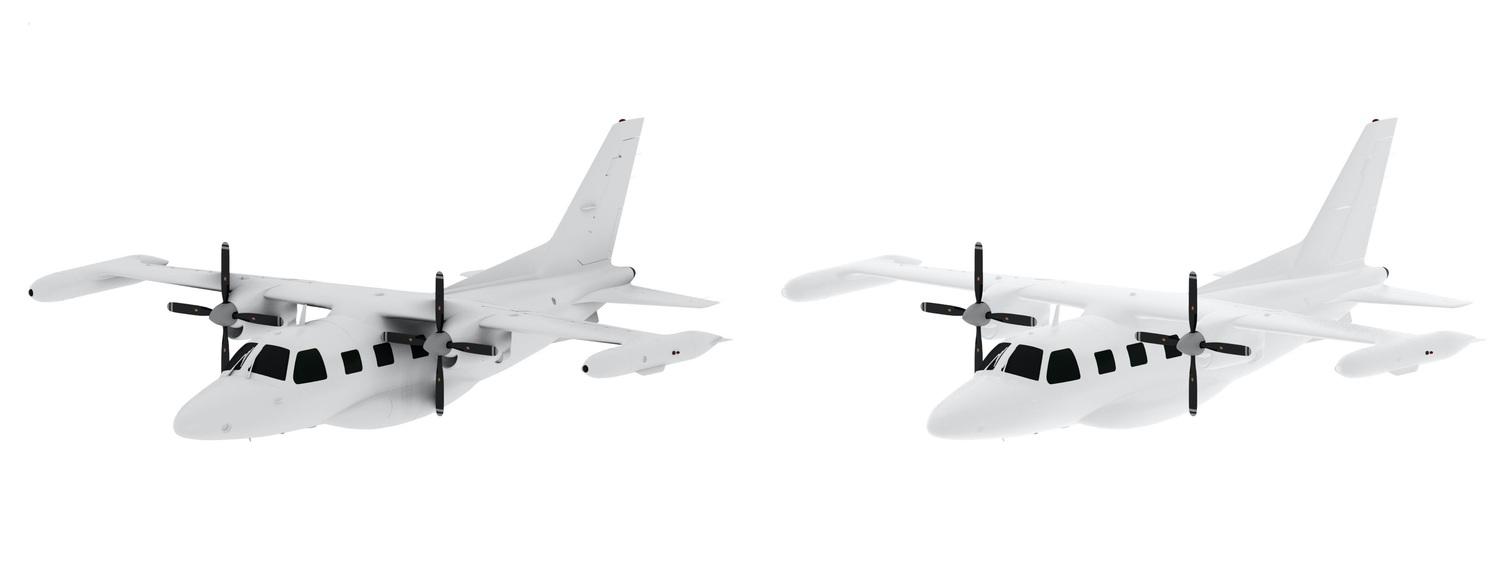
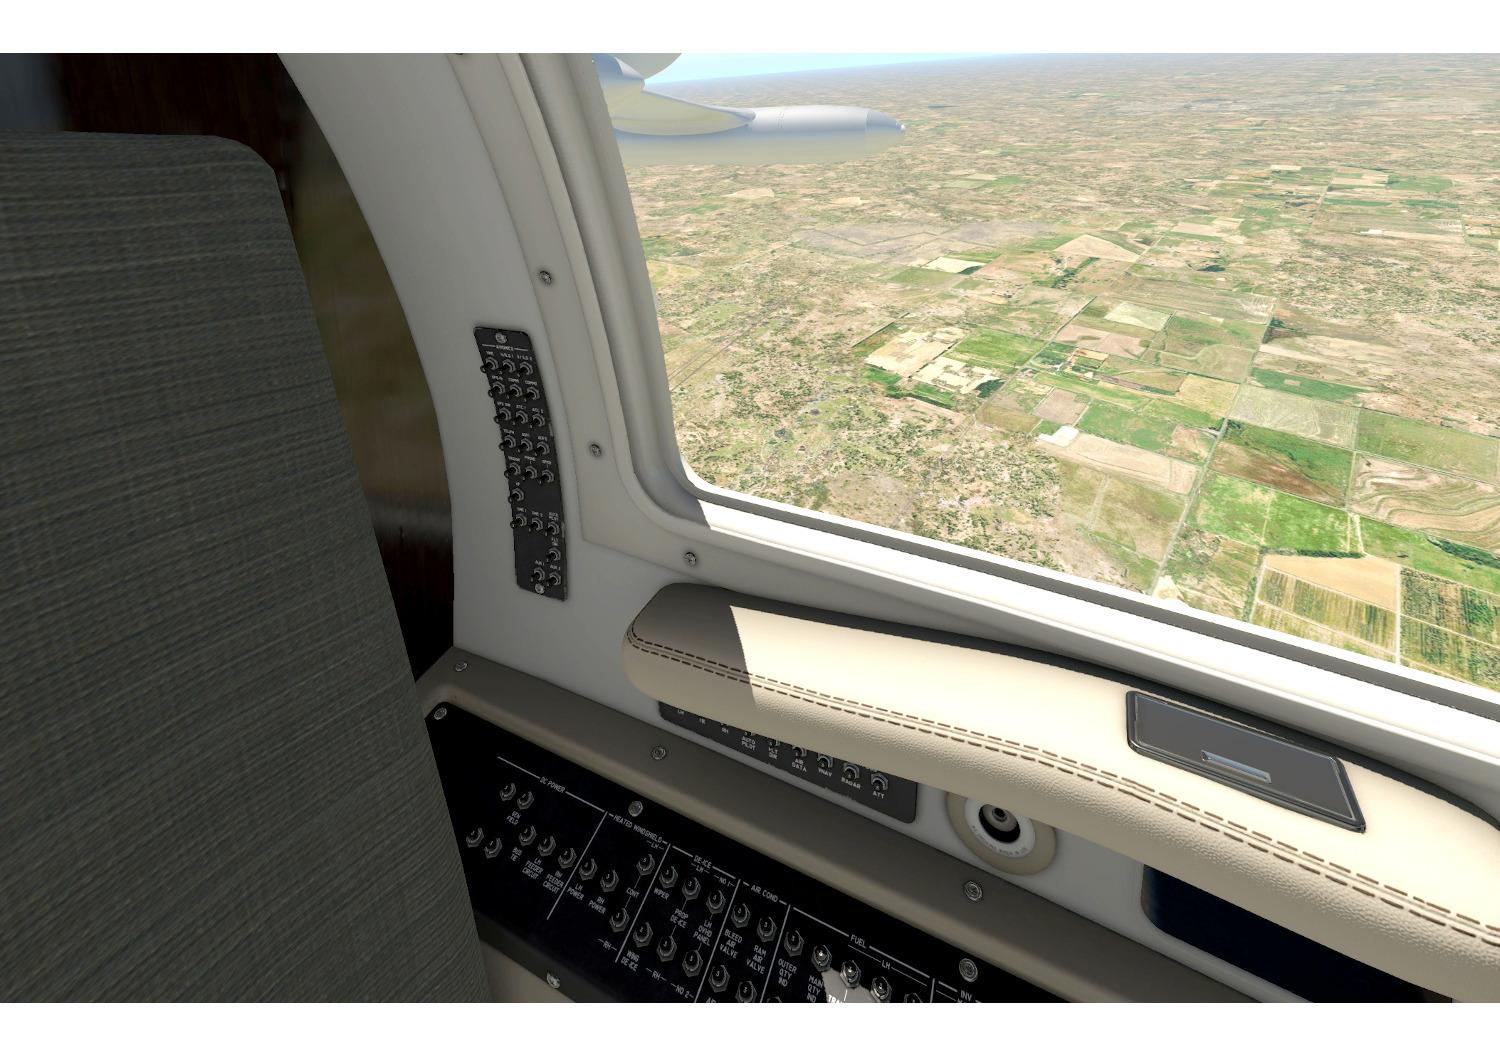
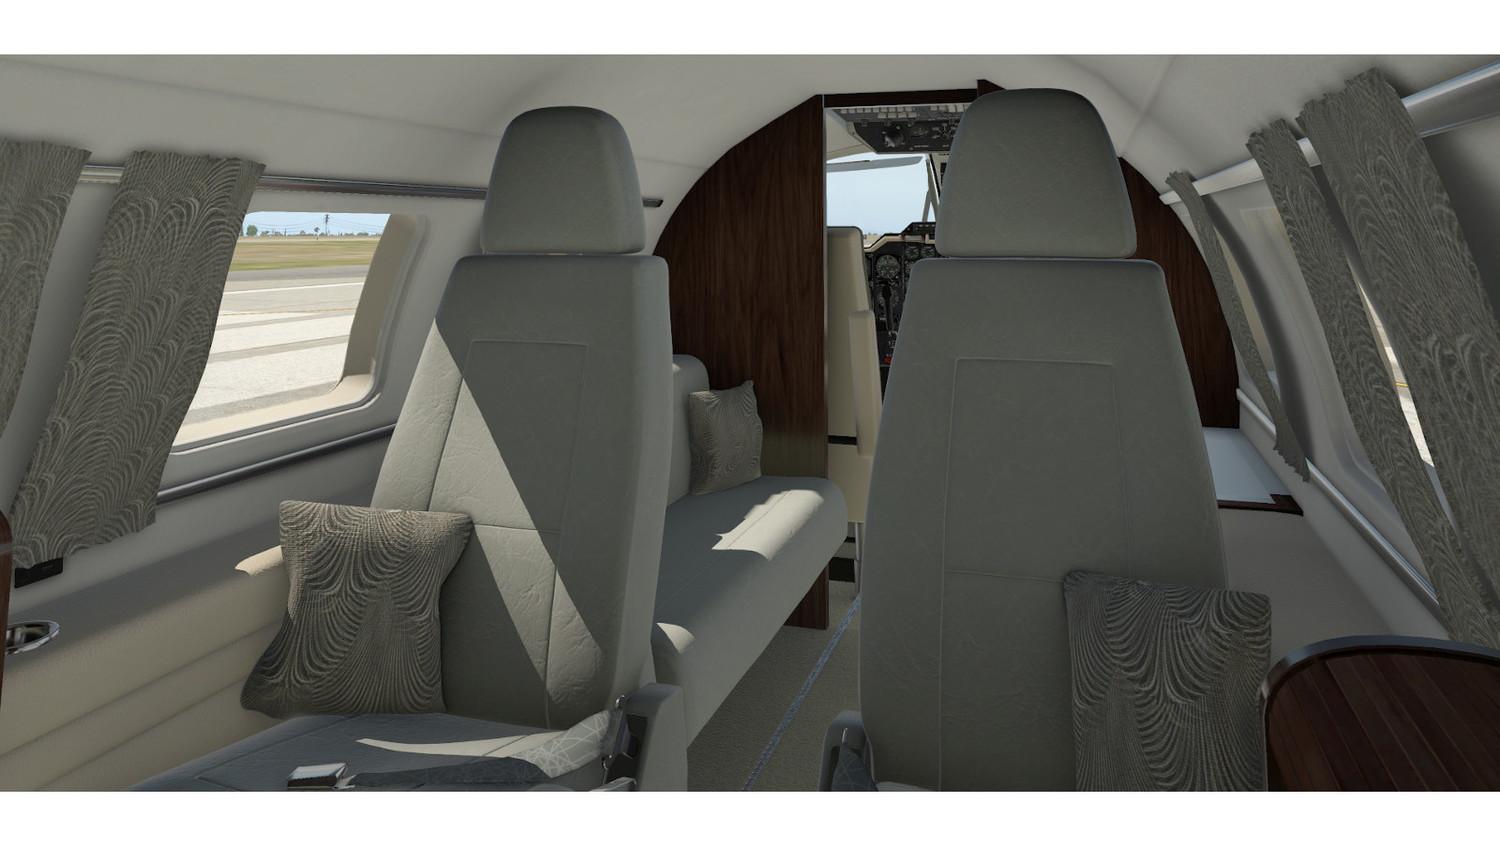
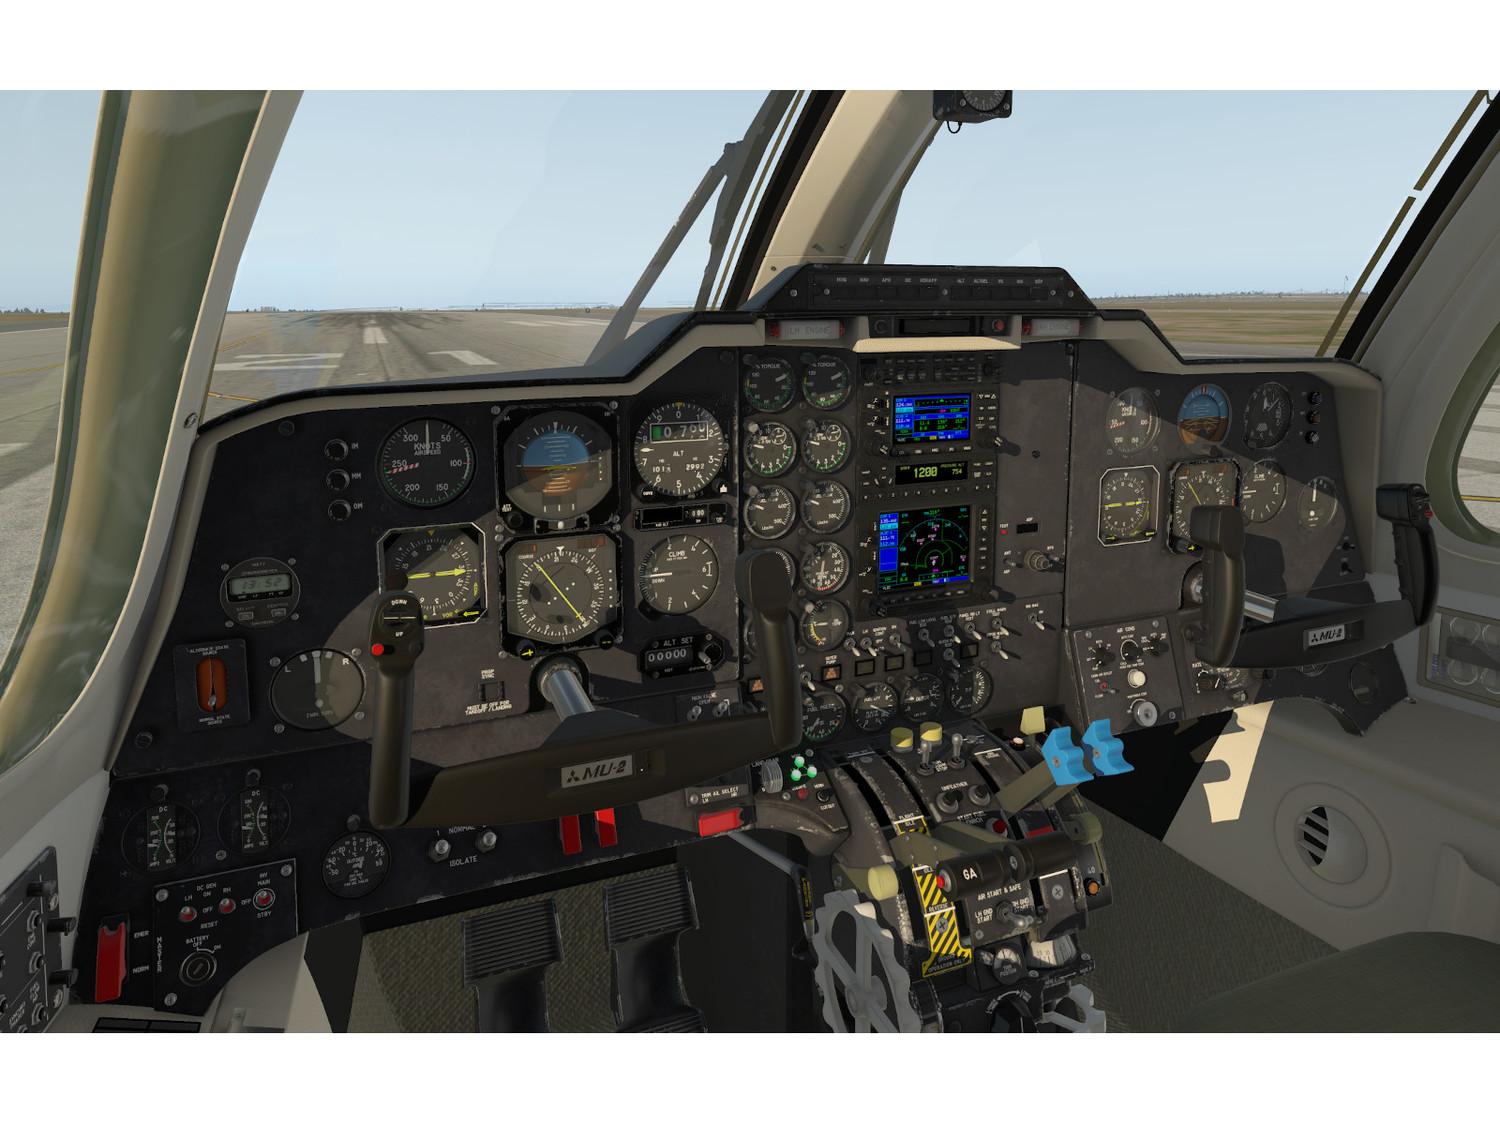
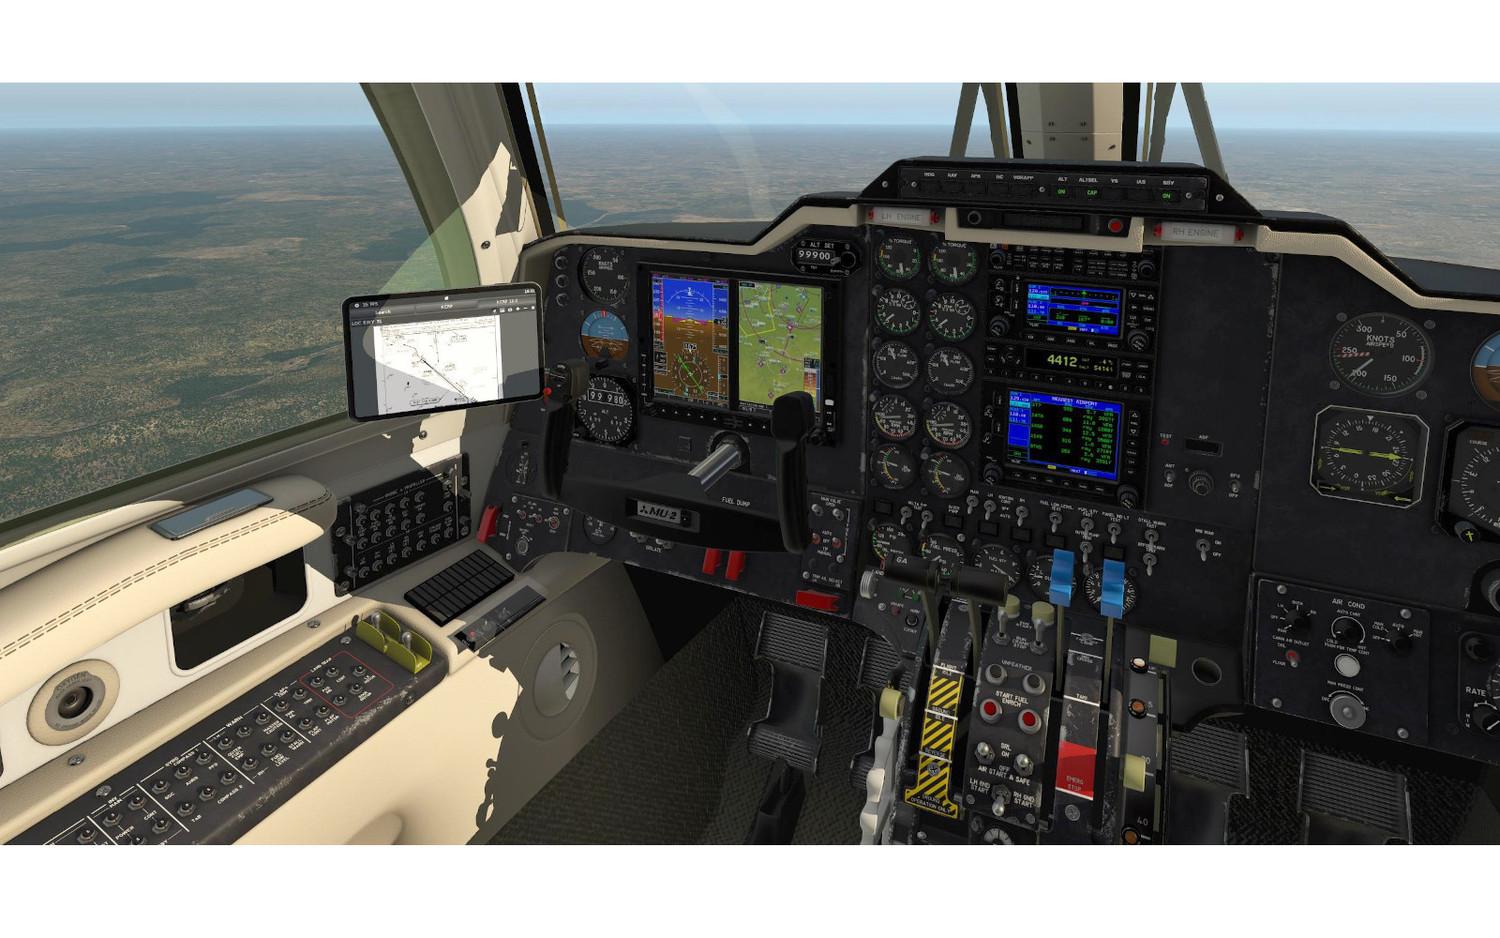
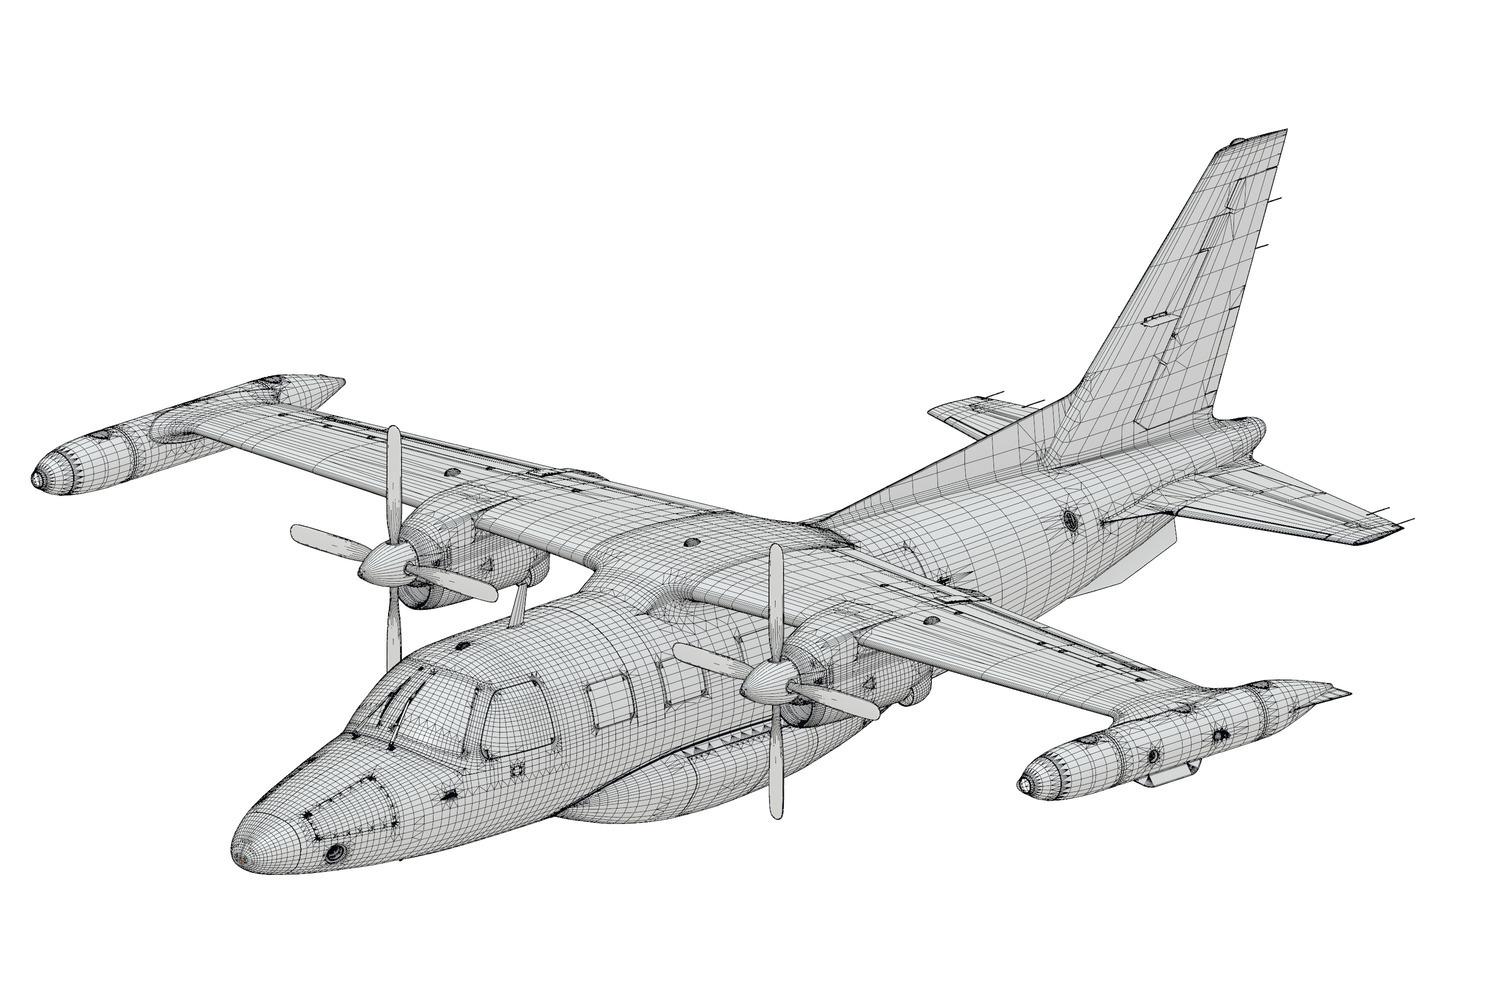
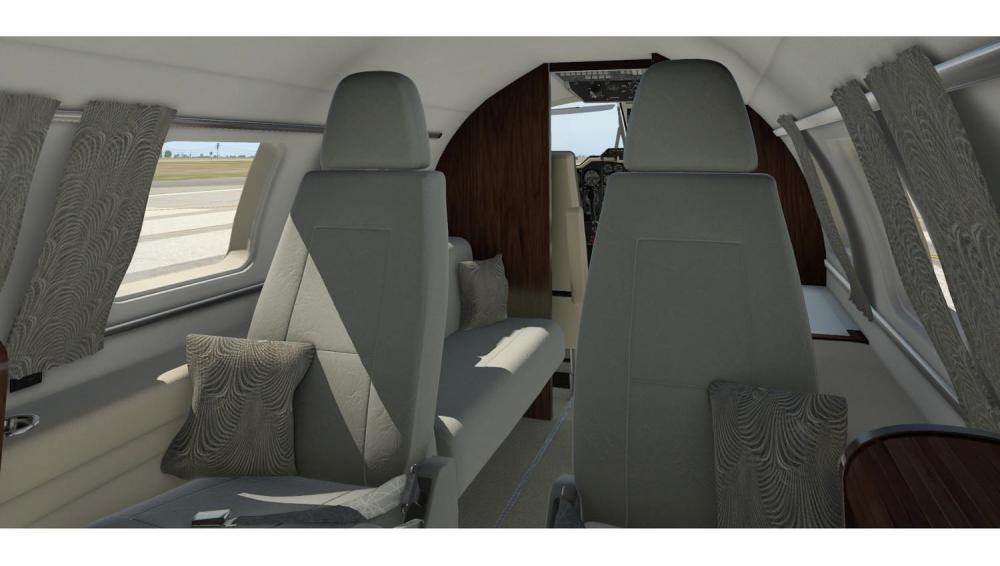
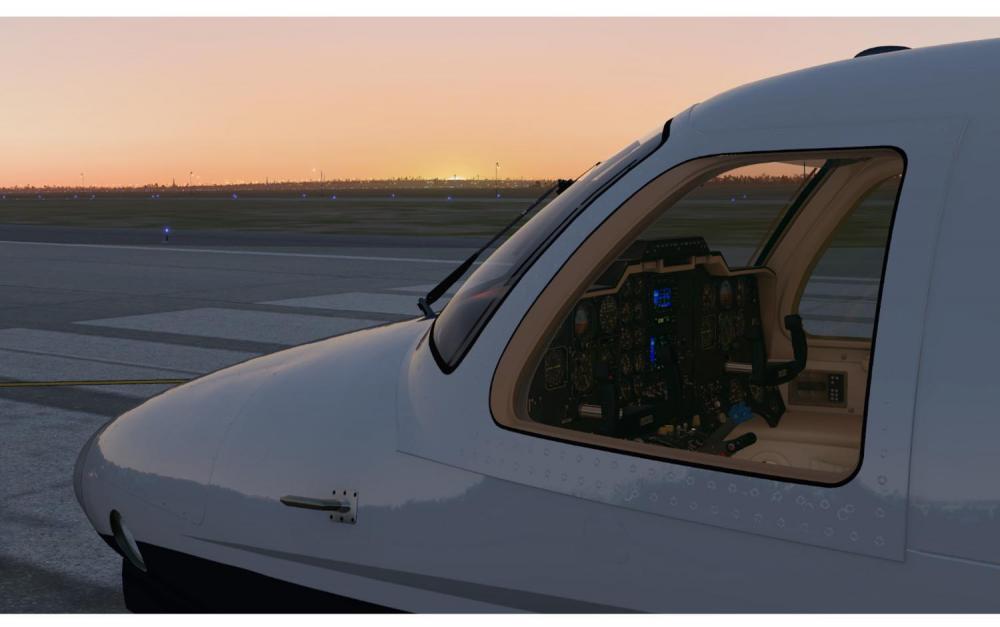
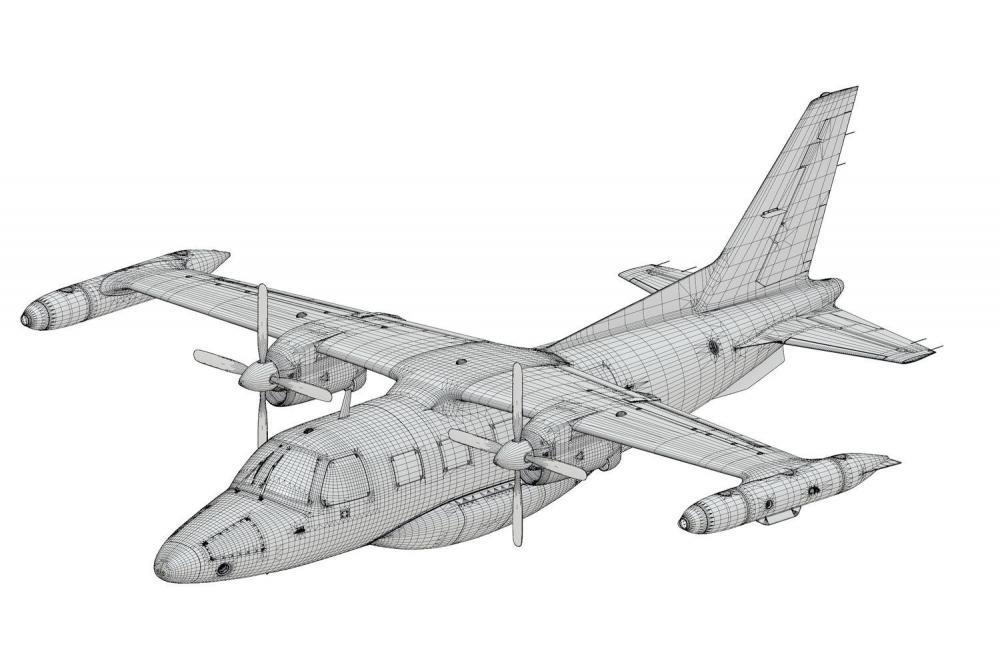
Captains, It's with a lot of excitement that I get to announce this product officially now! Back in 2008 we started X-Aviation with the MU-2 as our first product for sale, and now we're re-inventing it with this beautiful new version. Many people in the X-Plane community found the original v1 we sold as one of their very first payware aircraft back in the day. Today will be the first of a series of progress updates leading up to the forthcoming release of the Mitsubishi MU-2B-60 Marquise 2.0 simulation for X-Plane. Since its beginnings in 2005, the MU2 has been a labor of love by @tkyler and has been nursed for 13 years and for the upcoming 2.0 release, has incorporated the latest X-Plane features. The MU2 is poised to last for many more years to come and certainly through future versions of X-Plane. We are also pleased to announce all previous owners of v1 will be receiving an upgrade discount to v2! The MU-2 is a perfect GA airplane to have in your hangar and get you around X-Plane quickly when you need to feed your flight simulation addiction and actually cover some ground but don't feel like flying tube-liners. With its distinctive profile, engine sound and a cruise speed of 270+ knots, it can cover a lot of X-Plane scenery in a simulator session and have you off the computer before dinner time. In this first report, we'll discuss the most obvious improvement in version 2.0, the visual 3D model and textures. When looking at the MU2 Version 1.0 series 3D, it it quite apparent that there was major room for improvement (mind you this was X-Plane 9 days). As it turned out, trying to remodel the existing 3D was not a viable option and the 2.0 version had to be completely redone from scratch. There are a few noteworthy factors that have enabled the improvements to the 3D detail. Major advancements in Blender 3D, the modeling tool used as well as advancements to the exporter by Laminar, have facilitated a painless workflow between Blender and X-Plane, allowing focus on the geometric detail. In addition, the capability of today's graphic cards to handle fantastic numbers of polygons and high-resolution texture sets have really taken the visual aspect of flight-simming to a level barely imaginable a decade ago. The first order of business was to increase the geometric fidelity of the model and get the challenging shapes and curves more accurate. It is a difficult aircraft to get to look right. Increased geometric fidelity results in much sharper and crisper detail at close camera angles and generally a more natural look all-around. The two images below shows the Version 1.0 3D model against the Version 2.0 3D model. Version 1.x Wireframe Version 2.0 Wireframe If you study the two images above, you will see version 2.0 has a higher density 3D model all around; however, note the darker areas of the 3D wireframe mesh. These are areas where higher 3D detail has been applied in order to achieve sharper visual results that reflect light more realistically as you move the camera around. The traditional way such details are added is through the use of higher resolution texture "decals", much like the decals on plastic models. While decals are a great technique and absolutely useful, they do lack the accuracy of subtle light interaction around geometric edges at closer camera angles. Lighting details on 3D edges have always been one of those areas that make the difference between a fake looking 3D model and one that comes alive. The image below shows a few areas where the 3D detail makes a difference to the lighting. Though higher detail is applied where it counts, it wasn't added where not needed, yielding an efficient 3D model that is very performant in X-Plane. With the 3D detail in place, you have to bring it alive with texturing. X-Plane's PBR (Physically Based Rendering) has always yielded a wonderfully crisp and beautiful color palette when taken to its limits, and X-Plane 12 looks to improve that even more when it arrives. One critical component of believable texturing is a solid implementation of what is known as 'ambient occlusion', or AO as 3D artists like to say. AO is a phenomenon where light loses energy as it bounces around into corners, resulting in darker corners and recesses. Below is a comparison of a 3D model with and without ambient occlusion. The results are quite stark! AO in real time for lots of 3D polygons is still quite performance heavy. X-Plane actually has a small bit of real time AO between the ground and airplane when in HDR mode. You may note the subtle darkening of the ground around the landing gear tires sometime as aircraft taxi; however, X-plane provides no AO effects for aircraft. We obtain this AO effect by "painting" the shadowing into our textures. This is a process known as "baking" in the 3D community and our 3D software tools actually do most of the painting work for us. By baking AO effects into our textures, we can achieve a much more realistic lighting look throughout the 3D model. Baking AO lighting though is a bit of an art and can be a bit time consuming but when done well, the results are quite immersive! AO really shines when applied to interior spaces, giving lots of visual depth and avoiding that flat, cartoony look. When all of the 3D elements come together: the geometric 3D detail, attentive ambient occlusion effects, PBR texturing and X-Plane's great PBR engine, the results are exactly what we've been waiting for 13 years! A SPECIAL NOTE is warranted about this last screenshot. We include it because it shows the 3D detail and texturing in the cockpit at its best! However, the G500/600 GLASS display shown will NOT be included with the MU2 purchase. It is a separate product available by Real Sim Gear through X-Aviation, but for those folks who wish to have some glass in their MU-2, then you'll be happy to know that we support it fully and it will be available straightaway when the MU2 is release for owners of the Real Sim Gear G500! In our next progress update, we'll talk about the cockpit variants, controls and animations and how they play a major role in our immersion! Until next report, Blue Skies and tailwinds!


 1 point
 -
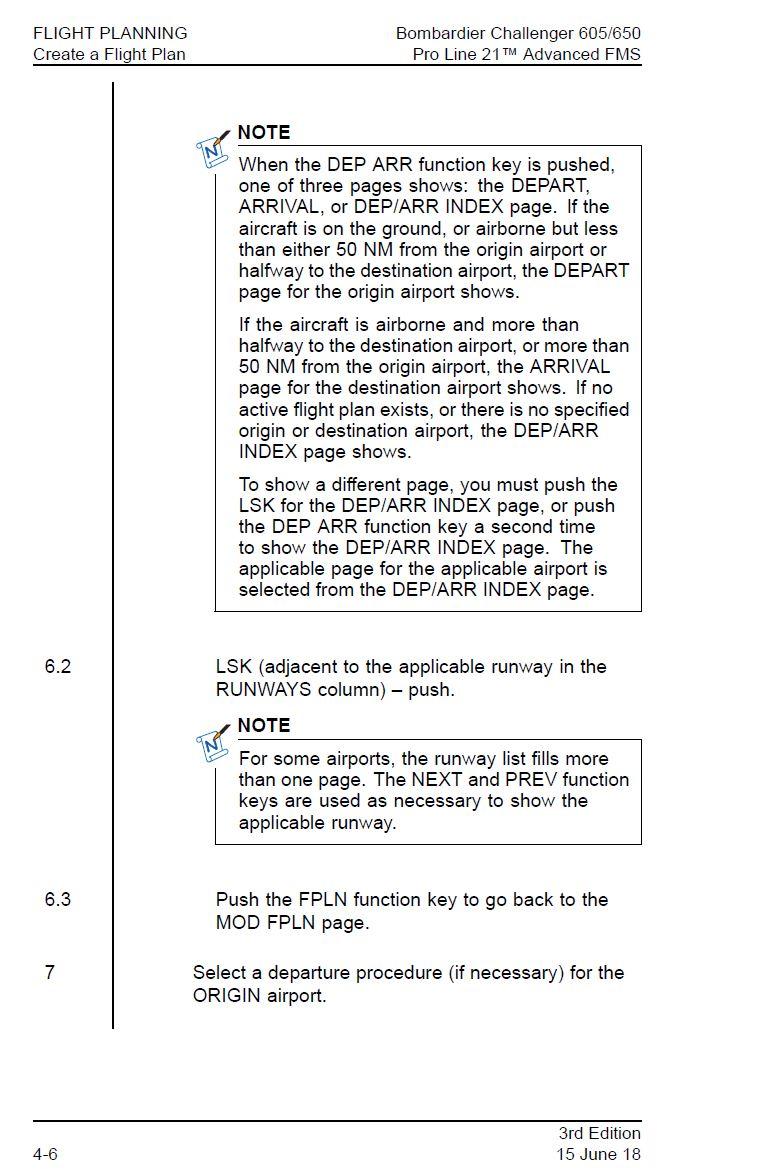
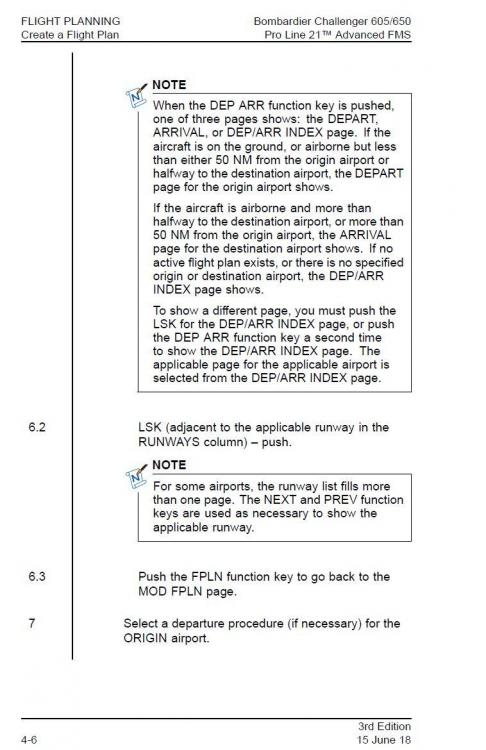
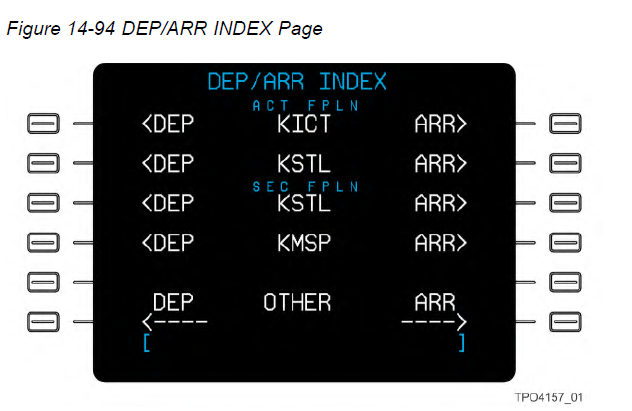
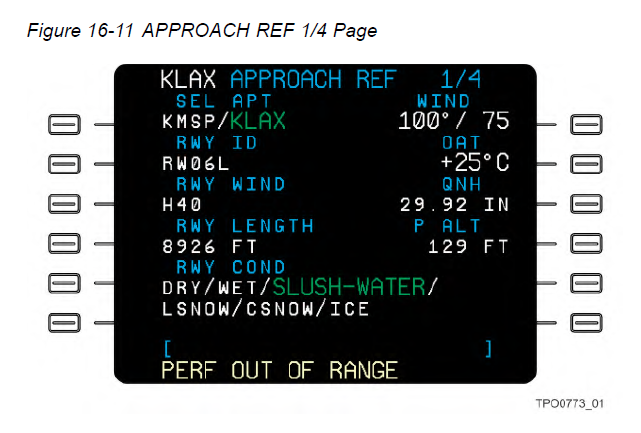
Hi Pils, I contacted my retired Collins customer liaison/training pilot about this behavior. He gave me a good explanation of how this works. When you enter the ORIG and DEST airports, you create two DEP/ARR page selection "silos", one for the ORIG airport and one for the DEST airport. On the ground, or airborne within 50 miles of the ORIG or less than 1/2 way between the ORIG and DEST airports if the distance between the two is less than 100 miles, the first press of the DEP/ARR key bring up the DEPART page (if on ground) or the ARRIVALS page (if airborne) for the ORIG airport. The second press brings up the DEP/ARR INDEX Page, where you select DEPARTURE or ARRIVAL page for either the ORIG (first option) or the DEST (second option): In the air, the first press of the DEP/ARR button bring up the ARRIVALS for the ORIG airport is less than 50 miles or less than 1/2 of the distance between the two airports if they are separated by less than 100 miles. More than 50 miles or more than 1/2 of the distance between the two airports, it brings up the ARRIVALS page for the DEST airport. These are the two "silos" ARRIVAL options that can be selected once airborne. The engineer's intent was that in an emergency return the departure airport, the pilot will want quick access to the approaches available at the departure airport, which is why the first key press of the DEP/ARR key brings up the arrivals for the ORIG airport. The closer the two airports are together, the greater the chance the airport selection can confusing. For example, a short flight from Wichita - Eisenhower (KICT) to Wichita - Jabarra (KAAO), separated by about 10 miles. After takeoff and while getting radar vectors to Jabarra, if you load the approach and complete the landing data on the APPROACH Performance page, but then for whatever reason start getting vectors back to towards KICT and the distance to KICT becomes closer than KAAO, the FMS can think that you're now trying to return to KICT, the FMS has moved back to the ORIG silo and the APPROACH Performance page has moved back to the ORIG airport and as result has dropped the V-Speeds and performance data. If you look on the APPROACH REF page of the FMS, there are two airports - the ORIG and DEST: The FMS has gone back to the ORIG airport in this case and dropped the V-Speeds. It gets more confusing when you're in a round-robin training mode, for example the ORIG and DEST airports are both "KICT". in the air If you press the DEP/ARR key, the FMS brings up the ARRIVAL page for the ORIG airport, KICT. If you load the approach and then complete the APPROACH REF page based on the ORIG airport ARRIVAL loaded in the FMS, as you fly downwind for the return approach, at some point the FMS will think it's more than 1/2 way away from the ORIG airport and switch to the DEST airport's silo, and its APPROACH REF page is blank because you have not entered any data for this runway. The FLT PLN and LEGS page still show the approach you selected using the ORIG airport, but the Performance page has switch from the ORIG airport to the DEST airport. If you press the DEP/ARR key twice to bring up the DEP/ARR INDEX page, select the approach from the DEST airport (i.e., the second airport in the list) AND....you select the DEST airport on the APPROACH REF page (i.e. the second airport option - in the example above that shows KMSP/KLAX, select "KLAX") you are less likely to have the V-Speeds dumped. He says it's not impossible, but much less likely. Again, if you turn back around and it thinks you're going back to the ORIG airport, the FMS can switch back to the ORIG airport performance page. The behavior I was seeing in HS CL650 did initially mimic this behavior, and it's what I have seen in the Level D CL300 simulators when we're doing circuit training, i.e. multiple back to back approaches. What I was also seeing in HS CL650 was the FMS drop the V-speeds multiple times on final. My contact says that should not happen. As long as you're in one branch or "silo" of the ORIG or DEST airport, the V-Speeds should not drop unless you switch silos, which is not likely as your final approach and you've set one or the other branch/silo - the ORIG or DEST. Please let me know if this makes sense? Thanks! Rich Boll
 1 point
 -
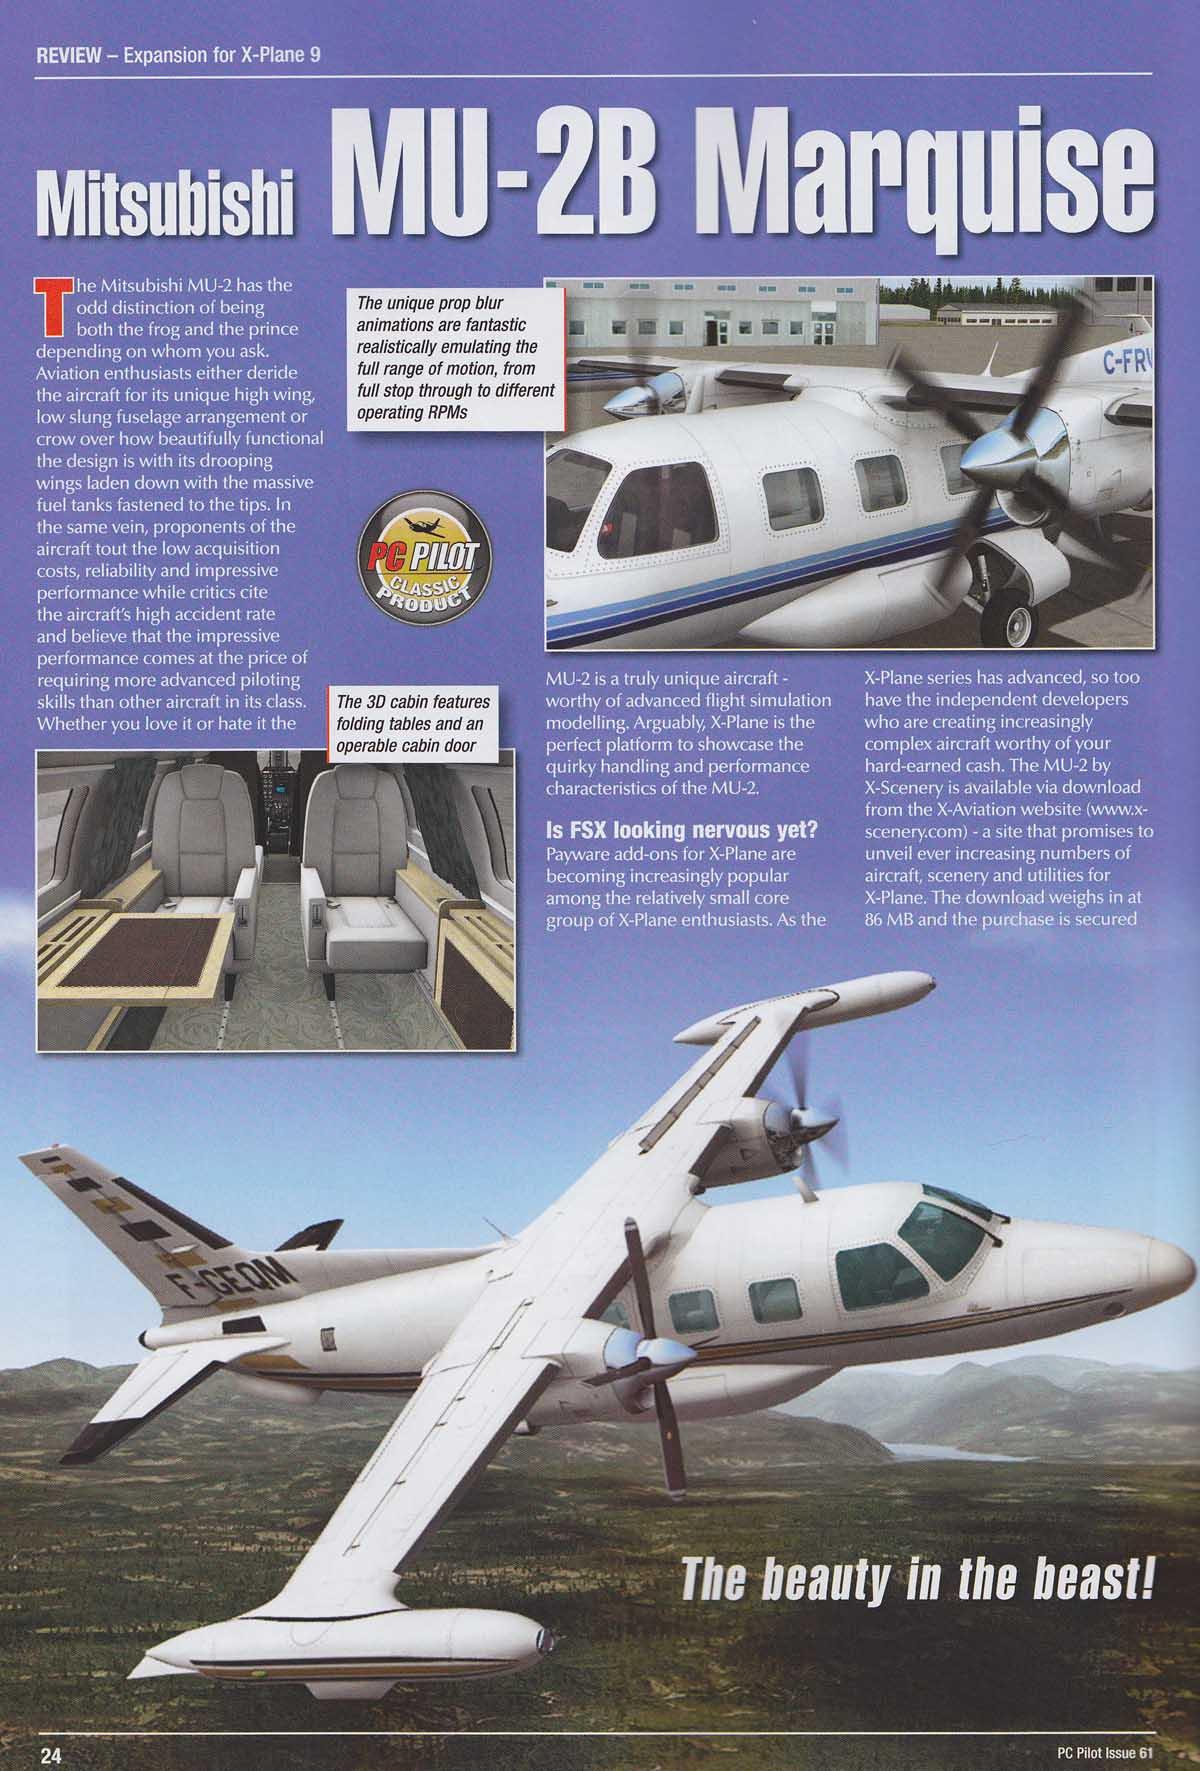
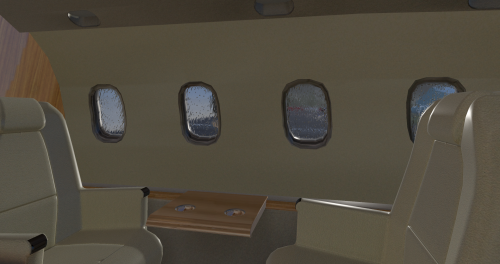
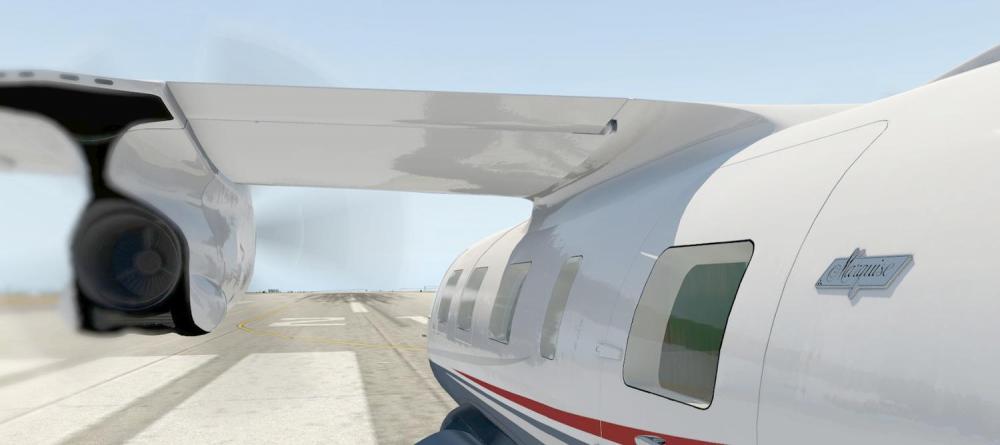
This is great news..! The MU-2B was one of the "OG" complex aircraft for X-Plane (I believe it was X-Plane 8.X?) back in the day..and has held its own over the decade+ since release. It is one of my favorite X-Plane aircraft to fly..always feels dynamic and sporty on landing. And I loved the old school panel having flown similar panels over my years... Looking forward to the updated/all new release. (Another vote for GTN 750 integration when possible..!) From my PC Pilot review way back in February 2009..!! Wow...
 1 point
 -
I understand we're your coming from, but for me on actually migrating back too X-Plane then MSFS. I spent a year flying the hell out of Microsoft flight simulator, but for me I was missing something. Along with looks, fidelity for me is very important as well. And the fidelity within Microsoft flight simulator platform is still not there yet to compete with X-Plane. But again, that's just me and others will probably differ. It's not all about the eye candy. Again looking forward, to the MU2. Cheers Dion1 point
-
As far as I know, you don't engage autopilot on the runway, it's a bad idea usually for a number of reasons - I'll attempt to explain why. What I do (and I may not have that completely right and there are variations on the theme here) is before you enter the runway set the heading bug to the runway heading (should be aligned with the runway) and arm the heading pressing HDG. Verify your speed bug is set to VREF+20 (can be different with airline procedures), alt armed to the desired initial climb set by ATC as part of your clearance, or your charts if not in controlled space. You have to follow the departure chart because it keeps you safe and out of the way of other traffic. Double check the MFD for any configuration warnings (should say TO configuration ok - if not - such as spoilers, yaw damper, etc... it will tell you what's missing) - double check your flaps. Press the TOGA button on the throttle the PFD should say "TO/TO" in green. Usually you do all that before you enter the runway so you're ready to go. In the US you confirm you have received your takeoff clearance by turning your strobes on which tells the tower (and also tells other aircraft in the vicinity) visually you are starting your takeoff roll. Then with toe brakes on you advance the throttles to 50% to verify engines stabilized so you don't have to slam on the brakes if something goes sideways, then release brakes and advance to take off max or press the ATS button that should read N1 TO. The flight crew operation manual says ATS should engage automatically at 75% or so but I've not seen that in the 650 so I just press it. Rotate at VR and once positive climb verified, retract the gear, by that time tower will give you a heading to follow after your initial turn instructions and you can engage autopilot 1,000 feet above the runway (or more) one the plane is stable in climb. Because you are in HDG mode you will follow runway heading and can quickly turn to any heading specified by ATC. Usually ATC will give you a turn instruction on take-off (left or right), and/or a specific heading to follow immediately after tower hands you over to the departure controller so LNAV is usually not the first mode you're in as you will be vectored by the departure controller until you are allowed to resume your own navigation. Thus HDG mode is what you want. For vertical you probably want VS mode too as FLC mode is typically too agressive for your passengers and you want comfortable transitions and small g forces, not fighter jet behaviors. I also found in controlled space your chart says one thing, but ATC may tell you something different so FMS legs initially aren't followed that closely. Remember that you are not alone in the sky - which is hard in x-plane I know without a traffic add-on and ATC. If you ever fly online on VATSIM or pilot's edge - you'll quickly get what works and what doesn't.1 point
-
Hi, yes, we always had to fly the RNAV approaches in V/S mode - VNAV mode was not certified on the 737-300. The 737NG and other more modern aircraft can fly these approaches in LNAV/VNAV - but you can also fly them in LNAV V/S or LNAV FPA (flight path angle). You have to do so, for example, if the temperature is too cold (as you would fly too low in VNAV). I know that technically the 737-300 was able to fly in VNAV as well... I tried it once in the real aircraft . In our aircraft (IXEG) it is possible, but you can not adjust the speed correctly, I think it will fly 150kts hardcoded. Cheers, Jan1 point