Lightcivvie
-
Posts
19 -
Joined
-
Last visited
-
Days Won
1
Content Type
Profiles
Forums
Latest X-Plane & Community News
Events
Downloads
Store
Everything posted by Lightcivvie
-
Download the MIDI plugin from the Elgato online shop - the one from Trevliga Spel - and install it. Can be accessed directly from inside the Elgato Stream Deck app. This will add some draggable action items to the sidebar. You then drag a Control-Change to a dial (or button), configure to send the appropriate MIDI change command on the appropriate channel, and presto!
-
I ended up getting the StreamDeck+ to work (very nicely). See my post from yesterday elsewhere on this forum,
-
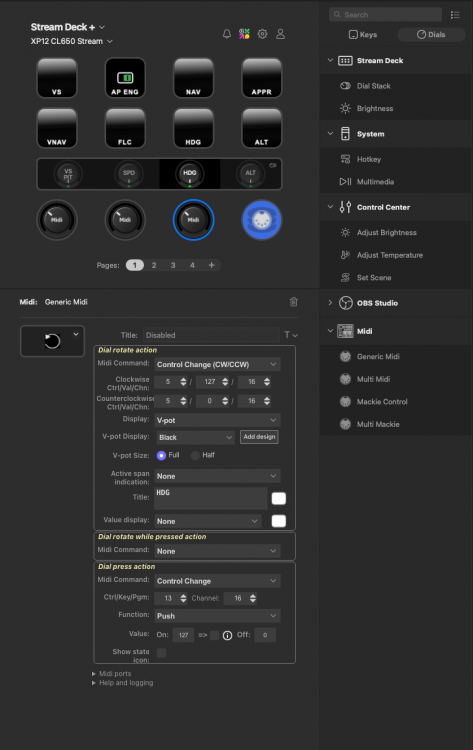
Got the StreamDeck+ to work with the HotStart Challenger 650, on a M1 Macbook Pro with xmidictrl. AND IT WORKS SPLENDIDLY!!! This gets rid of the latency issues I had when I first set it up using the StreamDeck+ without xmidictrl (and only sending keypresses). Now the dial knobs on the SD+ work like a charm to control the heading, speed, map range, VS/pitch wheel, and more. Here are the individual steps, in case anyone else with a Mac and a StreamDeck+ wants to do this. I assume that you have the SD+ connected and the Elgato Stream Deck app is installed. I basically got all the info from Xplane.org, https://mauer.github.io/xmidictrl/#/, and Trevliga Spel's youtube videos. Many thanks to them/their sites for all that good stuff! The xmidictrl plugin officially supports some Behringer and LoupeDeck, so it was just a matter of adapting that. 1) launch the Elgato Stream Deck app, and from there, click the icon to get to the Elgato Marketplace (the colorful one near the top). From there, find the Midi plugin from Trevliga Spel and install it. 2) download xmidictrl, from Xplane.org. Version 1.12. Unzipped it and moved the resulting folder to Xplane/Resources/Plugins, as per the instructions. Also make a copy of the CL60_XMidiCtrl.toml file in that folder, and place it in the X-PlaneNN/Aircraft/X-Aviation/CL650 folder. You may need to edit this file later on to make the magic happen, but this is real easy and only involves making some numbers match. I've attached my copy of that file here, so you can just take that and place it in the CL650 folder. 3) Set up the Mac's midi interface. On the mac, launch the Audio MIDI Setup.app (comes with Mac OS). Once it's launched, you need to reveal the 'MIDI studio' part of the app, by going to the menu bar, selecting the Window option, and then the 'show MIDI Studio' option. Now select the IAC Driver icon shown there, by double-clicking. An IAC Driver Properties window will appear. Here, you want to add 2 ports that will have specific names. To do that, below the Ports subwindow that is shown, click + to add 2 ports. Name the first port 'StreamDeck2Daw', and the second one 'Daw2StreamDeck'. Each port will be created with one MIDI In and one MIDI out connection. Finally, near the top of the window, set a checkmark in the 'Device is online' option. 4) Launch X-Plane. It will give you a warning about the xmidictrl plugin not being able to be run because it's not signed. Select the cancel option (not the 'move to bin' option. Now switch to MacOSs' settings app, go into Privacy and Security, and find the warning that xmidictrl is not signed. Allow it to run anyway. When this is done, switch back to Xplane, quit, and relaunch it. After relaunching, in the top left menu bar, find Plugins. You should see XMidiCtrl. Select, and click the Show MIDI devices. At this point, you should see a window showing 2 sections. One lists INBOUND PORTS, and the other OUTBOUND PORTS. Both sections should show 2 entries, Port 0 with a corresponding MIDI device named 'IAC Driver StreamDeck2Daw', and port 1 with a device named 'IAC Driver Daw2StreamDeck'. Go back to Plugins - XmidiCtrl in the menu bar, and this time select 'Settings'. Go to the MIDI tab, and read the channel number for virtual MIDI messages. It said 16 on my mac. Make a note of whatever number you have there, and close the settings window. 5) Using the Mac OS finder, go to the CL60_XMidiCtrl.toml file you copied into the Xplane/Aircraft/XAviation/CL650 folder earlier, and open it using TextEdit. For each CL650 control that you want the SD+ to be able to drive, set the 'ch = ' entry to the channel number you noted earlier. Comment out all the other ones by putting a # at the beginning of each line. If your channel was 16, and you copied my version of the .toml file, you don't have to do anything. 6) Final step. Open the Sream Deck App (it normally minimizes to the Mac OS menu bar top right of the screen) by clicking on it's logo. Now, for every CL650 control that you want to drive, drag a 'Generic Midi' item to a rotary button on the interface. Then configure the dial rotate action to send a 'Control Change (CW/CCW)', so that the 2 channel numbers match the one you put into the .toml file, and the 2 Ctrl values match the 'cc = ' value for the control in the .toml file. I've attached a screenshot for one of my dials so you can see what it looks like. For more controls, you can just copy and paste from one dial on the SD app interface to another, and then tweak the Ctrl values. The HotStart 650 is already an incredibly good simulation of the real Challenger. Adding the SD+ and Xmidictrl as described above just takes it to an even higher level. Might be an idea to donate to both Marco Auer, who created the xmidictrl plugin, and to Trevliga Spel, for his StreamDeck plugin. Cheers. LCV PS. the VC, VNAV, NAV, APPR and other buttons I configured to just send keypresses, no need to use Xmidictrl for those. Just for the dials. PPS. Attached my version of SD+ profile for the HotStart. Note you may have to edit some of the key bindings in either XPlane or the Stream Deck profile, as mine are not standard. CL60_XMidiCtrl.toml XP12 CL650 Stream15.streamDeckProfile
-
Got it to work! I couldn't find a way to do it via command line, but found the following article, which provided the necessary clue. https://support.apple.com/en-gb/guide/mac-help/mh40616/mac TLDR & comments: Since I mostly fly HotStart's Challenger 650 and it uses Gizmo which as yet doesn't run native on an M1Pro MBP, I have the X-plane.app configured to use Rosetta mode, and use an alias to launch that file. I downloaded XMidiCtrl, unzipped it and placed it into the XP12/Resources/plugins folder. To allow XMidiCtrl to run, I located the file named XMidiCtrl.xpl using Finder in the XP12/Resources/plugins folder, right-clicked it, and then selected Open With... I then pointed it to the alias I use to launch XP12, and selected that. Mac OS then displayed a dialog box "this is from an unknown developer, run anyway". Accepting this caused XPlane to start, and the XMidiCtrl plugin now properly appeared in the plugins menu. Now the fun really starts, trying to get StreamDeck+ to talk to XMidiCtrl... Cheers, LCV
-
Privacy & Security in Mac OS Settings looks a bit different in Ventura. Regardless, no warnings of any kind appear there, nor do they pop up anywhere else. All I get is that "damaged" dialog box.

-
Hi Marco, I'm having what looks like a similar issue, trying to install XMidiCtrl on a MacBookPro (M1 Pro chip 16GB, Mac OS 13.4.1 ) per your instructions at https://mauer.github.io/xmidictrl/#/installation My ultimate goal is to get the StreamDeck+ running with XP12 and the HotStart CL650. When I launch XPlane 12, I get an error dialog box (screenshot attached), but no security popup of any kind. XPlane's plugin admin page doesn't show XMidiCtrl. Log.txt shows the following (excerpt only): 0:00:00.000 G64: core: Gizmo64 Script Engine v21.03.16.0101 macOS 0:00:00.000 G64: core: built: Mar 16 2021, 02:23:43 0:00:00.000 G64: core: X-P Folder:[/Users/LCV/X-Plane 12/] 0:00:00.000 G64: core: Sim Langauge set to: us Loaded: /Users/LCV/X-Plane 12/Resources/plugins/Gizmo64.plugin/mac_x64/Gizmo64.plugin.xpl (gizmo.x-plugins.com). dlerror:dlopen(/Users/LCV/X-Plane 12/Resources/plugins/XMidiCtrl/mac_x64/XMidiCtrl.xpl, 0x0006): tried: '/Users/LCV/X-Plane 12/Resources/plugins/XMidiCtrl/mac_x64/XMidiCtrl.xpl' (code signature in <82E49753-46B0-3B8C-A0AC-4A028484A0DC> '/Users/LCV/X-Plane 12/Resources/plugins/XMidiCtrl/mac_x64/XMidiCtrl.xpl' not valid for use in process: library load disallowed by system policy), '/System/Volumes/Preboot/Cryptexes/OS/Users/LCV/X-Plane 12/Resources/plugins/XMidiCtrl/mac_x64/XMidiCtrl.xpl' (no such file), '/Users/LCV/X-Plane 12/Resources/plugins/XMidiCtrl/mac_x64/XMidiCtrl.xpl' (code signature in <82E49753-46B0-3B8C-A0AC-4A028484A0DC> '/Users/LCV/X-Plane 12/Resources/plugins/XMidiCtrl/mac_x64/XMidiCtrl.xpl' not valid for use in process: library load disallowed by system policy) Appreciate any help you might be able to provide. It does appear to me this has something to do with Mac OS security. Cheers!

-
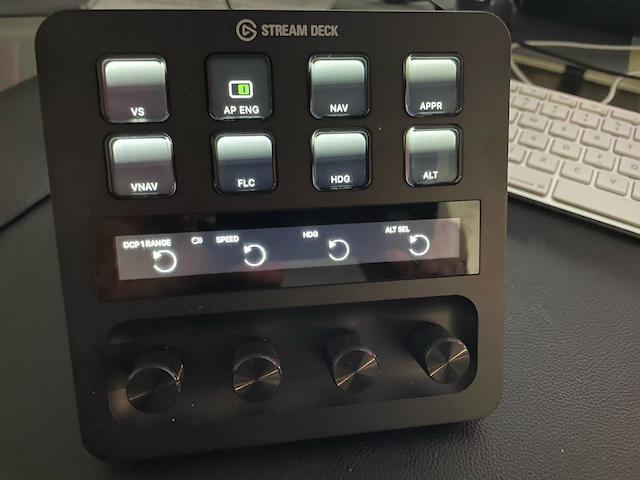
Got this brand new puppy (Elgato Stream Deck +) based on the notion that I could use the rotating knobs for HDG, SPEED, ALT SEL and BARO, as well as range. Just like in the real airplane, the knobs rotate with a ratcheting feel. It's no problem at all mapping the rotaries to the appropriate keypresses. First assign key sequences to the relevant CL650 FCP 'commands', then assign the same key sequences to the clockwise and counterclockwise actions for a knob in the StreamDeck software. With the mapping I did, every notch of clockwise or counterclockwise rotation of a knob corresponds to a 'HDG knob up' or 'HDG knob down' keypress. I did same for ASEL, SPEED and other knobs. There is an issue, and it's either on the Xplane side of things or with the Stream Deck software. When I turn the knob at a "normal" rate, i.e. same as I would turn it in the real aircraft, there is a noticeable lag in movement of the heading bug. It appears to me that the keypresses are sent repeatedly at a fixed rate, which is too slow. As a consequence, the heading bug keeps moving even when I stop rotating the knob, until all the "rotary knob" keypresses have been absorbed by XPlane. A further side effect is that reaction to any presses of the actual keyboard is delayed, again until all the "rotary knob" keypresses have been absorbed by XPlane. I looked around the StreamDeck SDK documentation, and these made me think that the StreamDeck software, out-of-the-box, sends not only a key-down but also a key-up command for every notch of wheel rotation, which further increases XPlane's workload. The solution most likely lies in writing a plugin for the StreamDeck software or or for XPlane - both of which are possible, but beyond my abilities - . But just on a hunch, I am posting this here as well, perhaps the HotStart folks have an idea on how else this could be done? (Note: as of this writing, the folks at Elgato have not yet updated the SDK API for the rotary knobs, so a solution might be forthcoming from their side.) As is, what I have done is still usable, but you mustn't be in too much of a rush when turning the knobs. The StreamDeck+ seems almost born for fsim use. The knobs are also have a momentary push function, just like the FCP knobs. So if you push the HDG knob, I have mapped it to sync the heading bug to the current heading - exactly like the real knob. And it gets even better: You can map 2 different actions to a knob push. In the picture, you can see that my leftmost knob is mapped to change the DCP1 range. But if I give it one push, then the mapping changes to PITCH/VS wheel up/down. Another neat thing is that the StreamDeck + has a touchscreen just above the rotaries, and can detect left and right swipes, allowing me to swipe to a second page of mappings. On my second page, I have a rotary set up for setting the BARO QNH/altimeter setting, with a knob push mapped to toggle between STD and preselected QNH. It's just great!! And on my third page I have the 10th stage bleed buttons mapped, so it is totally easy to transition from APU to engine bleed source and back. I'll also setup anti-ice controls when I have a chance, and then figure out how to post the mapping profile here - that is also possible. I don't know how many pages of mappings you can have, but I'm at 4 pages so far and it is still offering me the option of adding more. Final detail: you can download the StreamDeck software even if you don't have the hardware, which allows you to see how easy it is to configure. I am totally impressed with what Elgato have come up with here. And full disclosure, I have no connection to them whatsoever. Cheers LC
-
The "nav-to-nav transfer" function is designed specifically to tune each side's LOC and set each side's course, and then automatically change each pilot's nav source from FMS to ILS/LOC once APPR is armed and the aircraft approaches the LOC. Saves a lot of manual work and mode switching. It will do so for any side whose nav source is FMS. If a pilot's nav source is not FMS, there won't be nav-to-nav automatic setup or transfer on that side. Another essential condition is that an ILS or LOC approach be loaded in the FMS. A ghost needle is only ever displayed (in ROSE mode) after FMS has completed its setup per the above. Please disregard the following if, as I think, you are already aware, but I thought I'd mention it. Enroute - typically using the FMS as the nav source - the FGCs are in dual mode, meaning that the flight director is using the onside FMS (or the cros-side FMS if the XFR button has been pressed and the right FD is "flying"). You see LNV1 <- ALTS (or respectively LNV2 -> ALTS) on both PFDs. But for any ILS or LOC approach, the system wants to switch to split mode, where the left FD will follow LOC1, and the right FD will follow LOC2. Among other things, this provides very quick fallback capability if something fails on one side. Nav-to-nav transfer will also do its thing if the right side FD is "flying" and the requirements are met. Again, if one pilot's nav source was already switched to VHF, nothing would happen on that pilot's side, no LOC tuning and no course setting - this would be dangerous because it might undo something a pilot has manually set up. On the 605, some electrical failures can cause the FMSes to go out of sync, and this comes with only subtle indications (a white MSG on the scratch pad). In a level D sim, nav-to-nav transfer occurs even if this has happened.
-
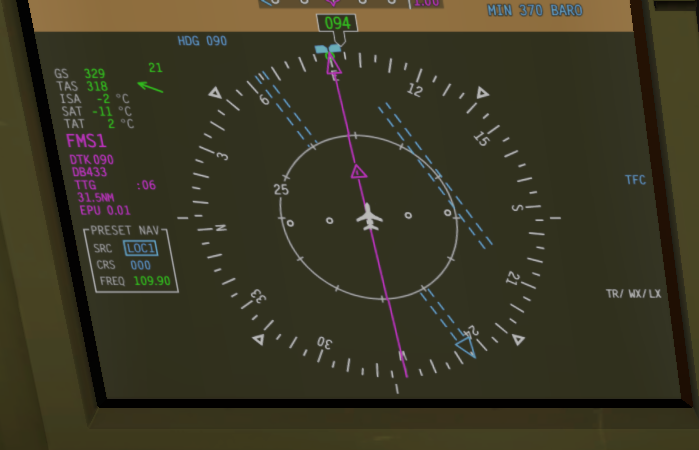
Possibly the 650 might have changed, this is from the 605 FMS Operator's Guide - FMS v4.0: On the attached screenshot (1.6.1), the FMS had completed the Nav-to-nav setup (EDDB ILS 25L), but not effected the nav-to-nav transfer yet as I had not armed APPR. The "ghost" needle was (correctly) pointing to 245º, but I was expecting the PRESET NAV box CRS to also show '245', rather than '000'. Fabulous simulator!!
-
Agreed, it is totally awesome!!!
-
IRS is no longer aligned in flight for whatever reason
Lightcivvie replied to skiselkov's topic in Systems and Tech
Non-debug way: If you have a red 'HDG' flag, go to the FMS, 'IRS CONTROL' page, select the offending IRS, and at the bottom right, enter the current heading obtained from the magnetic compass. This is also aircraft procedure, although there is more to it. I got the red HDG after using time acceleration, did not know about the sim option to realign in flight. -
What is the correct procedure to fly a VNAV approach?
Lightcivvie replied to cwjohan's topic in Flying the Challenger
Very good points you make about when exactly to arm APPR. You must be an 'old' Lear 55 pilot ;-) Same for the dangers of following SBAS guidance trustingly... -
Hi, I change the fuel load from the 'Edit weight and balance' menu option, using the sliders, but the Challenger just doesn't register the new fuel amount. The only way I am able to add more fuel than the default at startup is by actually going through the refueling procedure. What am I doing wrong? But what a great sim you have made there! PS. I just got a new Stream Deck +, and set it up to do Flight Guidance actions. The rotary knobs on the Deck really take flying this sim to the next level.
-
IRL, when VNAV mode is engaged, and you have altitude constraints on your FMS flight plan waypoints, the location above the VSI tape will show the next altitude constraint. RWY is displayed above the VSI instead of the next altitude constraint when you have an approach loaded, and the next waypoint on your flight is the runway. On your FMS 'LEGS' page, you will also see 'RWY' displayed on the right side of the waypoint list, just before the 'MISSED APPROACH'. Sometimes (depends on the FMS software version) you will see an altitude value instead of 'RWY' on the 'LEGS' page. If you see 'V-MDA' on the 'LEGS' page, you are not allowed to use VNAV past the final approach fix, this is an official aircraft limitation.
-
What is the correct procedure to fly a VNAV approach?
Lightcivvie replied to cwjohan's topic in Flying the Challenger
This thread quickly went from how to fly an RNAV/RNP approach to a discussion of minimums and what CDFA is. I'll give my answer on how to fly the RNAV(RNP) approach, but first: Most RNAV/RNP and overlay approaches have a descent trajectory that usually leads to 50 feet above the threshold, which has been coded into the FMS database. This means that the Challenger/Collins FMS can provide guidance along that trajectory, and I can fly it just like an ILS (with two HUGE caveats, more on that below). To check if the descent trajectory has been coded, I look at the FMS legs pages and check the altitudes and angles match the chart. I also check that V-MDA is not shown next to the missed approach waypoint on the right side of the FMS display (this would imply that a descent trajectory has NOT been coded, and I can't use VNAV past the FAF). TO FLY THE RNAV/RNP APPROACH (compared to an ILS) To fly an ILS, I set my minimums, and when cleared for the approach, I arm APPR. After GS capture, I set my missed approach altitude. On the FMA, I look for LOC1 to become armed, then captured, and for GS to become armed, then captured. To fly an RNAV/RNP, I set my minimums, and when cleared for the approach, I arm APPR and VNAV, and set my altitude selector to FAF crossing altitude. After GP capture, I set my missed approach altitude. On the FMA, I look for APPR LNV1 to become armed, then captured, and for GP to become armed, then captured (as VGP) ***. I also look for GPS APPR on my PFDs. THAT'S IT! It's that simple. The huge differences I mentioned? First, make DAMN sure you have the correct altimeter setting set. Second, once you reach minimums on the RNAV(RNP) approach, GP information IS ADVISORY ONLY AND DOES NOT GUARANTEE CLEARANCE FROM TERRAIN. The ILS GS is reliable to a much lower altitude. *** see below for why in some cases the vertical mode that initially arms and captures may be PATH and only when closer to the FAF will GP arm then capture. P.S. Now comes the fine print. You want to know the following facts about VNAV. There are 2 modes of interest for descent and approach: (V)PATH and (V)GP. KEY FACT 1: (V)GP mode is **IDENTICAL** to (ILS) GS mode - in this mode the aircraft will disregard the altitude selector. KEY FACT 2: (V)PATH mode considers the altitude selector. KEY FACT 3: (V)GP is only available with APPR mode (shown as APPR LNV1/2 on your FMAs), it is NEVER available in NAV mode (shown as LNV1/2 on FMAs). In NAV mode you will only ever get (V)PATH guidance. KEY FACT 4: In APPR mode, the FMS may initially provide (V)PATH guidance until sufficiently close to the FAF and lined up on final, then switch to (V)GP mode. Finally, there are some more things to consider. If the approach is coded in the FMS to use SBAS (WAAS, EGNOS and co.), the descent trajectory will be the same regardless of the temperature - just like an ILS. If it is NOT coded to use SBAS but only Baro-VNAV, or if it is but you change the approach setting in the FMS to use Baro-VNAV, then the descent trajectory will be affected by temperature (flatter/shallower when cold, steeper when hot. And distance-altitude checks won't help unless you do temperature compensation. But that is another topic altogether). You can see if an approach is SBAS or Baro-VNAV when you have selected the approach from the FMS, by pressing the 'ARR DATA' LSK. And, check carefully, there may be mistakes in coding of the database - happens more than you think. -
You don't mention yaw damper status. If both dampers are off (you will have an amber YAW DAMPER CAS message), AP won't engage.
-
it IS a wonderful sim that Hot Start have created here!!!! See the drawing (sic) below for the main gear locking mechanism. Claws that are part of the upper portion of the actuator (in black) grab the top of the lower portion of the actuator (in red - this is the shiny part of the actuator seen in the picture of one of the previous posts). The locking mechanism is a "hat" (in green) that positions itself over the claws and prevents them from releasing. When the gear handle is down, hydraulic pressure is continuously applied on the down side, which will (should) keep the gear in the down position, and the "hat" over the claws, even when the pins are not in. When you select gear up, hydraulic pressure lifts the hat, and pushes the lower actuator up a bit. The claws will spread and the actuator moves to the retracted position. Before you switch off hydraulic system 3, you have to put the pins in. The pin locks the "hat" over the claws, thus preventing actuator movement. If you forget to remove the pins and take off, the gear will not come up because the hat remains in place and the claws can't spread. People have tried...

-
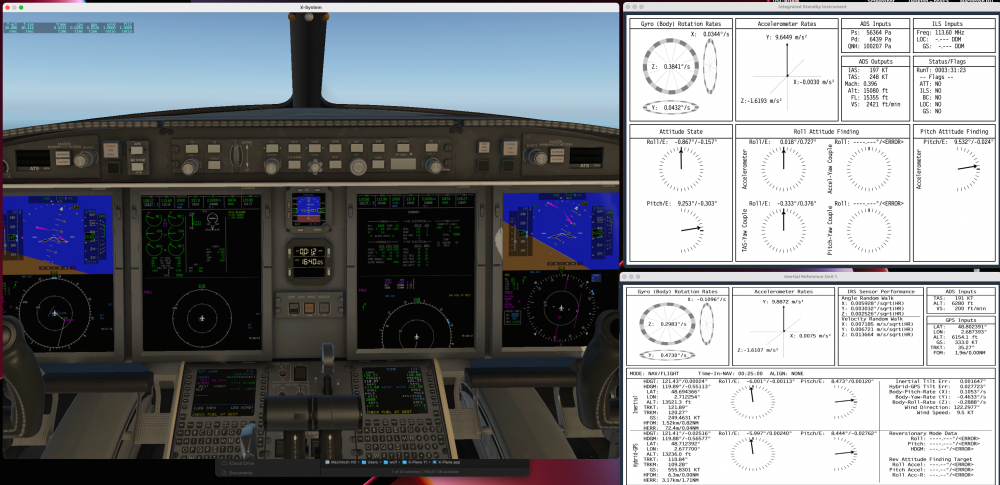
Seeing same issue intermittently, MBP M1Pro 16GB. ISI attitude info correct, but IRS 1 (and pbbly 2) get stuttery. I’ll add a screenshot when I get home. Aircraft remains flyable using standby horizon. CAS correctly points out EFIS MISCOMP and comparator flags appear. So it really “looks” like an IRS issue. Autopilot disengages as expected. But what a fabulous simulation you have made!! I flew 604/605 and am currently SFE on type. The systems AND the visual realism are out of this world, congratulations!! Wow!!! regards