Litjan
-
Posts
5,718 -
Joined
-
Last visited
-
Days Won
424
Content Type
Profiles
Forums
Latest X-Plane & Community News
Events
Downloads
Store
Everything posted by Litjan
-
Hi Roberto, Just to rule out some other problem I would: 2.) Remove all other plugins (temporarily move to another folder you make) to rule out any interference 3.) Windows defender is causing a problem when you "modify the route" in the FMS, i.e. every time you enter or change a routing - this accesses the navigational database and Windows Defender is trying to analyze every access...which slows things down. Just enter its settings and exclude the X-Plane folder from "live checking". 4.) You can check your VRAM usage (it has nothing to do with the computational load of your video card) in the X-Plane "graphics setting" - it will say how much VRAM you use under the "texture" slider. 5.) March 2021 version for Gizmo should be fine... I am wary of programs like "Riva Tuner" if a user is not an expert on computers it is likely to turn something on or off that hurts performance in an unexpected way. Also do the "graphical output" thing I told you so we can see if you suffer from generally bad framerates or just temporary stutters.
-
There could be several reasons for performance problems, I will try to mention them so you can rule them out: 1.) Not using Vulkan 2.) Interference with other plugins 3.) Failure to exclude the X-Plane folder from Microsoft Defender surveillance 4.) Exceeding VRAM (often due to other add-ons with extensive textures, like some airports) 5.) Gizmo garbage collector settings (you already tried that) You can output the framerate as a graph if you select the corresponding checkbox in the DATA OUT tab, then trigger the graphical display with ctrl-g. This will help you judge how "smooth" your framerate really is. Let me know if this helps? Cheers, Jan
-
Hmm - can we get you to attach your log.txt file here so we can take a look and possibly guess what happens? It could also be some plugin incompatibility - but the log would let us give you a bit of advice which one could be problematic. Thanks, jan
-
Hi, if you have no sounds at all...something is very wrong. We have had reports from users with weak soundcards that could only play a certain number of channels and some callouts and such were dropped...but no sound? No idea. I don´t want to go through the obvious (do other airplanes make sound, did you enable your speakers, did you actually start the aircraft so that it can make sounds,...), I will venture out on a limb and say that if you have no sounds at all, you have set something up wrong with your computer/X-Plane installation. Cheers, Jan
-
Older TCAS systems can select IF they want to transmit Altitude information or just the transponder code. I think newer systems will always display altitude information, there really is no reason to NOT transmit it (unless you want to bust an airspace and not get caught!) The ABV and BLW governs the DISPLAY of traffic on your EHSI, it does not change how TCAS reacts to other traffic. If you select BLW you can see traffic far below you (range +2700/ -8000 feet, iirc) - if the switch is in the normal position the altitude range is +/- 2700 feet iirc. only.
-
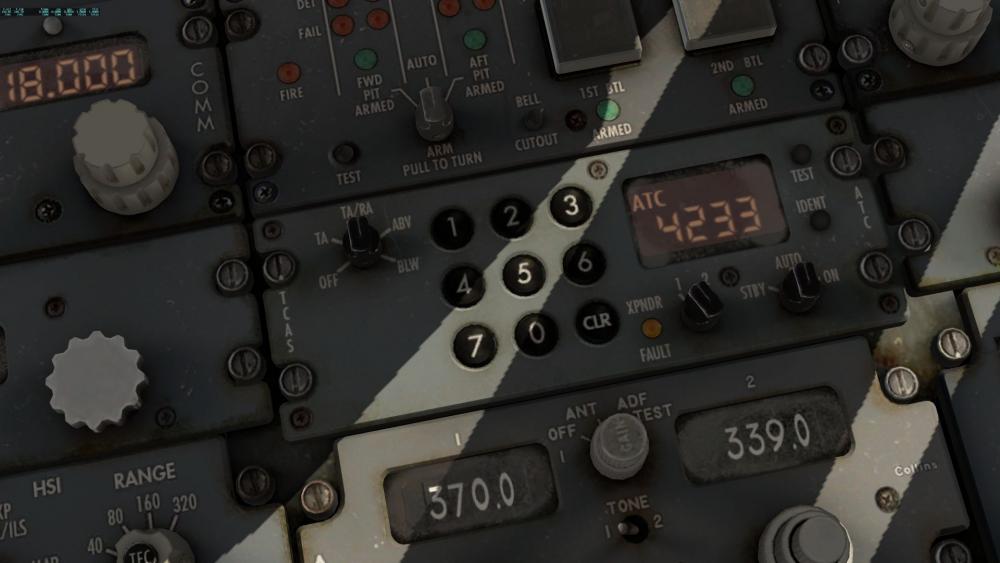
When you are about to push back or start taxiing you should select the Transponder switch to AUTO. This will make the transponder ON THE GROUND send a coded reply when interrogated (so that ATC can see where you taxi on the airport) but will not send other information, so aircraft flying overhead will not "see" you on their traffic display. Once the plane lifts off, it will also reply with altitude (so TCAS on other aircraft can work). When you enter the runway you should set the TCAS mode selector to TA/RA (so that your aircraft can react to other aircraft´s tranponder signals). When you leave the runway after landing set the TCAS mode selector to OFF again. After parking the aircraft, set the Transponder switch to STBY again. Cheers, Jan

-
Hmm - this may be worth a shot - there are lots of knowledgable folks around that forum as well!
-
There are certain instances (in our aircraft, not sure about the Zibo) where we disconnect the users input from the throttles - normally this is when the autothrottle is in control of them and we can´t have the user interfere with it´s operation (i.e. the autothrottle wants to set 50% N1 but the user´s joystick throttle is at 90%) This only happens if the user actually engages the autothrottle, though - and since you seem to be at least somewhat familiar with aircraft I don´t think that you do that? If you select "cold and dark" in the IXEG preflight menu the plane should be totally dormant - and there is no power for the autothrottle to work. You should be able to move the throttles with your joystick or mouse, though.
-
My money is on the Honeycomb Bravo causing problems...it seems to be prone to cause them, at least I got the impression. Maybe unplug it (does it have a dedicated software interface?) and try again?
-
Hi Tristan, the real 737-300 comes in a myriad of different weights...depending on configuration, route flown, etc. There is the absolute empty weight (no crew, no oil, no equipment, no nothing). Then there is the Dry Operating Weight (DOW) with everything needed except for passengers and fuel. Then there is the Zero Fuel Weight (ZFW) with everything loaded...except for fuel. Then there is the Grossweight (GW) which is the actual current weight of the aircraft. When the plane is about to take off, we call the Grossweight at that second the Take off Weight (TOW) - this determines how much fuel you will need for the trip for planning purposes. The only weights of any interest to the pilot are the ZFW "zero fuel weight" (i.e. weight with all fuel flown out) and the TOW "take off weight" (i.e. the weight the plane has when entering the runway for takeoff. I am not familiar with SimBrief, but all the other weights you enter should have no effect at all on the flightplan, performance or fuel needed. It is like entering the empty weight of your car when you try to figure out how much fuel you will need when you go on vacation with your family...it is not relevant, only the actual weights are. So looking at the SimBrief weights you want to make sure that the OEW is the same as the empty weight in the X-Plane menu. Then load up the plane with passengers (104kgs x number of pax) and add that - this should be equal to the ZFW in the IXEG menu. OEW (empty weight) + pax = ZFW ZFW + Fuel = GW (gross weight or actual weight) Cheers, Jan
-
Good morning, Silvereagle! I have moved this to "general discussion" as this is a more fitting place than the Gizmo soft crashes forum, but a link to the new place should let you find it. The problem is probably caused by either the plugin called "fly with lua" - if you have it, you need to physically move it out of your X-Plane folder, simply "closing it" in the plugin manager does not work. Other than that it could be some mapping problem, try to access the joystick configuration menu and make sure that the axis you are trying to use is bound to "throttle" and that there is no axis conflict (usually shown in red). Let me know if this helps, Cheers, Jan
-
 Sometimes it is the easy thing that is hard to spot! I am happy that you figured out what was the problem and hope that you can enjoy the 737 now! A little anecdote: You would not believe how many CATIIIa approaches got off to a bad start because the (professionally trained) pilots forgot to tune the ILS on the second set and then could not engage the second autopilot...
 -
Hi, try the IXEG preferences menu to adjust sound - bump mouse against left side of screen to access it.
-
I am sorry that you still have problems - but at the same time I am fairly certain that they are due to "operator error". While our aircraft is certainly not perfect, the problems you describe are certainly unique. Just the fact that you place an aircraft with 0 airspeed into midair and then are confused why it "pitches up and is uncontrollable" makes me think that maybe there are further issues like that which make the 737 exhibit "unexplicable" behaviour for you. But you are right - it is most important to have fun when playing flightsimulation games and if something causes frustration - it is sometimes best to just move on. All the best, Jan
-
If your preference file is the cause of your problem, you are just copying over the problem. Dont do that. And I would recommend installing the 737 totally fresh, that way also the plugin will be the correct version and such...
-
You can simply copy an existing installation wherever you want. You can simply make a new folder called "X-Plane Vanilla Testbed" and then a subfolder X-Plane 11 in there...
-
PS: You can simply install another copy of X-Plane into a different directory...if you have a lot of stuff installed in your main X-Plane installation... I like to keep one like that as a "testbed".
-
Just got back - hmm, so it does sound like there is a deeper problem in your system. Reinstalling the aircraft is probably not going to help, although it can´t hurt, either. To really troubleshoot the problem you will have to revert your X-Plane setup to a "vanilla" situation (as if you just downloaded it from Laminar Research) and then install the 737. That would be the basis to really find out what is going on, without possible interference from other plugins and add-ons. Cheers, Jan
-
Hehe, you need to read exactly what I wrote. It is vitally important for this to work. I will quote myself again: The behaviour you describe is exactly what I would expect if you drag an aircraft across uneven ground at lightning speed - then put it into the air at 0 airspeed ;-)
-
Yes, this is very much the case - especially when using the "10NM final approach" - X-Plane will try to set up the plane correctly for the approach, but this will not work reliably with a custom aircraft that is using many variables that our outside X-Plane´s control. A surefire way to start up in the air is this: Spawn on the ground, startup state "ready to fly". Then PAUSE, use the map to first set altitude to 3000 or 4000 or so...then set up speed to 220 kts, and pitch to 5 degrees (also heading if needed). Then drag the plane to about 20 NM out. Now unpause - then immediately click on AP A CMD and select a pitch mode (like ALT HOLD), then turn on the Autothrottle (this will engage speed mode). Now you are safe ;-) Now you can raise the gear (and release the parking brake), and then use the autopilot to set up for an approach at leisure. Cheers, Jan
-
Just tried it myself - and I managed to get into a similar state that you describe. What happened in my case is that I was in a rapid climb to 4000 feet when the GS captured - but the plane was not fast enough pitching down to intercept it and it went "out of bounds", so to say. I would recommend moving the plane manually back a bit further after using the "10 NM final" setup. The plane needs more time to stabilize, and you want to intercept the glideslope at a shallow enough angle that the plane can actually follow it. To move the plane, just open the map (m key), then drag the plane on the map. Let me know if that helps? Cheers, Jan
-
Hmm, this sounds like some more serious underlying issue. If the AP light flashes red, the AP is not in control. Check the FMA (flight mode annunciation) - you want green labels in the top row, and also CMD in green on the very right side. One measure (to rule out simple operator error) I find extremely helpful is uploading a short video of how things go wrong. Even a clip filmed with a smartphone (held fairly steady) can bring a lot of things to light! After you rule out unwanted joystick interference and things like going too slow (stalling) - the next step would be to (temporarily) uninstall all other addons, especially things like XPUIPC and fly-with-lua. Another source of trouble could be erroneous joystick button or axis assignments that cause the autopilot to disconnect, especially things like trim (which will disconnect the autopilot) and secondary axis assignments that can double the regular flightcontrol axis assignments. Last resort would be trying with the joystick disconnected (especially the Honeycomb Throttle, I have read many quirky things about it) and see if that helps. It has to be something unique to your setup, otherwise this forum would be full of complaints about this with several thousand copies sold... and I am determined to help you find out what it is . Cheers, Jan
-
Hi there! Glad you are enjoying the aircraft - but sad to hear that you are having trouble with it. From the sound of it, you are doing pretty much everything correctly. The one thing that raises a flag is the "instability in pitch" that you describe. That sounds like possibly your joystick might be interfering with the autopilot trying to fly the aircraft. On the second picture you posted you can see that the autopilot is in (yellow) CWS P - which means the pitch is controlled by "control wheel steering" - this means that you either never selected a pitch command (like ALT HOLD) or that it disconnected because it detected the pilot giving inputs on the "control wheel" = joystick in the pitch channel. If you have a "noisy" joystick that is sending erroneous pitch commands, you can increase the "joystick dead zone" in the IXEG preferences menu that comes out if you bump against the left-hand screen edge. Let me know if this info helped? Cheers, Jan
-
Autopilot Vertical Speed selector stuck
Litjan replied to AppleM1's topic in 737-300 Aircraft Systems and Operation
Hi, that is a known bug that Tom fixed already for the next release (whenever that will be ). Here is what happens: Currently the V/S scrollwheel is coded to have a limited number of revolutions up or down. So you can roll it down for maybe -10.000 feet...then it gets stuck. Whenever you select another mode, the number on the display gets reset to 0000 - so it is hard to see that you maybe already almost "used up" your "rolling down" number. So one trick is to select another mode, then roll your V/S scrollwheel the "other way"...this frees up additional revolutions in the other direction. Think of a string attached inside...once you are at the limit, you can´t turn it further anymore. But rolling the other way will loosen up the string again. Sorry for the inconvenience, Jan -
TCAS would not activate
Litjan replied to luiz_monza's topic in 737-300 Aircraft Systems and Operation
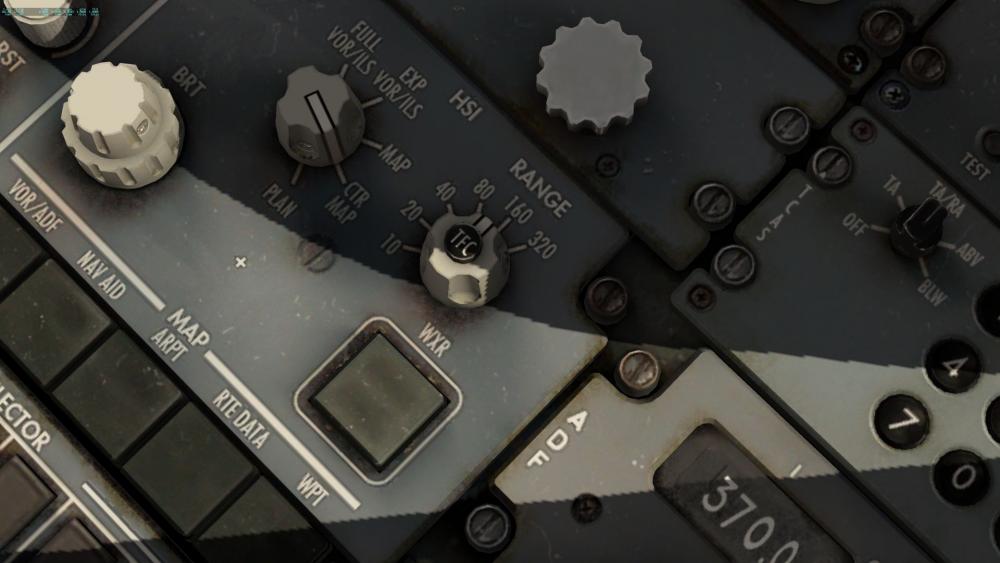
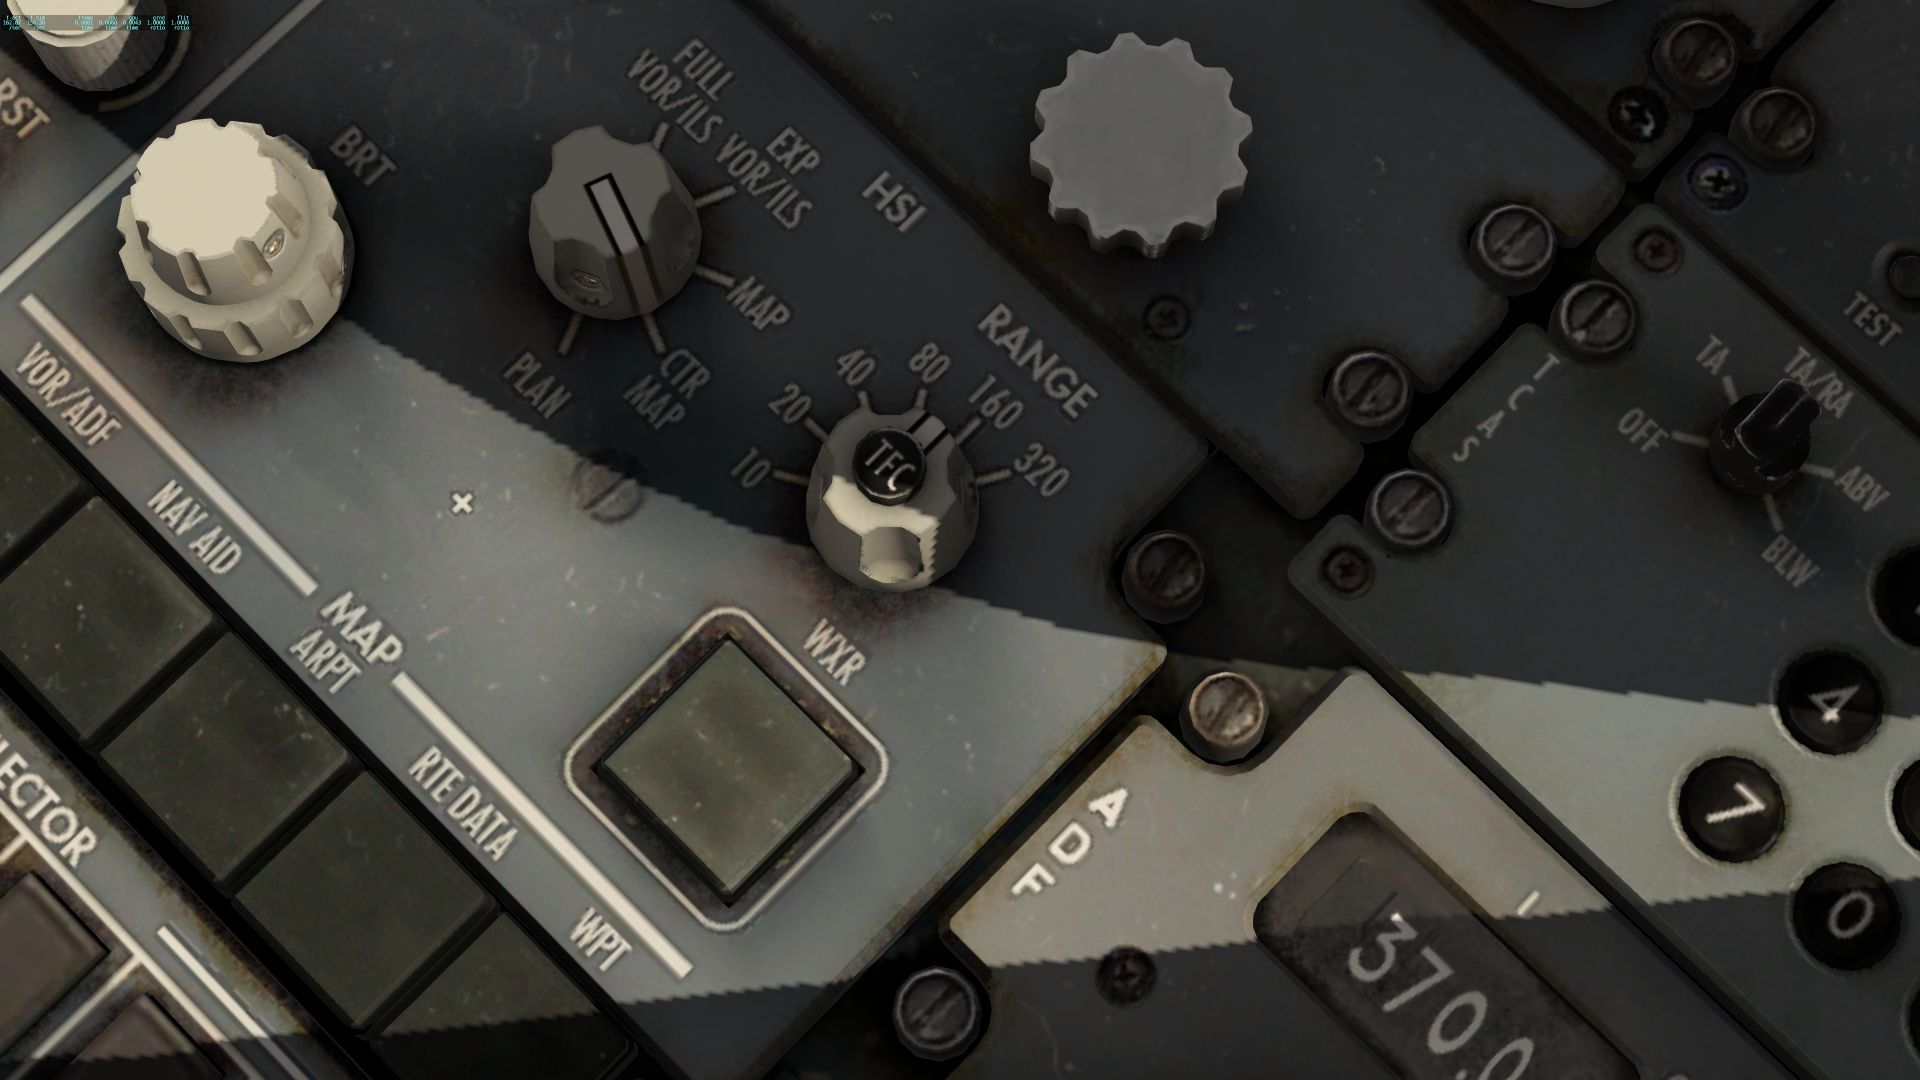
Hi Luiz, to see traffic on your navigation display (ND) you need to be in a mode that displays navigational data (i.e. NOT FULL VOR/ILS or PLAN modes) - and you need to set up your transponder to be active, and also TCAS to at least TA. In addition you need to click on the TFC button that is on top of your map range display, check out these two pics: