
Leaderboard


Popular Content
Showing content with the highest reputation on 01/04/2024 in all areas
-
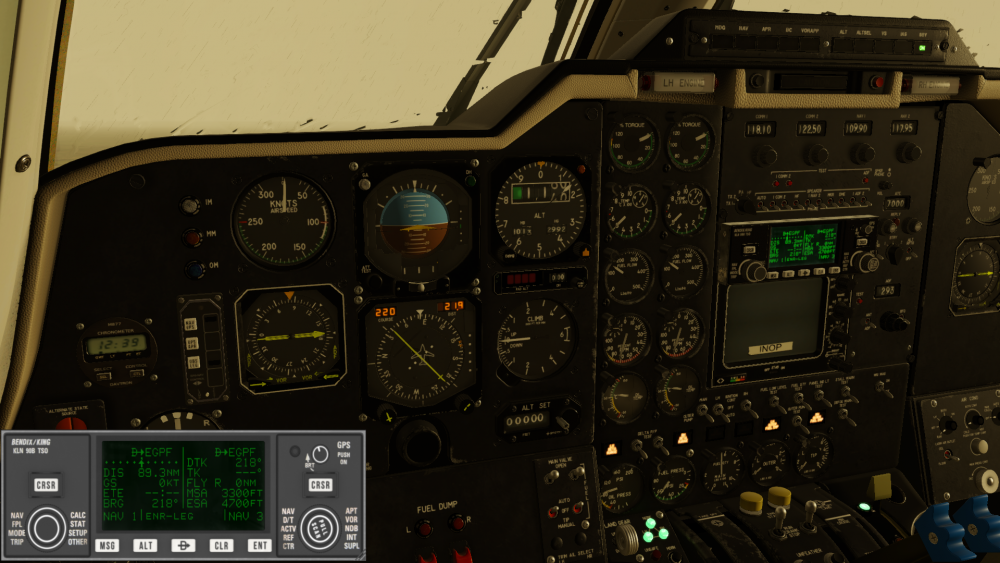
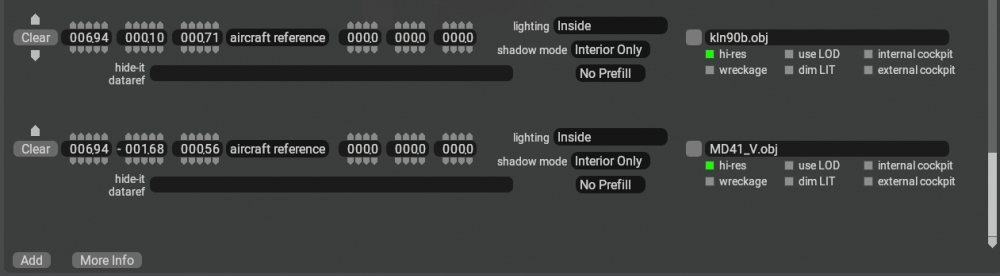
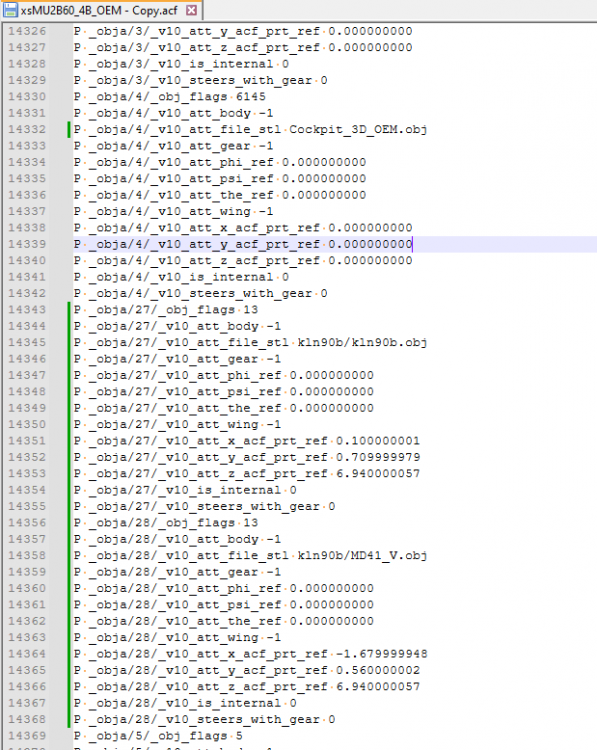
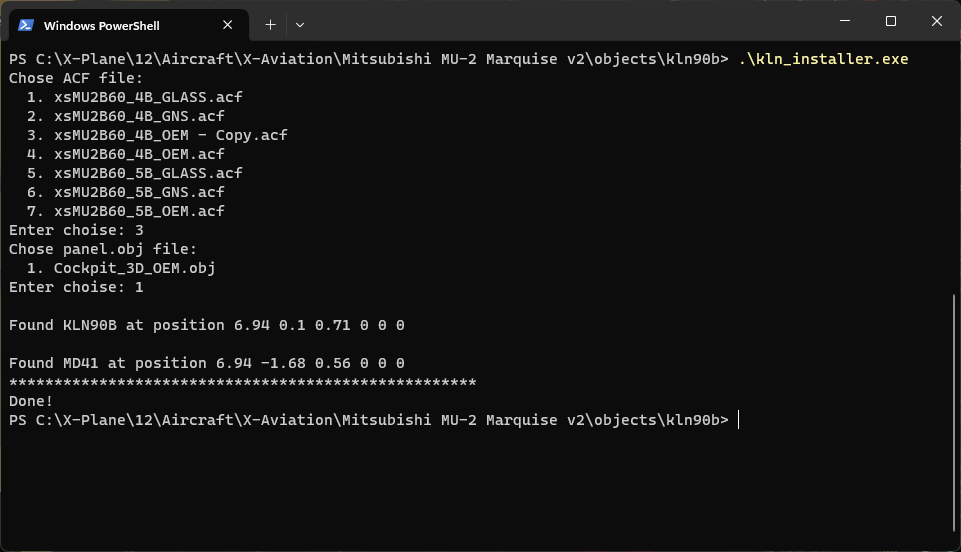
If you've ever looked at a Garmin GNS530 and thought "that's just a bit too mid-2000s modern for me"... today I've successfully integrated Todor Radonov / Todir's KLN 90B plugin with the MU-2: The outline of the installation process is: install the KLN90B plugin place the GPS and MD41 panels in the 3D cockpit in PlaneMaker customise where the GPS screen gets drawn on the MU-2's panel texture, along with the UV mapping for the GPS object - don't worry, I've done this step use a utility that comes with the plugin to add manipulators for the GPS and MD41 to the MU-2's cockpit Steps: Download Todir's KLN90B - get the latest .zip: https://github.com/todirbg/kln90b/releases (at time of writing this was 0.99.1b) Copy the `objects` and `plugins` folder into your MU-2 directory - don't copy `cockpit_3d` Replace the `kln90b_click_regions.obj` file in MU2/objects/kln90b with the attached version (this has the updated UV mapping) Make a backup of your 4B OEM acf file e.g. `xsMU2B60_4B_OEM.ackbak` Open the 4B OEM acf (not the backup!) in PlaneMaker Standard > Objects > Add: select `kln90b.obj` from MU2/objects/kln90b set its coordinates to 6.94, 0.10, 0.71 set lighting to Inside, shadow mode Interior Only, hi-res Yes/ticked/green/selected Add `MD41_V.obj` in the same way, coordinates 6.94, -1.68, 0.56, same parameters Save the .acf - leave PlaneMaker open for now At this point, you can test your progress by launching the MU-2. You will see the KLN90B and the MD41 mode controller on the panel, albeit with a blank screen and no clickspots. Edit MU2/plugins/KLN90B/data/modules/main.lua (in Notepad++ or VS Code or some other sensible editor): line 28ish, the KLN90_panel component, change `position = {814, 0, size[1], size[2]}` to `position = {0, 1138, size[1], size[2]}` (this determines where on the MU-2's panel texture the GPS screen is drawn. I've picked a spot which appears unused.) The next three steps are to accommodate a bug in the installer utility Copy MU2/objects/Cockpit_3D/Cockpit_3D_OEM.obj to the MU2 folder Make a temporary copy of `xsMU2B60_4B_OEM.acf` Edit the temporary copy in Notepad++ or similar: search for kln90b. you should find where the KLN90B object is specified, and just below it the MD41 mode controller search for Cockpit_3D_OEM.obj - you will probably find it just below the MD41 note the objects are identified with a number e.g. _obja/27/, _obja/28/ cut all the lines for the KLN90B and MD41 objects and paste after the Cockpit_3D_OEM.obj - for me they were numbered 27, 28 and 4 respectively. (cursed alphabetic number ordering strikes again) change "Cockpit_32/Cockpit_3D_OEM.obj" to just "Cockpit_3D_OEM.obj" Save the changes to the temporary copy .acf Run MU2/objects/kln_installer.exe: select your temporary .acf copy select Cockpit_3D_OEM.obj it should generate a new file in MU2/objects/kln90b: Cockpit_3D_OEM_kln90b.obj - this is the existing cockpit object with extra clickspots and the screen all in the right places Move MU2/objects/kln90b/Cockpit_3D_OEM_kln90b.obj into MU2/objects/Cockpit_3D In PlaneMaker, under Standard > Objects, find Cockpit_3D_OEM.obj, click the box to the left of its name and change the file to Cockpit_3D_OEM_kln90b.obj Save the plane in PlaneMaker To undo all of this: Replace xsMU2B60_4B_OEM.acf with xsMU2B60_4B_OEM.acfbak Steps 10-12 are a workaround for a couple of bugs with kln_installer.exe, which doesn't expect files to be in certain locations or for a numbered sequence to go 27, 28, 3, 4... they might become unnecessary with a future version of the KLN90B If you'd like to position the KLN90B instruments elsewhere, use the Visualisation settings in PlaneMaker to hide most of the exterior and interior objects, and make adjustments. Then run kln_installer.exe again to regenerate the _kln90b.obj cockpit object. Snags: MD41 buttons don't seem to light up properly in the 3D cockpit. You can click on the annunciators to get a 2D popup - but I'd rather the 3D instrument worked correctly and I never see the 2D popup KLN90B overlaps slightly with the top of the weather radar Autopilot / FD / HSI mapping not figured out just yet Powered by the default battery bus (or battery switch?) - you can give it a dataref representing a voltage bus but there's none available currently representing the radio bus voltages. This could be modded in though. Happy flying folks! kln90b_click_regions.obj

 1 point
 -
The gen_LED instrument can display leading zeros. You need to modify the png texture.1 point


