

tkyler
-
Posts
2,825 -
Joined
-
Last visited
-
Days Won
612
Content Type
Profiles
Forums
Latest X-Plane & Community News
Events
Downloads
Store
Everything posted by tkyler
-
Good call..just makes sense! Its just that I've been in so many older ones and the pics I used for reference were amber....but makes 10x the sense to make em green. done!
-
Thx Jerry, I put it in the Bug tracker for the Moo
-
data:image/gif;base64,R0lGODlhAQABAPABAP///wAAACH5BAEKAAAALAAAAAABAAEAAAICRAEAOw==
-

Reality XP GTN 750/650 Integration
tkyler replied to riceman718's topic in Mitsubishi Marquise MU-2 v2
http://www.togasim.com/mu2docs/supplements/bug_tracker.html ongoing list of right good info! Just posted today. -
http://www.togasim.com/mu2docs/
-
Officially Announcing Mitsubishi MU-2B-60 Marquise 2.0!
tkyler replied to Cameron's topic in Mitsubishi MU-2 v2
That is correct, but make sure 1) AP is engaged and 2) you're not in ALT mode (that's got me several time). My method for "altitude change"....FWIW....is to set the ALT preselect first (if desired), then disconnect ALT mode (if selected), then adjust the pitch trim wheel to get the VS desired...then hit VS...and finally...hit ALTSEL to arm the altitude capture (if you want). -TomK -
Looks like the transponder mode for Mode C is 3...even though it says TEST above. For V12, '3' will be Mode C. Since the source code inidcates that >= 2 is mode C, I'll set it to 3 and that way it should work for you and be rady for V12 as well. -TomK
-
No worries...if developers gracefully accept that we're all probably equally capable and creative, but only differ in what we get around to implementing for all sorts of diverse reasons.....time, market, resources, our own limited experiences....who knows... and not some kind of measure of who's smarter, then we all win. Your 'snapping' flap controls with FLAP axis are in place for the next update -TomK
-
For the early-birds https://forums.x-pilot.com/forums/topic/24825-toga-simulations-mu2-version-20-paint-kit-rc1/
-
- 3
-

-
RC1: Paint Kit includes 4 Photoshop files and *.fbx file of "paintable surfaces" for import into 3D programs for painting purposes only. 3D mesh is property of TOGA Sim and not to be used for anything other than personal livery painting and is not to be distributed or used for any other purpose. While the docs section for liveries are sparse at the moment, there is a brief graphical of what each exterior object contains. RC2: Fixed UVs for tip tank Fasteners. new *.fbx. All other files same as RC1. http://togasim.com/mu2docs/supplements/paint_kit.html TOGAsimMU-2_Paint_Kit_RC2.zip
-
FYI, This is a tougher geometry to paint than most are used to, especially the tip tanks. The 3D was optimized for UV space, not ease of painting. If you look at the C-FRWK exterior_5_ALB tip tank stripes...you'll see what I mean. Its for this reason I provide the *.FBX file for import in to Blender/Substance. My preferred technique is to use Blender (import the FBX) and use "projected closed bezier curves" via the "knife project" tool to cut the stripes and patterns into the 3D mesh itself mesh. These resultant 'graphics meshes' are then rapidly baked into "graphics masks" that you can overlay on the UV for tracing with a pen tool.. or bring into Substance as a mask.
-
The paint kit is not officially posted...because I want to add more instructions; however, paint kits are "extra" and come with no guarantee of quality :P.....so I can post it the way it is if you like.....because most livery painters are used to the "mess" of layers, and assets and can usually make sense out of it anyhow. Anybody interested? Once I get all the initial bugs and hardware settled, I'll also get that paint kit cleaned up a bit for future folks. If anybody is willing to take it as it is now, let me know and I'll get it uploaded as a "beta" version of the paint kit The paint kit is 4 photoshop files, plus 5 additional "mask image" pngs and a *.fbx file of all the paintable surfaces that can be imported into blender of Substance.
-
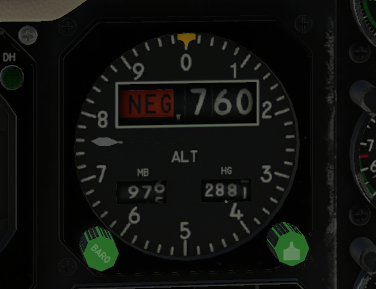
baro command implemnted, plus NEG flag
-
Thx. its already been implemented and indeed I use my "lift levers" command as the "command" to jump the gate. -TomK
-
-
Can anyone hit torque settings from PoH at altitude ?
tkyler replied to Matchstick's topic in Mitsubishi Marquise MU-2 v2
You are definitely not doing anything wrong. The TPE-331 sim in XPlane is relatively generic. Getting accurate numbers out of the engine for X-Plane is easily a multi-month affair of nothing but flight testing and wrangling with X-Plane to hopefully get close. Once we get the interface and operational kinks worked out, we will look at improving performance numbers. I suspect before its all over, I will have completely overriden X-Plane's engine model.- 1 reply
-
- 1
-

-
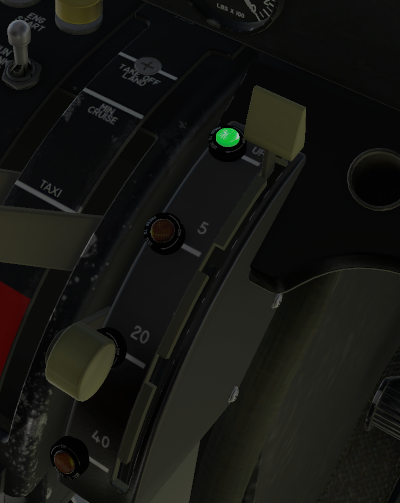
right. in the new setup, EXT will basically be ON. "EXTended and illuminated" OFF (as labled...not the datarefs sense) is extended by not-illuminated. and OFF (in the dataref sense) will align with RET (RETracted and OFF).
-
so with the relabeling....and now that Im' testing it. I find it a bit awkward to have an "extension" command. I'm inclined to use the default commands to "extend and illuminate" and "extinguish and retract"...and just use the mouse manipulator to move the switches to the OFF position, as in my experiences in the Moo..its a pretty rare position to use. any objections or thoughts?
-
I would agree with that. no telling where I got that..probably a photo from someone else's "remodled Moo"....but its that way in the manual for sure. I'll adjust. Good catch! But I do find it a bit weird to pull the switches "back" to make the lights "extend forward" Gonna get some comments on this I think...but we do have the documentation. -TomK
-
So looking at these:

-
So I'm thinking the default commands for the OFF and ON..and custom for the extension. Executing the commmands will "move the switches" and the code will run based on switch position (and power states)
-
The default commands don't account for the extension...only the off/on states. so I'm inclined to go custom all the way, however, I could use the default commands for the OFF/ON and provide custom for the extension? thoughts?
-
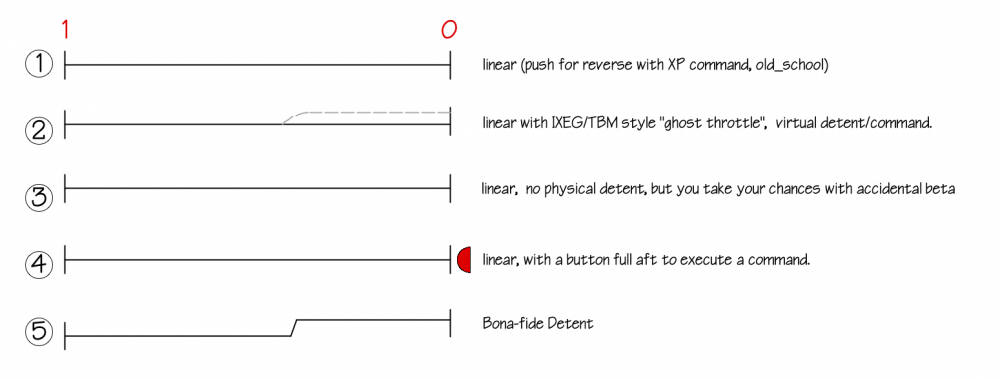
I actually tried early on, but wasn't happy with either the sound samples I had....nor the hardware handling till last night The new throttle mappings will come out at the next update. With the implementation of the "TBM-style" throttle option, this will make implementing those sound much easier across differing configurations. So really its a matter of getting just the right samples...and once I have those, putting those sounds in is a 30 minute affair...at which point we can get it out to you guys. So yes...definitely on a short todo list. -TomK
-
POH or performance data for MU-2?
tkyler replied to mfarmercytz's topic in Mitsubishi Marquise MU-2 v2
I'll probalby do a performance pass at some point after "casual operation" stabilizes. The acf model and airfoils, while refined, still has some old roots and needs to be "flight tested" proper at some point. I've learned quite a bit about performance since the early days of my XP work. -Tomk -
There were a lot of holes in the landing light controls....I wired them up to their respective busses, including the extension motor..so the whole external lighting just got revamped. I'm putting in commands for those landing lights now.

