

tkyler
-
Posts
2,825 -
Joined
-
Last visited
-
Days Won
612
Content Type
Profiles
Forums
Latest X-Plane & Community News
Events
Downloads
Store
Everything posted by tkyler
-
A bit of good news to report I guess. I finally got the plugin project moved to my home machine. Why is that a good thing? Well imagine working on xplane stuff all day and ready to go home. Who wants to stay late and work at the office when you have dinner and family at home? Not me. I don't mind working on the plugin at home, it can be a bit relaxing...so it's nice to get it set up. With that in mind, I made some progress on the quadrant. I'm putting in code to cater to the hardware and keyboard users and that's being a bit challenging with the custom datarefs. But the props are up and working, throttles, condition levers, etc....dare I say I'm cresting the difficult stuff and hopefully moving downhill. I suspect I'll work on this a few times a week in the evenings and get this thing out.
-

Updates via .zip vs .exe installation files.
tkyler replied to StormyPilot's topic in General Discussion
Sorry...I use the term 'exe' generically and not in the literal *.exe sense. The installer is consistent across Mac and Windows.....I think it is a dmg on mac :-P I honestly don't know because x-aviation does the packaging. Cameron? ...and for those folks who might wonder why I wouldn't know, let me just say it's the fact that x-aviation handles it for me and I don' t have to deal with deployment issues is why I go with x-aviation in the first place :-) ...so I can worry about development! -
Thanks for your input, but your view is very limited. If I have a DRM product and 60% of the market is legit and 40% is black market, yet I make a million bucks on the 60% and that is sufficient for me...what do I care if 40% if pirated? The goal set upon in the production of the product has been reached and/or exceeded. You're arguing a point from a minority of users, who's view, while understandable actually, represents a minority of pirates. What people fail to realize is that we are software users ourselves....and I have pirated software myself also and have a rather solid handle on why I pirate and to what ends I pirate and whether or not it violates the spirit of the software license. I have never used pirated software in the pursuit of income or pleasure. Having dealt with DRM ourselves, we are keenly aware of the "annoyances" associated with DRM and work to alleviate those annoyances. We think we have succeeded to a pretty good degree...enough so that I even have DRM versions of my own products on my own machine. I actually have to get licenses from x-aviation to run my own stuff!...and you know what? It ain't that bad. I have nothing to offer those who find it offensive or troublesome. My personal opinion is that we deal with rights management all the time....whether digital or otherwise and if people get put off by having to enter a user name and password or send an email to troubleshoot a problem once a year, then screw em' They're just lazy and inconsiderate and I don't care to have them as a customer. I am doing well enough to gladly not have to deal with the whiners. I am committed to my customers and have contingencies should I or x-aviation disappear to make sure my customers have access to the product they paid for for all time. I can offer no more. If someone doesn't like it, they don't have to buy it....or they can try and pirate it and crack it! ;-) Good luck on the MU-2...the DRM was programmed by one hell of a programmer! By the time a product gets so in-demand that someone moves to crack it...chances are I'll be more than happy with my income and probably won't care and be on to other things.
-
A "cockpit object" is a 3D polygonal mesh created in a 3D program like any other 3D shape, but it has a few special conditions on it. Unlike regular objects that make up the parts of xplane aircraft like the wings, gear or fuselage (the ones found in the 'objects' folder), the cockpit object is a special object and x-plane recognizes an object as a 'cockpit object' when it is named properly and located in the proper location as Zach mentioned. You can have only one cockpit object per aircraft* (Two actually if you use the INN / OUT method...a topic for another time). What makes the cockpit object special is that the cockpit object can possess special commands in it (remember it's a text file) that allow x-plane to interact with the cockpit in 3D. The way you get these commands to work is through using special tools in the 3D programs Blender or AC3D, which has plugins that allow you to do this. So if you had an object you wanted to make a cockpit object, generally you'd get this object into Blender or AC3D, do what you need to do to it and then export it and put it in the right place in the aircraft folder. The "do what you need to do" part is the vast part that requires a good amount of reading, practice and pretty much lots of question asking.
-
WHOA! Will definitely fix that in the next update! Thanks for pointing that out.
-
TThank you, I'm glad you enjoy it, I hope the future updates will make it even more enjoyable. here's probably a 2-phase solution. 1.) I can add in a "physics mesh" that will keep the camera in the cockpit area I believe and 2.) Adjust the sensitivities in Track_IR Point 1 should go a long way towards helping moreso than point 2 and it's a feature xplane has supported a while but I have not taken advantage of. I will work this in as soon as is practical after V1.5...perhaps as part of the V1.5 update. never having tried it, I have no idea how tough it will be but suspect it should be easy.
-
Well it sits a week or two between me getting to work on it. But I have worked on it a bit the other day. I moved through the radio panel and got most all the buttons and knobs animating. So a bit closer still. Video of radio stack animation below. Now one consequence of the custom programming is that you should be able to actually use the TX1 / TX2 / PA switch with vatsim to put in a frequency in com1 and com2 and change from com1 to com2 with the TX switch......so this is helpful when transitioning from tower / approach / center and will make the MU2 with vatsim that much more realistic. http://dl.dropbox.com/u/955680/radio.mov
-
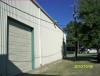
Definitely something different. My brother is a HVAC engineer and needed a quick visualization of a outdoor AC unit as it would look installed on a existing bldg. I don't do comps much, but it was something different. Had to paint out electrical service and wire shadows on the bldg (original image below). The cool part was "baking" the shadowing onto the bldg. Fortunately blender renders "shadow with alpha" only so it can be layered in GIMP/Photoshop.

-
I'm well into writing the tutorial, but am going to wait until you have had a go at it Zach. What I do not want to do is put any more ideas into your head about how to approach the problem as you'll learn a lots more solving it on your own. As you work through it, we can take what you have achieved and work that into the tutorial for others.
-
Segfault, all I can promise you is I listen to and consider your concerns. I too have to deal with DRM in many of the softwares that I use and I know what I like and don't like and the best that I can do is try to balance everything the best I can. Customer freedom and flexibility is at the top of my list though, I promise you that.
-
Man I wish I knew...it's one of those 95% done, 95% to go things. I'm chipping away at it and it seems imminent, but my plate is quite full of higher priorities. Best I can do is keep at it. I do report in the progress thread whenever I work on it no matter how little so people know when I'm making progress, so keep that eye there!
-
Ok then. I'm going to being assembling the tutorial but not publish any posts or anything while you work through the problem, that would defeat the purpose of your learning. Do I have your permission to use your blender file and gauge in the creation of the tutorial?
-
If I recall, there is either a menu command in the plugins menu to activate the 2D popup of the overhead OR there maybe some mouse click hotspot on the panel that brings up the overhead popup. I don't have the docs in front of me, but having used it in the past, it seems it's one of those 2. I'd suggest starting by looking in the x-plane menu under "plugins" and see what you find there.
-
Actually, it is very well I believe. well...AFTER they made a few billion dollars. After I make a million bucks, I'll probably relax a bit on my DRM too. I am not disagreeing that what people want most is freedom, it is certainly fundamental to our way of life in the US and other countries as well; however, with the advent of the internet, freedoms will diminish whether we like it or not and each of us will have to take steps to try and best control our outcomes in life to be the way we want them. When this happens, not everyone will be satisfied. Life has no guarantees, Apple computer could fall tomorrow, so could Google or Dropbox and we would all lose some convenience if that happened. The only thing we can do is consider if what we are willing to give up for something balances out what we gain in return. For you DRM clearly does not, but for others it does. keep from piracy? none! Keep people from sharing a 100% working product? 100% Many more than Zero. We have data to support this. Thank you for your response though but you will never have absolute freedom and the very internet service you use to communicate with me is dependent upon someone else and their technology....there will ALWAYS be some level of trust you must put forth to get something in return and this will vary from situation to situation. I understand that with DRM though, this is not for you and that is OK.
-
Thank you very much! But of course there are 2 reasons why i will never buy your products: You're assumption on my lack of interest is way off base. You should check with someone before you interpret their motives. Both my products run on every platform x-plane does. My products are designed to work with x-plane, not a platform. I concede that other's lack of triple platform support causes doubt in customers mind as to what platforms are support by products and I NEED to clarify this on mine and XA's website, we'll do that! . The Falco is currently a special case though and we handle Linux Falco users on a per request basis for the moment. Assuming that you had to contact a lot of companies, it would indeed be a PITA...same as driving cross country in a Model T Ford...but technology gets better and someone has to be first! What does this mean? It means that as time progresses, you won't have to ask us to change machines but we'll still be using DRM to keep people from spreading it around...how we do this is our business. This method of software management WILL be the norm in 5+ years. Already big software companies are "leasing" and "renting" their software, and those ARE tied to hardware. As more companies do this, it WILL be cumbersome to the end user you are correct and the market will dictate that a new solution be demanded; hence our goals to make multi-machine DRM a reality in our market. So let me ask....IF you did not have to ask us to change computers, would you be against the DRM then? According to your reasoning, that would be a no and hopefully we can get you as a customer once we rectify that situation....unless you have another problem with it. In conclusion, I totally respect your comment as "just for the record" and am not trying to convince you. I am merely putting my "for the record" response for others to read. We are one of the first companies to be involved in web-based management of our software in this market and we expect a fair amount to be uncomfortable with it and from a business perspective, that is a risk we obviously are willing to take. I do thank you for you opinion though, it helps us get insight in how to better develop for all customers.
-
DOH...talk about tunnel vision! I did remember this and lost it in the conversion process. Yea, anytime you have two inputs needed to calculate one output you're generally in custom programming territority. I'm honestly no paid advertiser for gizmo but this is exactly why Ben has gone through the effort of creating it. As many people think that Ben's simply out trying to make a buck, people who have known us a long time know it's more than about money and this is a tool not only Ben, Even folks in laminar has said this (a scripting language) is just what the community needs to bring in more "layperson" programmers. It does take a small bit of study, but most people with some natural intuition can pick up basic dataref creation and simple formulas with those datarefs. I think when people see that a few lines of gizmo lua can get them where they want to go, most of the time in less than 30 minutes if they're comfortable with basic dataref creation, maybe they'll look at it differently. If you want / need any help on it, we'll help you here, in fact, I think your gauge is an excellent case for writing a proper distributable tutorial on a common feature authors need, so if you can be bribed, I'll help you along with it providing you can hand me some screenshots and things along the way that can be used in the tutorial...it's a great first example and its pretty simple. Sorry about migrating from the org post....the org has a ton of value in many many areas, but as a struggling up and comer forum, we feel we have some knowledge value here. I dont' think this will get you where you need to go. First a clarification question, the mach bezel rotates counterclockwise to indicate the mach number using the tip of the needle from the RPM indicator, is that correct? NOW, if you want to use temperature in your calculations for mach speed, then you'll need a custom script and a few extra lines of code. The general procedure is to gather you input datarefs, create your output datarefs and then calculate your values. The general outline of the script might go like so...refer to Ben's example to see how the actual code follows this outline, his order varies a little bit, the important thing is that all variables, the ones you create and the ones you get from xplane, they come before the "main" function: -- This is where you grab values from xplane to use in your calculations (the two dashes mean this line is a comment) GetDataref_from_xplane "outside air temperature" GetDataref_from_xplane "speed of aircraft" GetDataref_from_xplane "prop RPM" -- this is where you specify the custom dataref names that you'll use in blender to drive your animations. Create_dataref_in_gizmo "needle for RPM" (this isn't necessary but I like to keep all the logic in the script...personal preference) Create_dataerf_in_gizmo "mach_indicator" (bezel in this case, could be needle by someone else) Create_dataref_in_gizmo "MU_indicator" (recessed bezel?) -- In gizmo there is a function called "MAIN" and it runs every frame in x-plane. -- The basic framework of the main function is like this function main() -- this line is required to begin the main function PUT YOUR EQUATIONS HERE. end -- this line is required to terminate the 'main' function
-
This is an answer in response to a question Zach asked over at the org (http://forums.x-plane.org/index.php?showtopic=49683). I started to answer it over there but changed my mind. ------------------------------------------------------------------------------- Zach, As the relationship between speed of sound and temp is non-linear and your mach bezel animation requires 2 inputs, (RPM and air temp) you have to simplify the problem without the use of a plugin. Any equation with 2 inputs will yield a 3-dimensional plot. There are 2 simplifying options: 1.) You assume the lowest possible mach no. you might encounter in flying conditions or 2.) You assume some average mach no between some temperature extremes. Case one above gives you a safety margin of never exceeding real mach. Case 1 example: If you anticipate flying in no lower than -40 degree C conditions, then you can take the fixed value of 307 m/s as the speed of sound. I ran a few numbers with this SoS value and verified the outcome. Given the range and angles of animations you provided, you should animate the RPM gauge like so: Angle of rotation of RPM needle = 1.2727 * RPM (I'm quite sure you got this one...not insulting your intelligence :-) ) Then you need to make the mach bezel a child of the RPM needle and animate it with the following relation: Angle of rotation of Mach bezel = -1.4088 * RPM (The negative value has the gauge rotating CCW) This gives you two animations linearly related to a single RPM dataref. These values come from basic unit conversion calculations. Let's verify the mach gauge value at a arbitrary 157 RPM and assumed -40 degree T: AT 157 RPM @ 50ft radius blade, tip speed = 16.44 rad/sec * 15.24m = 250.625 m/s for the tip speed. if we assume the lowest value of the speed of sound you may encounter to be at 307 m/s (at -40c), then the mach value at that temp is 250.625 / 307 = 0.8164. So now lets look at where the animated mach needle will be if using the above relation : using the above relation of mach bezel angle, we have a mach bezel rotation of (-1.4088 * 157 RPM) = 221.18 degrees. given your scale of (271 degrees / 1 mach unit), 221.18 / 271 = 0.8162. This means your mach gauge will read 0.8162 So at 157 RPM, you actual tip mach (assuming -40c) is 0.8164 and your gauge reads 0.8162. Any temp over that, the real mach is higher and you're in a "safe zone" and Mu = (1.59 * RPM / airspeed), again a function with 2 inputs and one output.....so no solution here except plugin. About 6 lines of gizmo lua would take care of that and having your gauge running pretty smooth. For "accurate" mach values...as opposed to simplified, then a bit more programming would be needed.
-
Those images are mostly a "technology" achievement and yet to be "art-ed" into something nice looking. Austin, as an engineer, gets excited about technical achievement and rightfully so; however, the end result is always artistic in nature and until the final product ships, then it's hard to say what we'll actually get...clouds aren't my area...but the IDEA behind what he's doing is most definitely a huge improvement and step in the right direction even if the screen shots don't show it.
-
Another good day today, unfortunately, I'm going to have to set it aside for a while now...I just allowed myself the weekend to work on it. A good 70% of the cockpit is animated with the new plugin, did the quadrant controls today...what remains is the overhead, a few copilot side stuff and some systems stuff. Definitely getting closer. The biggest change that most will be aware of is clearer instrumentation and better lighting. Most of the functionality will be the same but the fuel transfer system will be accurate and the Garmin transponder will be new, along with wipers (no rain effect yet) and the working overhead lighting controls.
-
unfortunately no, but it is a priority item. 2011 has me on the Mu2 update, C208 and 2 other projects....and as soon as we can get V10 out, I'll be on it. I'm trying to get the Mu2 update out the way first so I can jump right on the C208. Good thing is a lot of the MU2 plugin code will be portable and adaptable to the C208 so I wont have to rewrite stuff.
-
Beat it -Indi, this is my thread ;D Seriously....I'm done for a while, have to get back on laminar stuff, but I did get the altimeter working to my satisfaction...MUCH smoother, more readable and realistic. Glad to be past those pesky rolling numbers....never thought 10 lines could take so long to write. Video link at the bottom. 8.7 MB quicktime float baro_altitude = XPLMGetDataf(xp_DR_baroAltitude); ((int)baro_altitude % 100 < 80 )? g_ind_alt_hundreds = ((int)baro_altitude % 1000)/100: g_ind_alt_hundreds = (float)(((int)baro_altitude % 1000)/100) + (float)((int)baro_altitude % 20)/20; (g_ind_alt_hundreds <= 9)? g_ind_alt_thousands = ((int)baro_altitude % 10000)/1000: g_ind_alt_thousands = (float)(((int)baro_altitude % 10000)/1000) + (float)((int)baro_altitude % 20)/20; (g_ind_alt_thousands <= 9 )? g_ind_alt_tenthousands = ((int)baro_altitude % 100000)/10000: g_ind_alt_tenthousands = (float)(((int)baro_altitude % 100000)/10000) + (float)((int)baro_altitude % 20)/20; http://dl.dropbox.com/u/955680/altimeter.mov
-
I have standard plugin code for just about every kind of interaction and animation. It took a while to learn and set up (1.5 years :-P) but makes things very quick and efficient. As I mentioned though, Ben's Gizmo is a even more efficient step of coding and merges very well with what I'm doing. I'll be layering some gizmo functions right on top of what I have on the MU2....so if you want some painless and quick tool to try your altimeter in, do consider gizmo. It may sound like a sales pitch, but it delivers. Last night, in about 15 lines of code, I make a camera view that keeps the eyes on the horizon and rotates the 'head' based on the rate of turn / angle of bank to give a "look ahead" sensation when turning VFR final. Probably take a few hundred lines in C.
-
Progress update...refer to the quicktime movie link at the bottom. Behind the scenes is the new plugin allowing more rapid development and control of manipulators. Here's what to look for in the movie, not much, but it makes customization fast (not as fast as gizmo :-P), most of this programming was just in the last few hours. 1.) Smooth animation of the volt/ammeter needles. This makes for smooth animating needles vs. instantaneous "pop". Note the effect when the battery switch it turned on 2.) For the moment, I've changed my mind on offering both drag and click options for switches. Two position switches are altered with a single mouse click and any 3+ position switch is done with a click/drag. Note the two generator switches are done with a click and the inverter switch with a drag. The cursor for clicks are a "pointy finger" and a "hand" cursor indicated a click-drag. I did this because in a real airplane, a flip of a switch is a very quick thing whereas dragging such a short distance in xplane is a pain. The net effect is that the mental effort and time you might spend in a real plane to actuate a switch is more accurately simulated in my opinion. 3.) Switchguards are actuated with a single click and self closing OR if you're quick enough, you can click to open the guard, click the switch and click the guard again to close it. Fuel transfer simulation with 5 tanks (as opposed to 3 before) is up next. http://dl.dropbox.com/u/955680/mu2_progress.mov
-
it's just one of those unfortunate timing things where the timing hit you bad. My brother flew Harriers in the Marines....slipped in under Ronald Regan and his generous military spending. I came along a few years later trying to get a Air Force pilot slot under Clinton....after he basically shut down military spending and basically missed my calling in life. A few years later after I was too old to become a pilot...the pendulum swung the other way and people were getting 25,000 bonuses just to join or stay in as pilots. My brother racked up 200,000 in bonuses over 8 years while I worked for 8.00 / hour putting myself through school. Bad things happen and 5.00 ain't bad....sure beats losing your calling or waiting 20 years for it while you raise kids. Funny how the hard drive manufacturer has us xplane people pointing fingers at each other instead of them eh?
-
The idea behind the circuit breaker simulation is simply to simulate reality, mostly in regards to failure simulation. The Falco is a "stepping stone" in simulation that hopefully I can apply to more complex aircraft for those who wish to experience such reality. The MU2 POH describes several scenarios in which the pilot must diagnose a problem and turn off relevant circuit breakers to ensure 'safe' operation. Since it was my desire to simulate "reality", which includes realistic behavior during failures...then I wanted to simulate the electrical systems properly also. Most won't appreciate the work that's gone into the circuit simulation simply because electrical systems rarely fail and they'll never notice it; however, I want it to be there anyway. I pride myself on having features that people don't even know exist and may never know...but when it is discovered by the savvy, then folks will know that I go the extra mile for "real" reality...and not marketing reality. The MU2 is in overhaul to a much higher level of reality than current, but probably will not incorporate the fancy circuit simulation until well into the V10 run, where I hope to have new electrical simulation options from Austin. What is "real reality"? As an example... a certain product out there allows you to change radio frequency with a click-drag like the Falco does...but the Falco radio frequency will "wrap around" during a drag like the real radio whereas this other product will not. This is hardly noticeable by the end user, but one of those things where if I experience it in a real plane, it darn well needs to be in my products as best as technology will allow.

