Michael_Chang
-
Posts
861 -
Joined
-
Last visited
-
Days Won
39
Content Type
Profiles
Forums
Latest X-Plane & Community News
Events
Downloads
Store
Everything posted by Michael_Chang
-
We're still going free.
-
-
the 787-9 will have to wait until i can obtain an FCOM, because until then, i can't guarantee that the flight model is as close as i can make it, also, the FCOM would indicate any changes to the design that I overlooked
-
boeing 787-9
-
9, fully extended and modified
-
Fear not, the plane will remain in V9 for now, mostly because i'm to lazy to make the move, however this will be the last V9 compatible jet that this team makes, after this, all projects will be V10 only. 787-9 being built.
-
Thanks for your help Kieran, I found a working one I would if I could but I can't (yet?)
-
Hi! I'm building some manipulator buttons for the cockpit but I can't seem to find a dataref that corresponds to the FLCH or speed w/ climb mode in plane maker, is there a dateref I can use?
-
my comp is a macbook pro 2012...
-
payware.
-
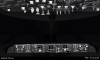
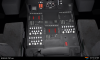
Darkened the shadows on the pedestal, about to do the glare shield. 2 things that need to be discussed, 1. Due to mounting exams and work at school, the release date is being pushed to August 2014, please bear with me because it's hard to work at this time 2. Would you guys be okay with this plane becoming exclusively V10? because it's running a lot better in V10 than it is in V9
-

3D Shots and Renders - showoff what you have been working on.
Michael_Chang replied to Kieran's topic in 3D Shop
Because I really like this plane, and thanks to design commonality with the 787 in many areas, it won't be very hard to create it either. At this point, it's mostly just blueprints and photos, but it'll get better eventually -
3D Shots and Renders - showoff what you have been working on.
Michael_Chang replied to Kieran's topic in 3D Shop
Normally i hate the idea of using blueprints, but the sheer lack of information requires it right now :/ -
i'm not talented enough to "pro" it up to their level unfortunately :/ plus it would involve creating a VC and cabin which I don't have time for between my two "pro" projects
-
believe me, we considered this, but given the fact that this plane has a cabin, we felt it'd be cool if we created each cabin for each airline, more immersive, but yes, a bit more restrictive if you like changing liveries on the fly.
-
-
in many respects, this plane is meant to be a quick conversion, simple sim jet, not very in-depth, based mostly on its visual detailing and ease of use (think of it like a plane with training wheels XD) while we will incorporate a few SASL components into the 2d cockpit so.....
- 39 replies
-
- 1
-

-
- 737NG
- conversion
- (and 3 more)
-
This project is more or less at the request of Hiroshi Igami, and he hasn't done classic models to convert.
-
you can't honestly be asking us to post a link to a download of a payware scenery right?
-
as i've mentioned before, the plane is a "one paint per package" system like peter's a380s, and it'll feature custom cabin detailing and different seat, window and mesh configurations designed specifically for each model.
-
3D Shots and Renders - showoff what you have been working on.
Michael_Chang replied to Kieran's topic in 3D Shop
for when the 787 has been released, I think you all know what it is. -
I'm surprised you're still using the XPFW 767...
-
Alright, so samen made a post a while back about how to convert aircrafts from FSX .mdl files into x-plane objects via blender, however, it's a little empty, so I'm making this tutorial post to try and fill in the holes that he left, as well as create a useful, step by step guide for up and coming devs to try their hand at converting aircrafts, which I have found to be a great way to practice your own modelling skills before entering the x-plane world with a full-out home modelled aircraft. In this tutorial, I will be using a boeing 787 aircraft from Hiroshi Igami's 787 family. I will provide a list of convertible aircrafts as well as how difficult they will be to convert in terms of level of detail and mesh distortion. To start, you'll need these materials: Blender 2.49b http://download.blender.org/release/Blender2.49b/ you need to use this version of blender because the FSX import scripts and interface is the version that in my opinion, works best for these projects.FSX2blender import scripts -> http://173-233-77-148.static.turnkeyinternet.net/forum/showthread.php?t=8298 in order to install these files, you'll need to run the install.cmd or install them manually. See below to see how to install the script you'll need some kind of application that allows you to see invisible files.windows instructions: http://windows.microsoft.com/en-ca/windows/show-hidden-files#show-hidden-files=windows-vista Mac instructions: http://www.mikesel.info/show-hidden-files-mac-os-x-10-7-lion/ once you've set this up, to install manually on a mac, find the application in the application folder, right click and select "show package contents" and follow this path, copy and paste the contents of the folder into the scripts folder. To install in a PC, I believe you go into the program files and follow a similar path to find the scripts (it'll still be in an invisible folder titled .blender, and in a similar directory)Now that your FSX2blender scripts are installed, you can install the blender2x-plane scripts found here: http://marginal.org.uk/x-planescenery/tools.html you can install them manually or run the install command for your respective operating system Now let's deal with the model files, attached is a model file you can use namely, Hiroshi Igami's boeing 787-8 with GENx engines (freeware, distribution must be done with permission of hiroshi igami, who has allowed for this to be used for tutorial purposes). the model is located in the compressed file under the "model" folder, and has the file extension .MDL Now you can go ahead and open blender, and go file/import/fsx .mdl and locate and import the .mdl file. once it's been imported, it should look something like this: As you can see, this plane comes equipped with a lot of goodies, which will be covered in later additions to this post. This part is a little tedious, but it'll make things easier later on. Notice how the meshes are dark gray or brown and don't have sharp edges? you need to delete the color assigned to the mesh and add edgesplit modifiers to every mesh. DO NOT JOIN ALL THE MESHES AND ADD THE EDGE SPLIT, BECAUSE SEPARATING THEM AGAIN IS A PAIN. The below image shows you a few things. the forward section of the fuselage has had the assigned colour deleted, to do that, right click on the mesh and find the "links and materials" tab under the "editing" (f9) button (the square with four orange dots on the ribbon). there, you'll see a coloured square and a button near it that says delete, hit delete and it'll delete the assigned color, leaving behind a white fuselage. the reason we delete it is because now, it'll be easier to create ambient occlusion and full render shadows for the plane. Don't forget to add edge split modifiers to the meshes (far right tab, "modifiers" , click add modifier and select edge split) That's all for now folks! I'll post this on a weekly basis every friday! stay tuned for more! FSX_TDS788GENX_MDL_IF55.ZIP
- 4 replies
-
- 2
-
-
- conversions
- fsx
- (and 1 more)
-
WOW okay, sorry I've been quiet lately, I was just caught in the midst of a horrible freezing rain storm which took out my power and wifi for the last few days (it also destroyed my piano via frost damage)... I worked on some LIT cockpit textures over that time, and they still need a bit of work, but this gives a general idea of what the cockpit will look like when finished