


Graeme_77
-
Posts
427 -
Joined
-
Last visited
-
Days Won
30
Content Type
Profiles
Forums
Latest X-Plane & Community News
Events
Downloads
Store
Everything posted by Graeme_77
-
Thanks. So everything looks perfect with the aircraft setup. Do you have any other plugins installed that could affect the radio availability? For example sometimes FSEconomy can affect GPS availability - I'm wondering if this is something similar.
-
Ah, so if you're finished with the ATS you need to press the ATS disconnect button. The binding is CL650 \ pedestal \ throttle \ auto-throttle disconnect.
-
Caused by doing an APR test before engine start. Start the engines as normal using the checklist, then do the APR check at the correct time and the message will clear.
- 1 reply
-
- 1
-

-
Can you add some more context and detail please?
-
Thanks, that looks fine. Maybe another screen showing the MFD screen please?
-
Can you please check this topic and make sure you are using the correct checklist bindings? The checklist commands are also accessible Challenger 650 \ Checklists menu. Please note the FO will not speak the checklists if you advance the checklist using the DCP controls - you must use the specific checklist commands.
-
Can you please send me a screen grab of the audio panel, with X-Pilot on screen? Also please check the post under "System and Tech"
-
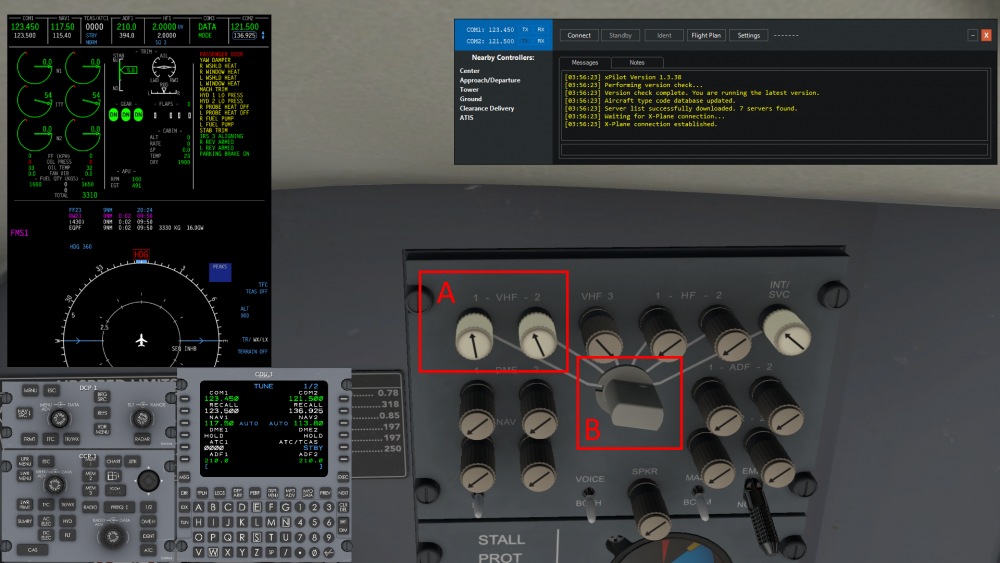
The simulation interfaces fully with X-Pilot, but to use it you need to understand how the aircraft audio panels work. You need to choose the radios to listen to with the press in / press out volume controls (A) in the image below, and choose which radio to transmit on using the selector knob - (B) in the image. The radios can be tuned on the MFD using Radio Adv on the CCP panel, or the TUNE page on the CDU. Please note the audio panels are different for left and right seats, if you want them to be synchronised there is an option in the Challenger 650 men, User Settings, F/O Assists. If you have hardware like the Honeycomb or Saitek units with avionics switches, these can affect X-Plane directly, bypassing the Challenger simulation. Please make sure to switch these switches on if you have no radios in X-Pilot.
- 1 reply
-
- 1
-

-
-
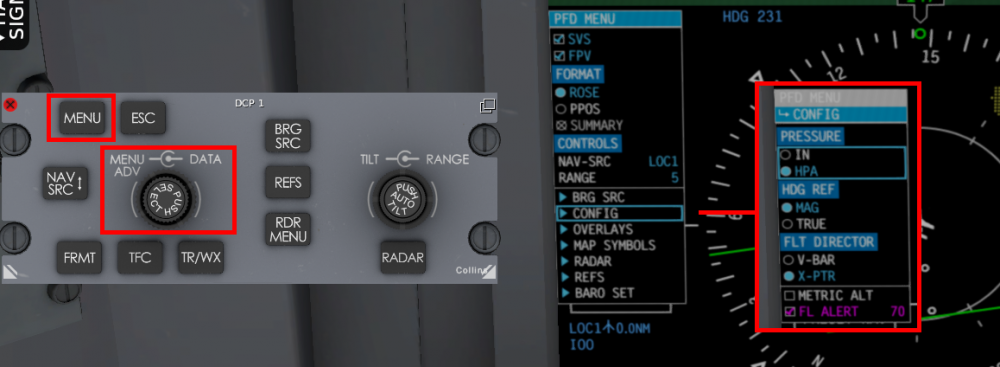
Change between hPa and inHg altimeter scales by using the DCP menu to navigate to config, then pressure. Lots of PFD and MFD options are available in these menus.
-
- 9
-
-
-
The real aircraft is configured for Kilograms or Pounds and Feet or Meters in a device called the "Configuration and Strapping Unit". To set these options on your simulated Challenger, go into the Airframe Manager, choose Edit Options, and look at the CSU tab. The setting is per-airframe, so you can have both metric and US customary airframes. This option is available in Career Mode - the airframe in Non-persistent mode is only available as it leaves the factory, in pounds and feet.
-
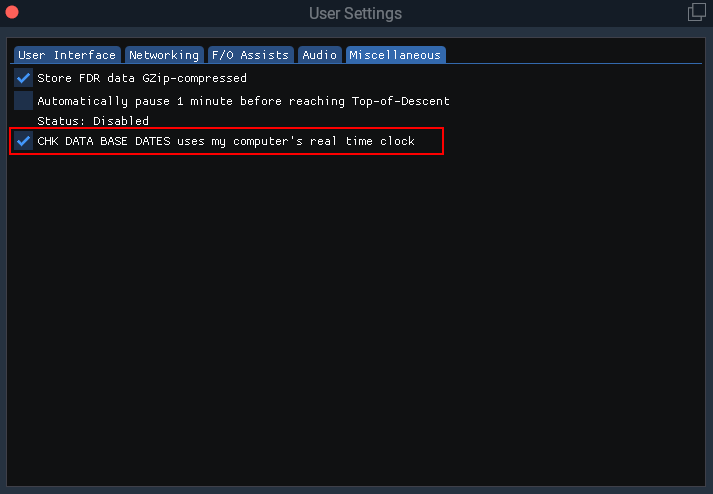
The avionics will look at the X-Plane Date, when checking nav data validity. If you regularly load X-Plane to a date or month that's different to the nav data you have, then look for this option in the Challenger 650 menu, User Settings, Miscellaneous. This will force the avionics to compare nav data with the real date, not the X-Plane date.
-
- 3
-
-
The CL650 automatically selects Experimental Flight Model - you don't need to do anything with X-Plane settings.
-
Documents attached updated 20th December 2022. Latest versions are always available in ...\Aircraft\X-Aviation\CL650\Documentation directory. IMPORTANT: you must be signed in to download the PDFs below. Not a user yet? Head over to Sign Up. 1128340285_CL650FMSPrimer.pdf CL650 Operations Reference.pdf 1323904309_CL650ExpandedNormalProcedures.pdf CL650 Checklists.pdf CL650 Checklists - Printable.pdf CL650 Flexible Take-Off.pdf CL650 Shared Cockpit Quick Start Guide.pdf
- 24 replies
-
- 32
-
-
-
State Saving The aircraft autosaves the state, position and trajectory every 20 seconds while in flight or upon entering a runway, and on approach passing 1000 feet above airport elevation. Additionally you can manually save a state and name it. In the unlikely event of a crash you can resume your flight from where you left off by reloading the aircraft and ensuring the “Restore Position and Trajectory” checkbox is selected. State Tracking In most simulated aircraft there are no consequences for leaving a battery on or quitting the sim without a proper shut down. You may be unhappy to discover the state of your aircraft if you do this. Like the TBM, the aircraft tracks its own state and if you fail to shut down the aircraft properly your batteries will be discharging while you are away. Reloading States The aircraft state can be reloaded, optionally with the saved position and trajectory. This allows states such as "Ready to taxi" to be created at one particular airport, then at a later time load the aircraft to a spot at another airport and reload the state without using the saved position. This is a quick way to create scenarios like "Ready for takeoff". Note that when a state is reloaded, the simulation time is not automatically set, so if you are resuming in-flight it will be necessary to set the sim time correctly after loading the state. This may cause a momentary loss of GPS position.
-
An Expanded Procedures is provided to help you accomplish every action in the Challenger. These Expanded Procedures follow the checklist structure exactly, but have additional guidance on how to accomplish each action. Follow the first few items on the procedure to get the avionics powered up. Once all the avionics are on the checklist is available on the MFD, and from this point the virtual First Officer will be able to read the checklist to you so you don’t loose your place. The Expanded Procedure guidance is also available as a popup hint for each item. You can easily ask the First Officer to start the checklist with any key or button bound to the command CL650 \ Checklist \ Confirm checklist item. Don’t worry about learning every item in the checklist the first time through. Have fun, pick a new system to focus on each time, and soon it will all become natural. When you've got it, disable the hint images and you're on your own!
- 1 reply
-
- 9
-
-
The Challenger can be hard work on the approach and landing, but when it all comes together it's very rewarding. All the beta testers had difficulty learning how to land, it's all part of the fun. On approach be aware that unlike aircraft like the 737, the pitch response to power is reversed, that means a power increase will see the aircraft pitch down for a moment. This can lead to an oscillation developing, so be sure to fly the pitch attitude accurately. If you find you're wobbling up and down, aim to make smooth power changes, and remember the HUD flight path vector is useful tool, but can get you into trouble too. A useful check is 0.6 on the AoA index on approach. If it's higher than that, you're too slow. Remember Vref +5, and check your weights on the approach ref page. For the landing flare, lift the nose to to arrest the rate of descent, starting at just below 40 ft. Make a smooth power reduction and fly the aircraft onto the runway. The pitch attitude in the flare is around 3 degrees, but look at the end of the runway, not the HUD! You'll have plenty of time for butter later, so for now put the aircraft down positively in the touchdown zone. If you go butter hunting, you'll only find little bounces - ask me how I know! Once you've landed, extend the flight spoilers (the ground spoilers are automatic, but the flight spoilers need to be raised by pulling the lever), use the reversers and you're down. And stay away from that HLIS button, it'll trick you into making your landings worse!
- 10 replies
-
- 24
-
-
-
The Challenger has very good takeoff performance, so everything happens quickly. For the first few flights a heavier weight can help keep things in check. One of the key differences between A320/737 aircraft and the Challenger is there is no speed reference system on the Challenger. Instead the flight directors will give a fixed pitch target when pressing the TOGA buttons. Following the guidance from our subject matter experts, and adapting it for use in the simulation, we've got two easy ways to manage the initial climb, which can be remember as Pitch/Sync and FLC. Try both and see what works for you. Pitch / Sync: Takeoff and follow the initial flight director pitch target. Accelerate in the initial climb maintaining that pitch, retract the flaps at VFTO+5 then at a safe altitude hold the “Sync” button and lower the nose to about 10 degrees to start accelerating. If using autothrust it can be set to maintain a suitable speed, but your primary control is pitch, which can be adjusted easily by holding sync and flying the aircraft to the new pitch attitude. FLC: Takeoff and aim for the initial pitch target before selecting FLC mode to capture a speed of roughly V2 +20. At most weights this will result in a very steep climbout. At a safe altitude, increase the speed to lower the nose then retract the flaps at VFTO+5 A hybrid approach may be useful - remember unlike an airliner the Challenger has seats facing sideways - so while a space rocket climb profile can be fun, it’s unlikely to get repeat business for your VIP transport business.
- 5 replies
-
- 18
-
-
-
 @andrey458You said you’re quite new to this, so one of the things that is often very confusing is the misleading concept of a “stall speed”. In short, there really is no such thing without a lot of other parameters also being considered. I reported the stick pusher issue after spending a good few days flight testing the Saab model, and while it does kick in too soon, it should not affect you at all when flying normally. Make sure you do not have the experimental flight model select (this makes the situation worse). It’s worth having a look at this video, you can start at about 9 minutes if you want to skip the theory and see the flight demo. It shows another aircraft, but the concept is the same for all aircraft.
 -
Excellent, glad you got it fixed, and thanks for letting everybody know too! Hope you enjoy the TBM now.
-
So your experience is apparently unique with the TBM. Therefore we need to understand what is different on your system compared to everybody else. Any Plugins? What Axis bindings do you have?
-
OK, so I’ve seen something similar with another model, only once or twice on 11.50b9. It seemed to have the trim snap to the full aft position and stay there. However, I was never able to replicate it and haven’t seen it with the TBM. What plugins are you running? May be worth hopping onto the Hotstart discord as there’s a lot of TBM experience there.
-
I’ve never heard of anything like that before - Is it possible you have multiple controls bound to the same pitch axis? Actually, I have an idea. Let me do some testing.
-
No idea about the X-Plane C.G. as I only use the built in payload manager. However on my version it’s set to -7.1 centimetres and a payload weight of 95 kg on the initial w&b screen, before loading the flight. If I use the load manager to push the C.G. forward X-Plane reports -11 cm, and fully aft +11cm. could you have some other plugin affecting it? the only time I get a pitch up is if I deliberately fly beyond Vmo and even then it’s a gentle pitch up.
-
Really just to see if anything at all is out of place or unusual. I’d be looking at power settings, pitch attitude, trim positions.

