


krogerfoot
-
Posts
26 -
Joined
-
Last visited
Recent Profile Visitors
4,241 profile views


krogerfoot's Achievements
")
Newbie (1/14)
3
Reputation
-
I have no idea what the problem might be, but I wonder if any of John Maxx's suggestions here would help.
-
Just in case anyone finds this post on a search for a similar problem, it was remiss of me not to acknowledge that Peter's diagnosis was, in fact, completely correct. I hadn't mapped the textures correctly in Blender. Thank you, Peter.
-
Okay, this is hugely useful, and the answers are pretty much what I hoped/expected they would be. Thanks very much. I do indeed want to preserve the bump-mapping aspect of the RGB normal map images I've been using. Being able to add specularity data on the alpha channel is going to open up some new opportunities. Thanks again for your patient and thorough explanations.

-
Aha, thank you very much. If I understand correctly, then, adding the global specularity directive will result in X-plane reading the normal map textures for specularity information? I've been advised that alpha channels in normal maps can cause problems in HDR, but obviously there needs to be an alpha channel for the directive to take effect, correct? With regard to making only certain parts of the scenery shiny, this needs to be controlled with normal map then, I guess. Or does the modeler need to choose whether to have an RGB normal map or a grayscale specular map? Thanks again for your help.
-
Hi all, I'm baffled again with a texture problem. When exporting from Blender, I often noticed that my objects were gleaming in the sun. Opening up the OBJ files with a text editor, I found that they were always exported with ATTR_diffuse_rgb, ATTR_emission_rgb, some other ATTRs (namely no_hard, no_cull, depth, blend, draw_enable, no_solid_camera, and shade_smooth), and always ATTR_shiny_rat 0.500. I figured out that I could set the shiny_rat to 0, which took away the shininess, obviously (only recently did I realize I could just delete most of these ATTRs). My problem now is, I want to make parts of my scenery shiny, but now nothing I do with the shiny_rat seems to work. I've taken care to insert ATTR_shiny_rat immediately before the TRIS command, and have deleted every other ATTR that might seem to cancel out or affect the shiny_rat level, but nothing changes. Setting the shiny_rat to almost any number seems to have no effect. I'm wondering if I've done something with my texture files that I shouldn't have. I understand shiny_rat gets its effect by using alpha channels in the png texture file. Is there some way to confirm that there is a usable alpha channel in my texture files?
-
Hi Peter, That's what I thought was going on. Many of the faces where the speckling was occurring were indeed sampling a very limited part of the texture maps, but even after (I think) I fixed this, I was still hearing about the problem. Some of the pictures show enough of the texture to see that the face has more than a few pixels of horizontal and vertical data.
-
Thank you—will give those a try. Alpha layers seemed to me to be a potential source of trouble, but I honestly don't really know what I'm talking about. Love UrbanMAXX, by the way. Thank you for your great work on that.
-
I've gotten some feedback about problems with a scenery I've done the texturing for. Apparently, the normal maps I've included are causing weird output on certain faces. I've tried to figure out what the faces all have in common and made adjustments to the UV maps in Blender and tried to clean up the NRM file as much as possible, but it hasn't solved the problem. I can't reproduce the problem on my comparatively ancient setup, but you can see the effect on the screenshots. Taking out the normal files makes the problem go away. I'm making texture files with Photoshop and using Crazybump to make the normal maps. I've read that this workflow can cause problems with normal maps, but my level of understanding is too rudimentary to make sense of things. Can someone out there tell me what I'm doing wrong and how I should be doing this?
-
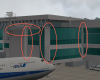
Spheres and columns taking up excessive memory
krogerfoot replied to krogerfoot's topic in Scenery Development
Thanks very much for the advice, fellas. I'm beginning to realize the importance of planning ahead when modeling in order to save lots of time texturing and to minimize complexity. I will also try the smooth shading. -
I haven't figured out a way yet to place anything in Blender that will help me find the coordinates later. Even the units within Blender itself baffle me. All I can do is open the OBJs in a text editor and take semi-educated guesses about where I think the lights will go. It's painful. If you place lights in Blender and then export, the OBJ code doesn't give you any coordinates that I can figure out. What I'd like to experiment with is exporting a much-simplified "shell" of a model made in Blender, opening it in SketchUp, placing lights and exporting that dummy model back to X-Plane. SketchUp does provide the coordinates of lights, so in theory I should be able to copy/paste that code into the full-sized model. Looking forward to downloading KPVD and poking around! Great work. [Edit] I am a fool. I didn't look hard enough for the light coordinates in the text file exported by Blender—they're right there in the middle of the code. I have been doing things very much the hard way for a long time, it seems. I'm editing this reply just in case someone else stumbles across it. How is de-bugging going? I haven't yet tried opening KPVD in X-Plane yet.
-
Spheres and columns taking up excessive memory
krogerfoot replied to krogerfoot's topic in Scenery Development
Thanks for that insight. The columns for my model definitely could stand to be a lot simpler—I'll try that. Still, I feel like I see spherical elements in aircraft models all the time, so I wonder how those are achieved. I've really gone overboard on what is, in the end, a fairly trivial component in this scenery, and hardly visible in the finished product. I discovered how huge the file sizes had become when I was unable to import it into SketchUp to do the lights, which are going to be a big headache to code into the OBJ files. Thanks again for your help. -
When exporting Blender files with Xplane2blender, I find that models with spheres and columns end up being comparatively huge. What I thought was a simple patio with 20-something posts and globe-shaped lights turns out to be tens of MB in size, making it impossible to import into SketchUp for relatively painless lighting. Is there a secret that I'm missing with regard to exporting obj files from Blender? How do modelers make objects with spherical elements that don't end up eating up huge amounts of memory?
-
I see. I'm not adept with SketchUp, but the ability to place lights is a godsend (with thanks due, as so often, to Jonathan/Marginal.uk for his tutorial on that and much more). One more thing—do you color the faces somehow yourself in SketchUp, or are those details mostly from texture files? Apologies if that's a stupid question; it's just that I tend to model in the seams and joints of a structure in Blender and then spend days and weeks lining them up with similar details in photo files. (See here and here for examples.) Again, really really lovely work all around. Very well done.
-
Looks beautiful. I'm mired in the texturing stage of a large terminal complex and it's making me miserable. Next up is lighting, which in SketchUp is not so bad, but with Blender, I haven't figured out any way around coding the lights and coordinates directly into the OBJ text files. Very tedious, and makes me wish I were handier with SketchUp so I could have done the buildings in that program. The old terminal you made is absolutely lovely. Was that SketchUp? And are the lighting effects in the dusk shots from X-Plane's custom lights, or more from LIT textures?
-
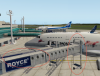
File Name: Japan RJTH Hachijojima Airport File Submitter: krogerfoot File Submitted: 14 Mar 2014 File Category: DSF Scenery Packages X-Plane Version(s): X-Plane 10 Hachijōjima Airport serves the island of Hachijōjima, administratively a part of Tokyo despite being located 287 km south of the metropolitan area. Hachijōjima is a popular tourist destination and gets daily flights from Tokyo Haneda. Toho Airlines operates helicopter flights between Hachijōjima, Tokyo, and other islands in the area. The package includes Andreas Wieberneit’s Weathered Edges enhancement on the shoulders of the pavement. I availed myself of Jonathan "Marginal" Harris's indispensable tools for exporting objects for use in X-Plane, and would have never made anything were it not for his helpful tutorials. Barbarossa's Reload_Scenery plugin made it possible to see the results of object placement and modifications without having to restart X-Plane or changing locations in the sim. The screenshots show some add-ons to the stock X-Plane 10 product. The darker and more detailed pavements are thanks to FlyJSim’s free Enhanced Runways HD files. The surrounding landscape scenery is augmented with John Spahn’s UrbanMAXX. X-Plane user ScottP posted conversions of many many airports all over Japan a few years back. I recommend these files to anyone who wants to populate Japan and fly around a bit. Update, August 2014: Adjusted scenery for use with Andras Fabian's highly recommended HD Mesh Scenery V2, which delivers more accurate elevation data, roads, buildings, etc. for Japan. Also added local bus service into town. Click here to download this file


