gilbenl
-
Posts
162 -
Joined
-
Last visited
Content Type
Profiles
Forums
Latest X-Plane & Community News
Events
Downloads
Store
Everything posted by gilbenl
-
Got a bite on blender forums, and the problem's fixed. Thanks.
-
I have an idea that would be nice to see as apart of this plug-in. Although not everyone has one of these (and myself and cam maybe the only two) but it would be awesome to see the SpaceNavigator supported to use to change the view in the VC. You can do it through default XP options, except when you let got of the SN, it recenters the view. Would x-joystick be the appropriate means by which the "autocenter" ability of the space nav (or any input device) could be ignored? While I don't know anything about how to program it, but what I am suggesting is that when you move the view using the device, when it re-centers with the spring, the sim ignores than and considers the current view to be the "new" center, from which all future input from the device would move from. Does this make any sense? -Nick
-
Airbus- It's rather impolite to throw your issue atop another persons, especially one as unrelated as yours. If you need help with your issue, start another thread, but don't bump mine so you can get yours solved. -Nick
-
Hey all- This just goes to show ya, no matter how much time you've spent in Blender, we all get hosed from time to time... Here's the deal: I'm running the latest version of blender (2.48), and I am working with a .blend file which is a panel outline that Peter of XPFW some how converted from .pdf to .blend wire mesh. (no clue how he did that, but it makes a nifty trick). Anyhoo, it would appear that all other functions seem to work fine, except for bevel, regardless of whether it's an edge or just a single vert (face or no face). When I hit bevel, the bevel ratio number in the bottom left moves accordingly, a new vertex is created, but doesn't budge from atop the original. I have tried changing the transform properties from global to local (and vice versa), but that's about all I can think of. Let me know if there's any more info you may need. Thanks guys! -Nick
-
Well, typically the only time you would have the stick shake is while on the ground, in moderate to severe turbulence (not really likely), and as a result of a stall (Stick shaker)...Give it a try in these scenarios, and see if it has any more functionality. Keep in mind that heavy airliners (at least modern ones) don't have the stick directly tied to the control surface. Therefore, the hydraulics actually actuate the surfaces *if functioning properly*. Now, on old planes, and GA, you tend to have resistance to input depending on speed, amount of movement of the stick etc, but I doubt a joystick would even attempt to simulate the difficulty in nosing down a cessna which is just under Vfe, or out of trim...I may be wrong though.
-
It does NOT say ppc only... New : X-Force for MacIntel ! X-Force now works on MacIntel. I speak french, and even if I didn't there's an english version if you click the link on the top right... Give this one a shot: X-Force Mac 0.1 Intel build 08050801 : http://pagesperso-orange.fr/christophe.saphar/x-force/X-Force01_Intel.zip ...And just to show you that it DOES work, while I don't have a FF stick, I just installed the plug-in in XP v9.3 B7 and it is recognized and active. I'm Finished. Sorry for the thread jack Indi...had to make a point, I'm sure you understand.

-
"Looks great! I've got a request for a possible plugin... A force feedback plugin for X-Plane. I know there's some old one floating around, but it's old and there is no version available for us intel Mac users. Nils" It was in response to that statement. This plug-in does indeed (supposedly) have an intel mac build. While it has only been tested with the logitech, the member who has the Cyborg should give it a shot...who knows, it may work.
-
Sorry to take a slight left turn here...but there is indeed a force feedback plug-in for XP. No clue as to if it works, but here's the link: http://pagesperso-orange.fr/christophe.saphar/x-force/
-
I have had the same problem since 9.22 as well. After some thought, i came to the conclusion it had to do with my apple-botched ATI card. Either way, even when it says Im only sucking 86MB of VRAM, its SLOOOOW. I don't even mess with the sim for this reason...good for ya'll because I spend all my time working on projects...bad for me because I want to fly. Anyone with a windoz system have any insight, as windoz through bootcamp seems to be FAR faster. -Nick
-
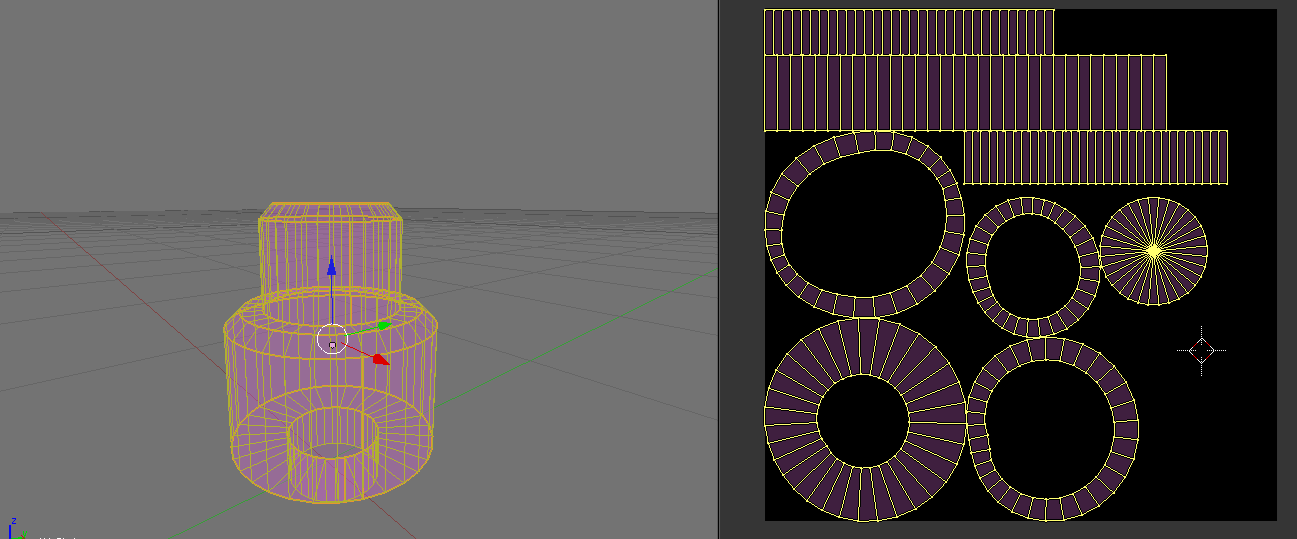
Hey All- It's been quite some time since I've done a tutorial, so I figured I should give something back. So, here we go! In this tutorial, I will be describing the basic steps (as taught to me by Tom K) for UV mapping, and Ambient Occlusion render baking. To begin, let's go over some terms: UV Mapping (As described in blender wiki)- The best analogy to understanding UV mapping is cutting up a cardboard box. The box is a three-dimensional (3D) object, just like the mesh cube you add to your scene. If you were to take a pair of scissors and cut a seam or fold of the box, you would be able to lay it flat on a tabletop. As you are looking down at the box on the table, we could say that U is the left-right direction, is V is the up-down direction. This image is thus in two dimensions (2D). We use U and V instead of the normal X and Y to avoid confusing the directions with 3D space. When the box is reassembled, a certain UV location on the paper is transferred to an (X,Y,Z) location on the box. This is what the computer does with a 2D image in wrapping it around a 3D object. During the UV unwrapping process, you tell Blender to map the faces of your object (in this case, a box) to a flat image in the UV/Image Editor window. Ambient Occlusion (as described in blender wiki)- Ambient Occlusion is a sophisticated raytracing calculation which simulates soft global illumination by faking darkness perceived in corners and at mesh intersections, creases, and cracks, where light is diffused (usually) by accumulated dirt and dust. This has the effect of darkening cracks, corners and points of contact, which is why Ambient Occlusion is often referred to as a 'dirt shader'. Okay, so now you know what the purpose of doing all this is. When combined, the process is loosely refered to as "Render Baking" because you are essentially telling blender to "render" the shadows etc to the UV map, thus creating what is called an ambient occlusion map. Why do all this? Well, if you skip ahead to the last image, you will see that you end up with what is essentially a black and white texture for your object. Once you have this, all you have to do is add color, details, text (if applicable), etc and you have your object's texture...and best of all, you don't have to hand shadow the thing, thus saving HOURS. So, now that we all know what we're intending to do, let's get down to the nitty gritty... For use in this tutorial, I have created a simple, two-tierd knob, as you would see on many radios. Step one: UV Map As you read above, UV mapping is essentially telling blender where to "cut" the various surfaces in order to make it flat. Simple?...not so fast buddy. Developing an understanding of how to do this simply takes time and practice. There is no set method of doing this, you simply have to learn the nuances of how your cutting will affect the final mapping/texture. Here are some general rules to remember: 1) If an object is flat in any view (IE the top of the knob), you're going to want to separate it. This applies to flat surfaces which meet curved surfaces...so cylinders only. Boxes etc. can be cut as a long continuous section. Examples--> (http://wiki.blender.org/index.php/Doc:Manual/Textures/UV) 2) Cylinders should be cut both vertically, and at the meeting edge of the top/bottom, and the curved vertical segment. 3) For all non circular surfaces, you should do your best to make the map of the faces be composed of nice regtangles/squares, with equal sides (all angles=90 deg)...this is by FAR the most difficult thing to get down, and often takes some creative cutting to make happen. Okay, now that you know the "tips", let's look at how to actually put them to use. In edit mode, you want to hit alt-tab->edge select. Using the guidelines above, you will select edges/edge loops, and hit ctrl-E->mark seam. If you did this correctly, the seams will turn orange. Now that we have all of our edges marked, were going to move over to the UV/Image Editor window, hit "new", and create the background and texture file to which we will do our baking. Now, go back to the 3D view window, and hit the "U" key, and click "Unwrap"... As you can see, the sides of the cylinders have come out EXACTLY how we want them, but it seems all the circle parts are not. YOU DO NOT WANT TO LEAVE THEM LIKE THIS!! So, we're going to have to go manual here. What you're gonna do is hit the alt-tab key again, and go into face select mode. Find yourself a skewed region, and press the "L" key while the pointer is over the little square indicating a face within that segment. By hitting the L key, it will select all the faces within that UV segment...remember that...its awesome, and works in both the 3D window, as well as the UV/Image editor. Keep in mind that you need not hold the shift key and "L" while selecting multiple regions in the 3D window, but you will need to use Shift-L in the UV/Image editor to select multiple regions. Now that you have your region selected, change the view in orthographic mode (hit the number keys, 1-9) to find the view in which the face is flat. In this case, I hit the 7 key (top down view) and then pressed the "U" key, then clicked "project from view". Once all of your faces are nice and pretty, you will now enter the second part of the process in which skill is required to achieve the best results. When doing a UV layout, you're going to want to cram as much as you possibly can, in the smallest area you can while still maintaining adequate separation of segments as to ensure you don't get texture "bleeding". Also, the bigger the region is, the more detailed the renderbake of that section will be. This means surfaces which will recieve the most attention (such as the top of the knob) will need to be a bit bigger than the others. For the purpose of this tutorial, I just make them all the same size, but typically, the UV map regions would take up about 1/8th of the 512X512 texture I created, with the top of the knob being bigger than the other sections. WHOO! You have just finished your first UV map...you should save, and then take a moment to be proud. Now comes the easy part...the baking itself. Now that you've created an outstanding UV map, you will need to set up the ambient occlusion settings. Essentially, blender sets up the majority of things for you, except for three settings "Samples" "Energy" and "Distance". Samples-This is how many times per a specific area blender samples the light. The higher you go, the more detailed, but the slower it takes to renderbake. Typically, 16 is fine for larger objects/maps, 18 for medium, but for the case of a small knob, I like to use 20 or even 22. Energy-This is how much light the object will reflect back. You typically want to set this at 1-1.5, but when you have objects that are surrounded by many other objects, thus making it in a shadow, you may want to turn this up depending on your taste. I rarely mess with this. Distance- How far away from your light source is this object. The default setting is 10...bad. Set this to less than 3 for the purpose of cockpit objects. For external objects, 10 will work...but typically I'll turn it down a slight bit. Setting up the ambient occlusion settings can be seen here: Now, you've done all the leg work. Go to the window where you would typically initiate a normal render. If you click the right tab of the box to the right of the render button (entitled "bake") a nice big button appears with the word "bake" in it...go figure. Hit this button, and wait. The baking process should begin shortly, and will take more or less time depending on factors such as texture size, complexity, object size, etc. And voila, you've done your first render baking. Should look like this: **Note: You may notice there are some funny lines on the object. Well, this is due to a setting called "Bias". Since this knob is MASSIVE (because I didn't take the time to scale it appropriately) the bias is off. This will typically be a non-issue, but will be discussed in the next tutorial. BUT WAIT!!! BEFORE YOU DO ANYTHING, IN THE UV/IMAGE EDITOR WINDOW, HIT "IMAGE->SAVE" Okay...now do whatever you want . Keep in mind, there's a lot more to this, especially when you get into much more complex objects/groups, but for the noob, this should give you a good starting point to learn the basics of this ESSENTIAL technique. I will be adding some more details sometime soon.


-
ABSOLUTELY DO AMBIENT OCCLUSION! If done correctly, it makes life a heck of a lot easier, and permits the paint artist to spend more time on nicks, wear spots, and other fine details, without really having to deal with shading. What's more, is that blender used to be limited to 15 or so samples...not anymore...in the VC I am doing now, the vast majority of parts are being sampled at 20 to 24 depending on the object, and MAN it looks AMAZING. As I said, I am actually in the process of doing some ambient occlusion on a project, so I will be posting a tutorial for this process in Blender sometime today. Nick
-
I have done the VAST majority of my training in a 172, and that is what I suggest to many who ask this question. This is due to a few things: First, and most obvious, is that I am 200 or so lbs, and the majority of the instructors are going to be about that too...and the weight limit on the 152 won't allow for that much weight. This pertains to you in the sense that when you have your PPL, when you take friends/family up, its going to HAVE to be a 172 unless you have only one friend, and a light friend at that. Therefore, it is in your benefit to get your license on the plane you'll be taking people up in. Second, the 152 is TINY. Now, I don't know how big you are, but at thirteen, I don't forsee this being a problem...get back to me after puberty. I'm 6'4 and although thats unusually tall, most teens/adults 5'11" and taller find the 152 cockpit VERY cramped. Finally, I disagree that the 152 teaches you how to fly any better than a 172. The 172 is simply a larger plane, but has the same design. I have flown 15 hours or so in both, and I will tell you that you get the difference in about 5 minutes of flying. Simply put, the 152 is just a bit less stable, yet quicker than the 172 depending on the loading. If you're solo, then a 172 is going to be a bit more speedy, but less responsive. That being said, I disagree with the earlier comment about the 152 being any more "stick and rudder" than a 172. In your particular case, the only reason to learn in a 152 is price. Because 152's are typically older than 172's in my experience...although not always (152 produced 1977-85, 172 produced 1956-today), they tend to have a cheaper rental price. Where I fly, for example, a 1980 152 is $75USD/hr while a 1985 172 is $95 USD/Hr. In my experience, albeit limited, the 172 is the most available rental as well, and having a flown in it throughout your training, will make a checkride at other FBO's much easier. This is just my experience though. It may differ from person to person. All of this aside, you're going to learn how to fly in any light plane, be it a DA-20 or a 1950 Cessna 150. The only difference will be the more rudimentary aircraft will make you work more. That being said, don't learn in a DA-20. I HATE them...the stick is only fun for about 20 minutes, then I want a darn yoke. I find that a yoke provides more "positive" control, and less error than a stick. Again, just my opinion. -Nick
-
Just to stave of any confusion, those of us with a CoreDuo mac will be unable to take advantage of a 64-bit capable OS, as the core duo is simply a re-branded pentium M. Yet, as mentioned earlier, anyone with the Core2Duo line of macs will have the capability of running in 64-bit so long as the OS will support that mode. In summary, as far as I know, any mac built after the Core2Duo introduction (to include the xeon mac pros) will be able to run in 64 bit. Just FYI...This is interesting... "Intel Core Solo (product code 80538) uses the same two-core die as the Core Duo, but features only one active core. This allows Intel to sell dies that have a manufacturing defect in one but not both of the cores" Now, just to stave off any more confusion, those of you with core solo processors should not think you can re-activate this second core. It's there, but the connection is physically severed. Talk about shady business. It sounds to me like intel is selling V-8 engines with 4 bad cylinders...so they make it a four-banger.
-
Nice video. PS: Madjason, who said anything about a high price? He has yet to announce any firm details concerning price. Im sure it will be very reasonable for the work involved.