


Altimutater
-
Posts
42 -
Joined
-
Last visited
-
Days Won
1
Content Type
Profiles
Forums
Latest X-Plane & Community News
Events
Downloads
Store
Everything posted by Altimutater
-
This is probably up the street of flight model enthusiasts everywhere, and SAAB fans in particular... Includes inflight demo of the stick pusher, 2g turns, "dynamic control response" i.e. give a quick shove to the control column and see how the plane reacts, Dutch roll... all with a couple dozen undergrads on board!
-
Did a bit more bugfixing - the plugin (source code and a Windows compilation) and user installation/modification instructions are up on GitHub: https://github.com/JDeeth/mu2tweak (shouldn't need saying but no assets/IP from the MU2 are included there, all modifications are at the user's risk and void support, etc)
-
I've extended my script and it now: filters the radio altimeter provides commands to move the prop levers to all four positions fixes/abuses the OEM nav radio stack NAV radios tune to 25kHz-spaced channels COMM radios tune to 8.33kHz-spaced channels… bit tricky with the 5-digit displays. If the 6th digit is 5 the 5th digit is turned partway to the next number. ~-~compromise~-~ provides a custom dataref for GPS power - if you pull the GPS-15 fuse it goes to zero
-
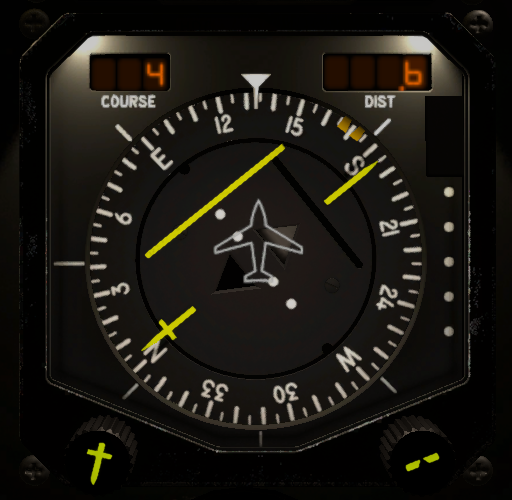
Found a dead simple way to get the leading zeros to show on the HSI COURSE and DIST displays! Also to get rid of the subtle extra glow on the 0.1s digit on the DIST display. Before: After: 1. open aircraft in PlaneMaker - after backing it up of course 2. go to 3D Panel 3. find "pilot_course" in hierarchy 4. change Key Frames and add 1000 to the outputs - 0 > 0 and 360 > 360 becomes 0 > 1000 and 360 > 1360 This means, when the course is 4, it displays 1004... but there's only 3 digits so we just see the 004. 5. do the same for "copilot_course" 6. for "pilot_distance" and "copilot_distance", change the mappings to 0 > 10000 and 200 > 12000 7. also change their properties from 3 digits, 1 decimals, -1 period width to 4 digits, 0 decimals, 0 period width 8. save changes in PlaneMaker gen_LED instruments are infuriating about displaying decimal places. They're supposedly a simulation of 7-segment displays, where the decimal place is the 8th segment underneath each number. But it makes a decimal place be the same width as a digit e.g 12.3 is wider than 123. The MU-2 has a clever workaround that makes the decimal place overlap with the 0.1s digit but that gives the double glow. The actual decimal place is already a separate PNG, so by changing the scaling, when the distance is 0.6 NM, it displays 10006 on the instrument and you see 0006 plus the separate decimal place.


-
Good shout, I never thought of that. By replacing the blank/space part of the texture with another 0, right? To get it to display " 00" on the ground you'd still need two gen_LEDs though - the left digits with blank-space png and the right digits with zero-space png. I think I'd rather leave the art assets as they are and keep the complexities and workarounds in my own code as much as possible.
-
Bit of experimentation but `sim/cockpit2/radios/actuators/gps_power` is good for the KLN 90B power supply dataref.
-
So with a little bit of scripting, and then a lot of swearing at X-Plane's generic instruments and a bit more scripting... I have calmed the altimeter! Seems gen_LED.png generic instruments will not display leading zeros including when displaying a value of 0.00. So this took a certain amount of brute force... (there's now two gen_LEDs in there and two datarefs in my script, for the first pair and last pair of digits separately. To make it display 00 on the ground the last pair are given the value 100 instead of 0. I hate this.) chill_altimeter.mkv
-
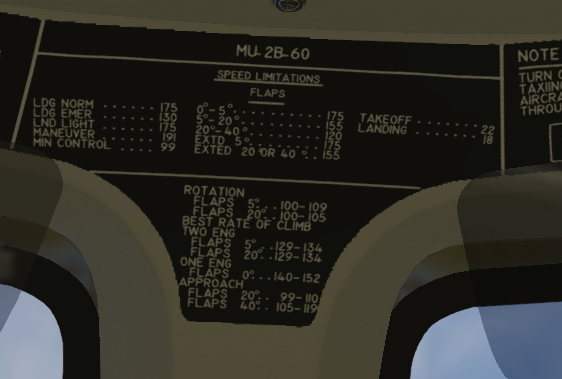
Found another one The CROSSWIND legend is missing from the Speed Limitations panel - cf pg34 of the Pilots Operating Manual. (I swear, I'm not going around looking for trouble, I was looking at this panel last week thinking "what do these numbers mean?", and only today I saw that bit of the manual!) Relatedly the "EXTED 20° or 40°" line could be tidied a little perhaps... the ° are overlapping and shouldn't it be "EXTD"?
-
Unable to move Condition Levers in V2.1.0 (XP12)
Altimutater replied to manofmac's topic in Mitsubishi Marquise MU-2 v2
Well, yes, I can create plugins/scripts for this kind of thing, I'm proposing this is added upstream though. -
Adding extra functionality to an existing Gizmo aircraft
Altimutater replied to Altimutater's topic in Plugin Development
This particular hypothetical aircraft already has Gizmo and SASL running side by side... I didn't want to add more scripting frameworks on top of those two, and Lua's implementation of classes (because yes, I did actually want to do a little more than just make one dataref) makes me die inside. If I was to add another scripting plugin, I'd use XPPython3, because I like Python, or just make a C++ or Rust plugin Happy New Year to everyone in UTC+6 and beyond! -
Suppose I wanted to add some extra functionality to a payware aircraft which uses Gizmo - for example, completely hypothetical, I'd like to make a radio bus voltage dataref which is just the Laminar avionics bus voltage except zero if the radio switch is off. Can I tack something like this amongst the existing scripts or is that likely to make things break? Also, happy new year, if you're in UTC+9 or beyond
-
As illustrated in the other thread, I'm a little nonplussed with RXP not using the current nav database, so I'm now using the OEM version with the KLN90B. The OEM NAV radio tuners are at 0.01 MHz spacing - could they be at 0.05 MHz spacing instead? I've not thought yet about the vintage COM radios and 8.33 kHz channel spacing yet...
-
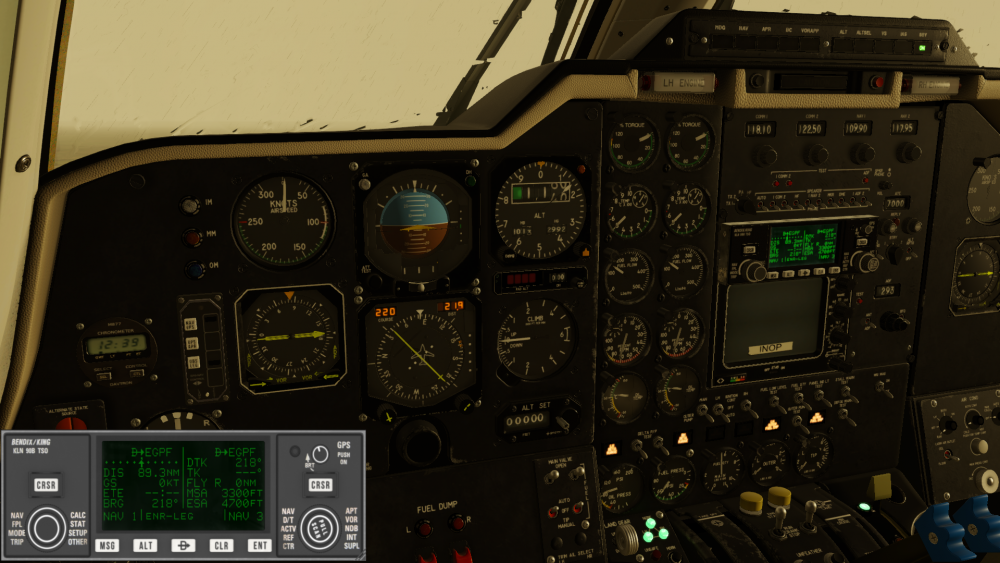
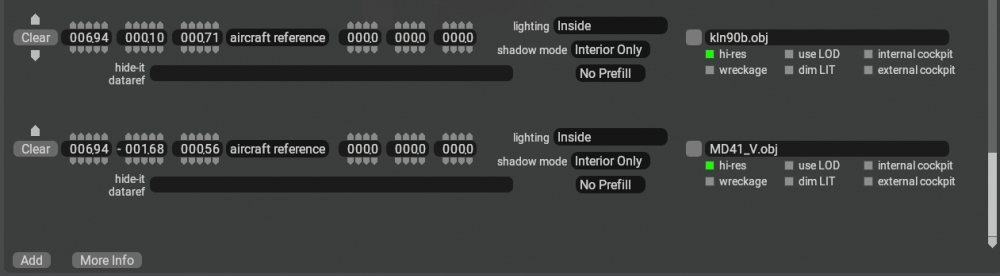
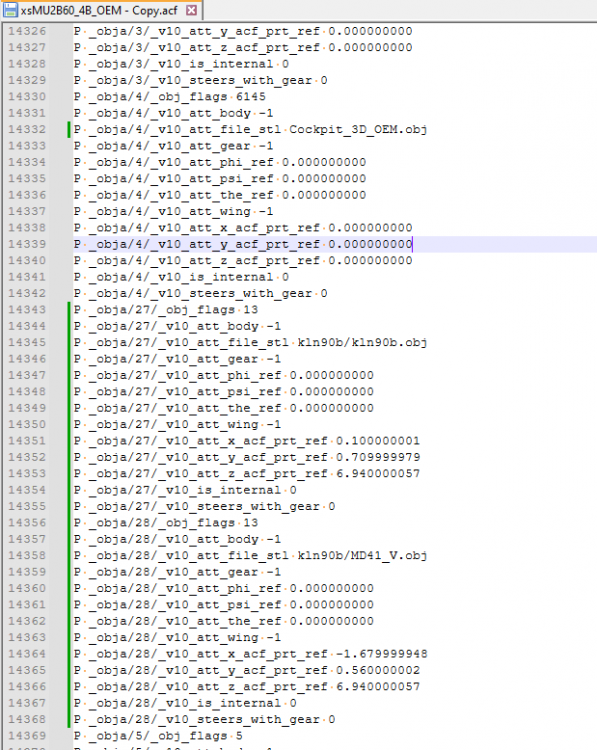
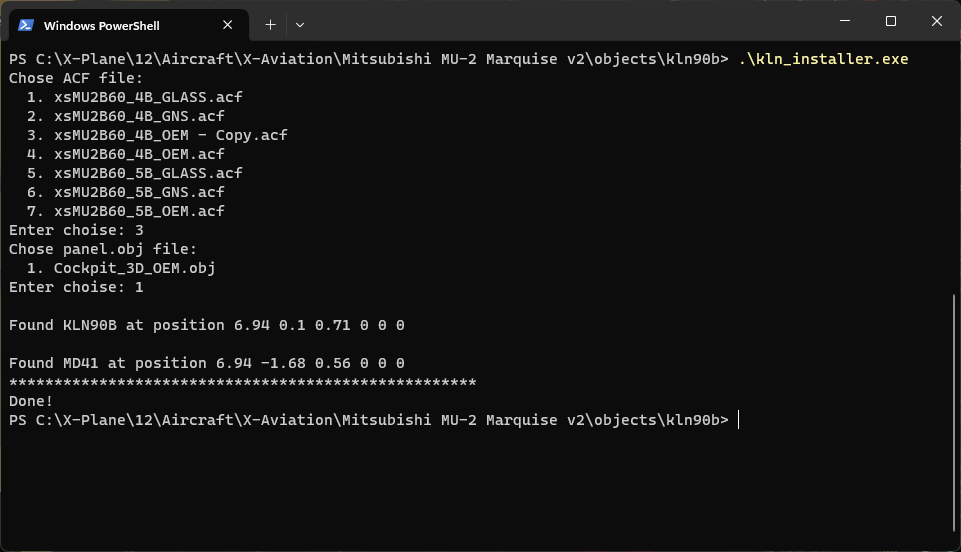
If you've ever looked at a Garmin GNS530 and thought "that's just a bit too mid-2000s modern for me"... today I've successfully integrated Todor Radonov / Todir's KLN 90B plugin with the MU-2: The outline of the installation process is: install the KLN90B plugin place the GPS and MD41 panels in the 3D cockpit in PlaneMaker customise where the GPS screen gets drawn on the MU-2's panel texture, along with the UV mapping for the GPS object - don't worry, I've done this step use a utility that comes with the plugin to add manipulators for the GPS and MD41 to the MU-2's cockpit Steps: Download Todir's KLN90B - get the latest .zip: https://github.com/todirbg/kln90b/releases (at time of writing this was 0.99.1b) Copy the `objects` and `plugins` folder into your MU-2 directory - don't copy `cockpit_3d` Replace the `kln90b_click_regions.obj` file in MU2/objects/kln90b with the attached version (this has the updated UV mapping) Make a backup of your 4B OEM acf file e.g. `xsMU2B60_4B_OEM.ackbak` Open the 4B OEM acf (not the backup!) in PlaneMaker Standard > Objects > Add: select `kln90b.obj` from MU2/objects/kln90b set its coordinates to 6.94, 0.10, 0.71 set lighting to Inside, shadow mode Interior Only, hi-res Yes/ticked/green/selected Add `MD41_V.obj` in the same way, coordinates 6.94, -1.68, 0.56, same parameters Save the .acf - leave PlaneMaker open for now At this point, you can test your progress by launching the MU-2. You will see the KLN90B and the MD41 mode controller on the panel, albeit with a blank screen and no clickspots. Edit MU2/plugins/KLN90B/data/modules/main.lua (in Notepad++ or VS Code or some other sensible editor): line 28ish, the KLN90_panel component, change `position = {814, 0, size[1], size[2]}` to `position = {0, 1138, size[1], size[2]}` (this determines where on the MU-2's panel texture the GPS screen is drawn. I've picked a spot which appears unused.) The next three steps are to accommodate a bug in the installer utility Copy MU2/objects/Cockpit_3D/Cockpit_3D_OEM.obj to the MU2 folder Make a temporary copy of `xsMU2B60_4B_OEM.acf` Edit the temporary copy in Notepad++ or similar: search for kln90b. you should find where the KLN90B object is specified, and just below it the MD41 mode controller search for Cockpit_3D_OEM.obj - you will probably find it just below the MD41 note the objects are identified with a number e.g. _obja/27/, _obja/28/ cut all the lines for the KLN90B and MD41 objects and paste after the Cockpit_3D_OEM.obj - for me they were numbered 27, 28 and 4 respectively. (cursed alphabetic number ordering strikes again) change "Cockpit_32/Cockpit_3D_OEM.obj" to just "Cockpit_3D_OEM.obj" Save the changes to the temporary copy .acf Run MU2/objects/kln_installer.exe: select your temporary .acf copy select Cockpit_3D_OEM.obj it should generate a new file in MU2/objects/kln90b: Cockpit_3D_OEM_kln90b.obj - this is the existing cockpit object with extra clickspots and the screen all in the right places Move MU2/objects/kln90b/Cockpit_3D_OEM_kln90b.obj into MU2/objects/Cockpit_3D In PlaneMaker, under Standard > Objects, find Cockpit_3D_OEM.obj, click the box to the left of its name and change the file to Cockpit_3D_OEM_kln90b.obj Save the plane in PlaneMaker To undo all of this: Replace xsMU2B60_4B_OEM.acf with xsMU2B60_4B_OEM.acfbak Steps 10-12 are a workaround for a couple of bugs with kln_installer.exe, which doesn't expect files to be in certain locations or for a numbered sequence to go 27, 28, 3, 4... they might become unnecessary with a future version of the KLN90B If you'd like to position the KLN90B instruments elsewhere, use the Visualisation settings in PlaneMaker to hide most of the exterior and interior objects, and make adjustments. Then run kln_installer.exe again to regenerate the _kln90b.obj cockpit object. Snags: MD41 buttons don't seem to light up properly in the 3D cockpit. You can click on the annunciators to get a 2D popup - but I'd rather the 3D instrument worked correctly and I never see the 2D popup KLN90B overlaps slightly with the top of the weather radar Autopilot / FD / HSI mapping not figured out just yet Powered by the default battery bus (or battery switch?) - you can give it a dataref representing a voltage bus but there's none available currently representing the radio bus voltages. This could be modded in though. Happy flying folks! kln90b_click_regions.obj

-
The manipulators for the range buttons are apparently backwards for the RealityXP GNS530 and 430 - on the popout displays the up-arrow is "increase range" but the 3D model the up arrow is "decrease range" Also I suspect I've done something in the course of setting up the RealityXP Garmins that screwed up my HSI perhaps... are the default RealityXP settings from RealityXP or from TOGA...? I deactivated a bunch of settings for "Garmin speaks to autopilot" and now the heading steer is Surprising. Could just be I barely know how to use the Garmins though. edit: I enabled a bunch more RXP settings and now the GNS530 has full control of the P1 HSI, including setting OBS, deflecting CDI, and showing distance. NAV/GPS switching via the CDI button on the GNS530. I'd like to get it back to heading-steer-only if I can… but I'm also slightly regretting the RXP purchase. I thought they'd use the X-Plane nav database for which I have a Navigraph subscription, but they use the same proprietary Garmin/Jeppesen databases as the real GNS units. So the best nav data available is from 2016!

-
Just catching a couple of other minor snags as I go... The course and distance readouts on the HSI do not show leading zeros - e.g. a course of 002° is displayed as "2". A course of 000° is just blank. Likewise distance - it's a bit odd seeing ".7" on the display instead of 0.7! Adjusting the course on the HSI does not move the course needle against the compass card. Edit: whatever this was, it was transient - next flight the HSI is working as normal! Please could there be commands to set condition to MIN CRUISE and TAKE OFF LANDING as well as to TAXI and EMERG STOP? Likewise for all three positions for the Run Crank Stop switches. I've just today received a Thrustmaster Airbus throttle quadrant - it's almost perfect for the MU-2, except the MCT detent pulls the levers and gets in the way. Quite happy with it though.

-
Unable to move Condition Levers in V2.1.0 (XP12)
Altimutater replied to manofmac's topic in Mitsubishi Marquise MU-2 v2
Bit of a tangent - given the condition levers only ever exist in EMER STOP, TAXI, MIN CRUISE and TAKE OFF LAND positions, I wanted to just map eight keyboard commands - but there's only commands for EMER STOP and TAXI, and for some reason I can only see them on the joystick screen, not the keyboard screen. Could commands for the other two positions be added perhaps?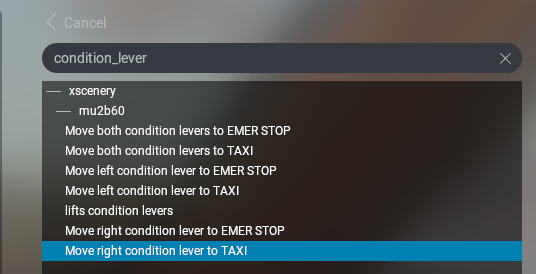
-
Hi folks, I got the new Mu-2 yesterday and love it. Immediately had to get the RealityXP GNS530 and 430 to go with it. The "ghost throttle" detent management works well and as we can have per-aircraft control bindings now it's no trouble to reuse HOTAS buttons for "lift out of detent". One thing which did catch my eye - the radio altimeter updates continuously and with 1ft precision, which is a bit exuberant and makes me feel I'm looking at DataRefEditor rather than an aircraft instrument! I found a video which just barely shows the radio altimeter - most clearly from 17:00 - and it appears to update about twice a second with 50ft precision, increasing to perhaps 10ft precision closer to the ground: Perhaps if this could be modelled/guessed at - 10ft precision below 250ft AGL and 50ft precision above? Cheers!


